# Create Time-based Escrows Using JavaScript
This example shows how to:
1. Create escrow payments that become available at a specified time and expire at a specified time.
2. Finish an escrow payment.
3. Retrieve information on escrows attached to an account.
4. Cancel an escrow payment and return the XRP to the sending account.
[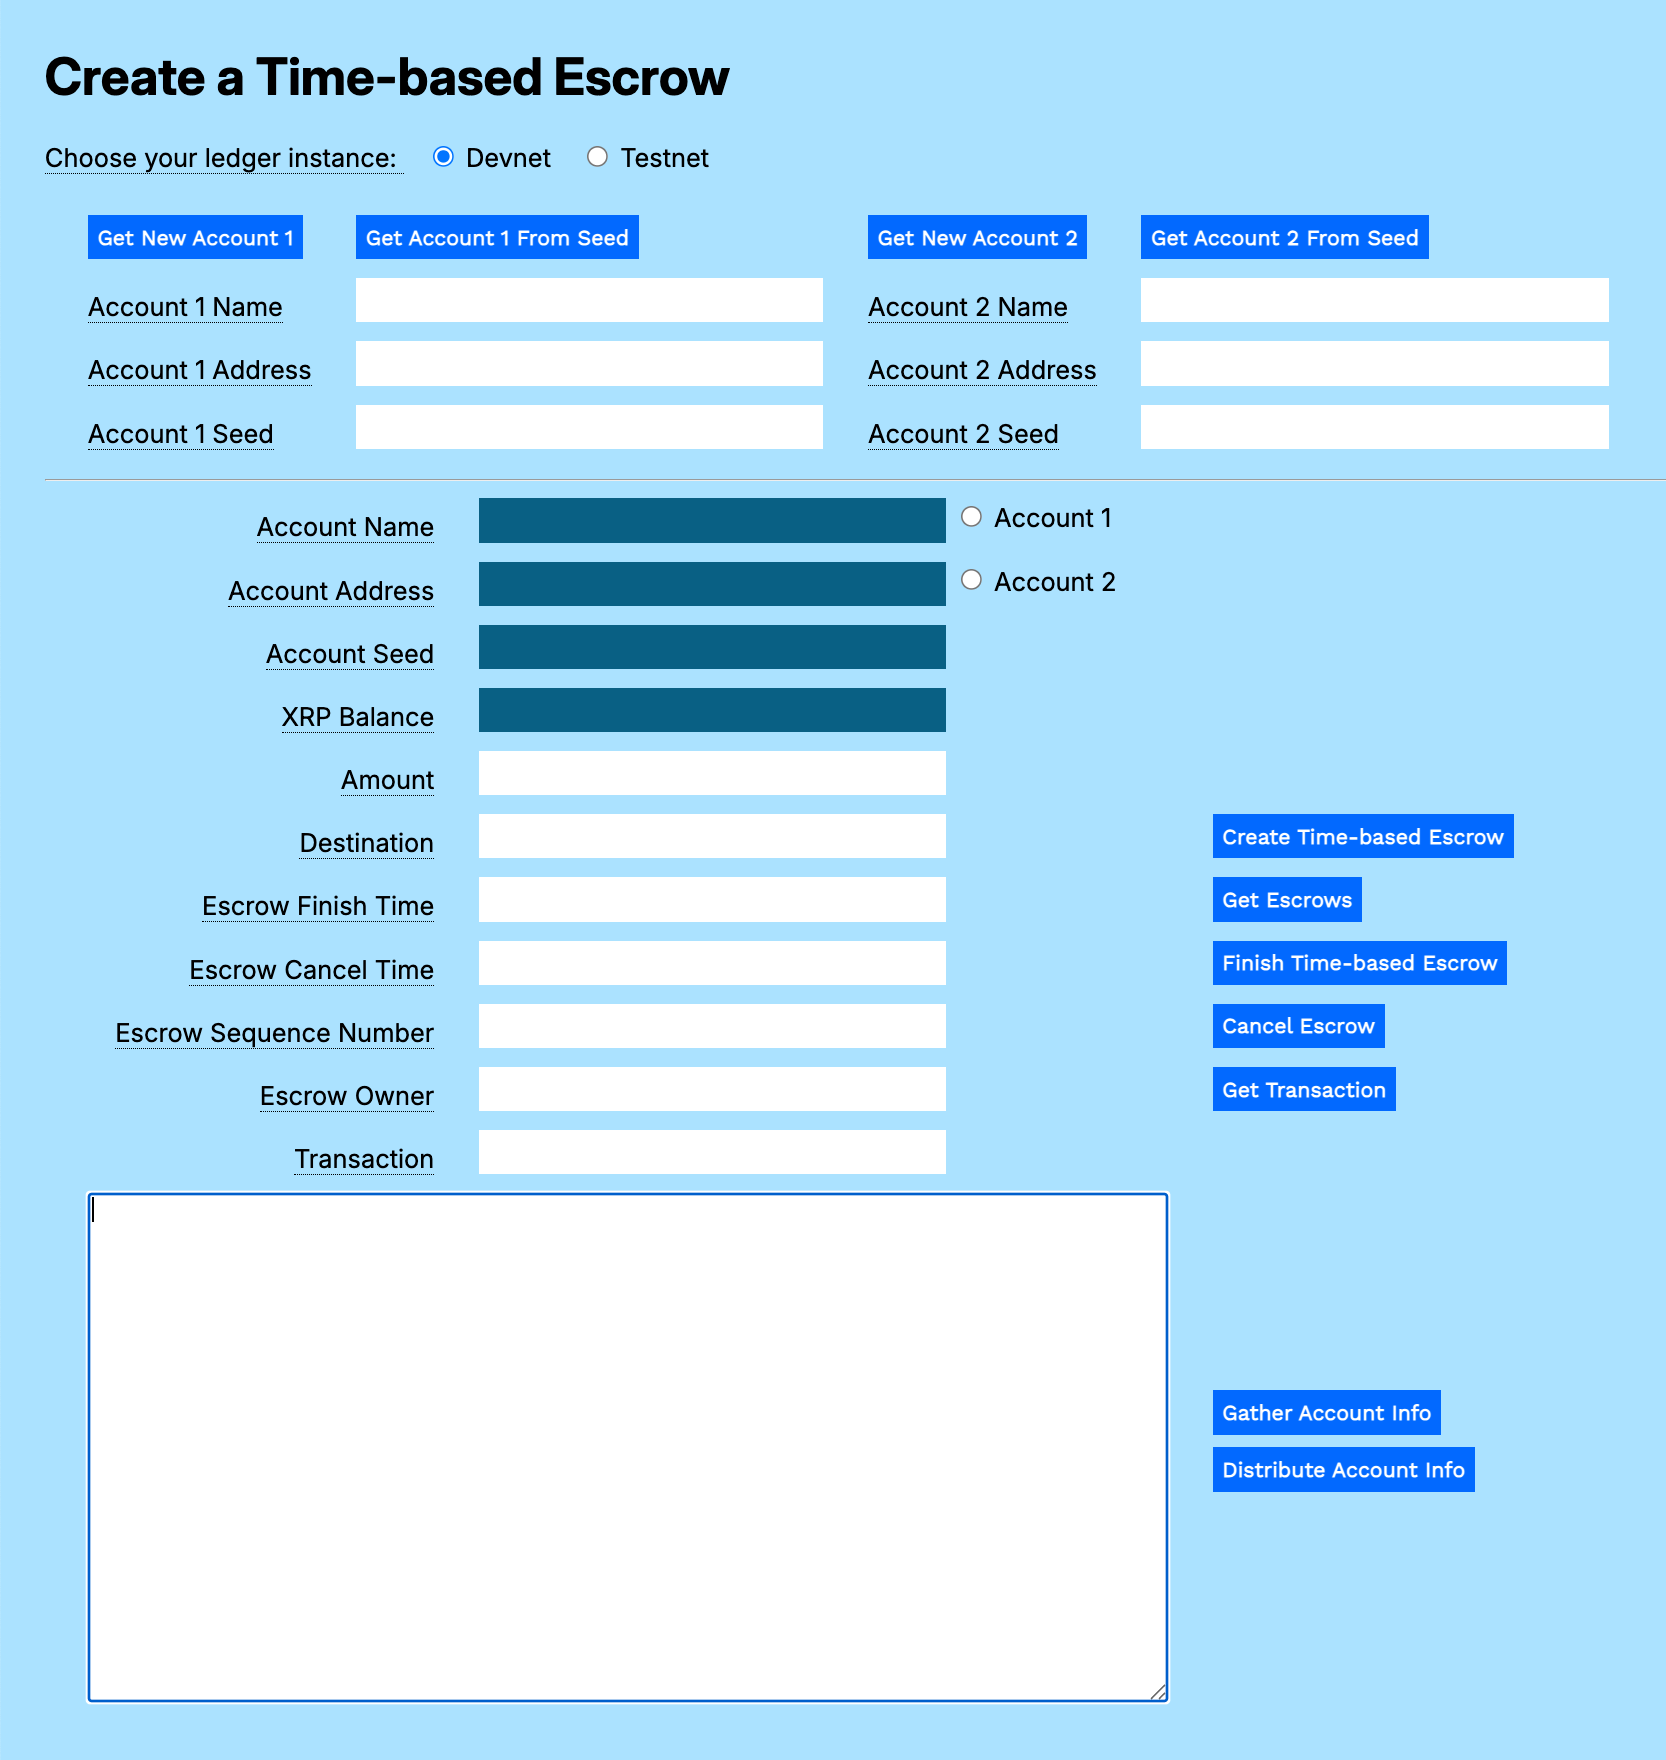](/assets/mt-time-escrow-1-empty-form.0d38116397b0d6d55bf606eb6dc0f0571e253b4ba54a7aff5df9b9dfb065fae6.ac57e6ef.png)
## Prerequisites
Download and expand the [Modular Tutorials](/assets/payment-modular-tutorials.a27fd32656123cc667fdfb8949e8c79c60732fc4da4448548774646ed28d5e69.bb35afea.zip) archive.
## Usage
To get test accounts:
1. Open `create-time-based-escrows.html` in a browser
2. Get test accounts.
1. If you copied the gathered information from another tutorial:
1. Paste the gathered information to the **Result** field.
2. Click **Distribute Account Info**.
2. If you have an existing account seed:
1. Paste the account seed to the **Account 1 Seed** or **Account 2 Seed** field.
2. Click **Get Account 1 from Seed** or **Get Account 2 from Seed**.
3. If you do not have existing accounts:
1. Click **Get New Account 1**.
2. Click **Get New Account 2**.
[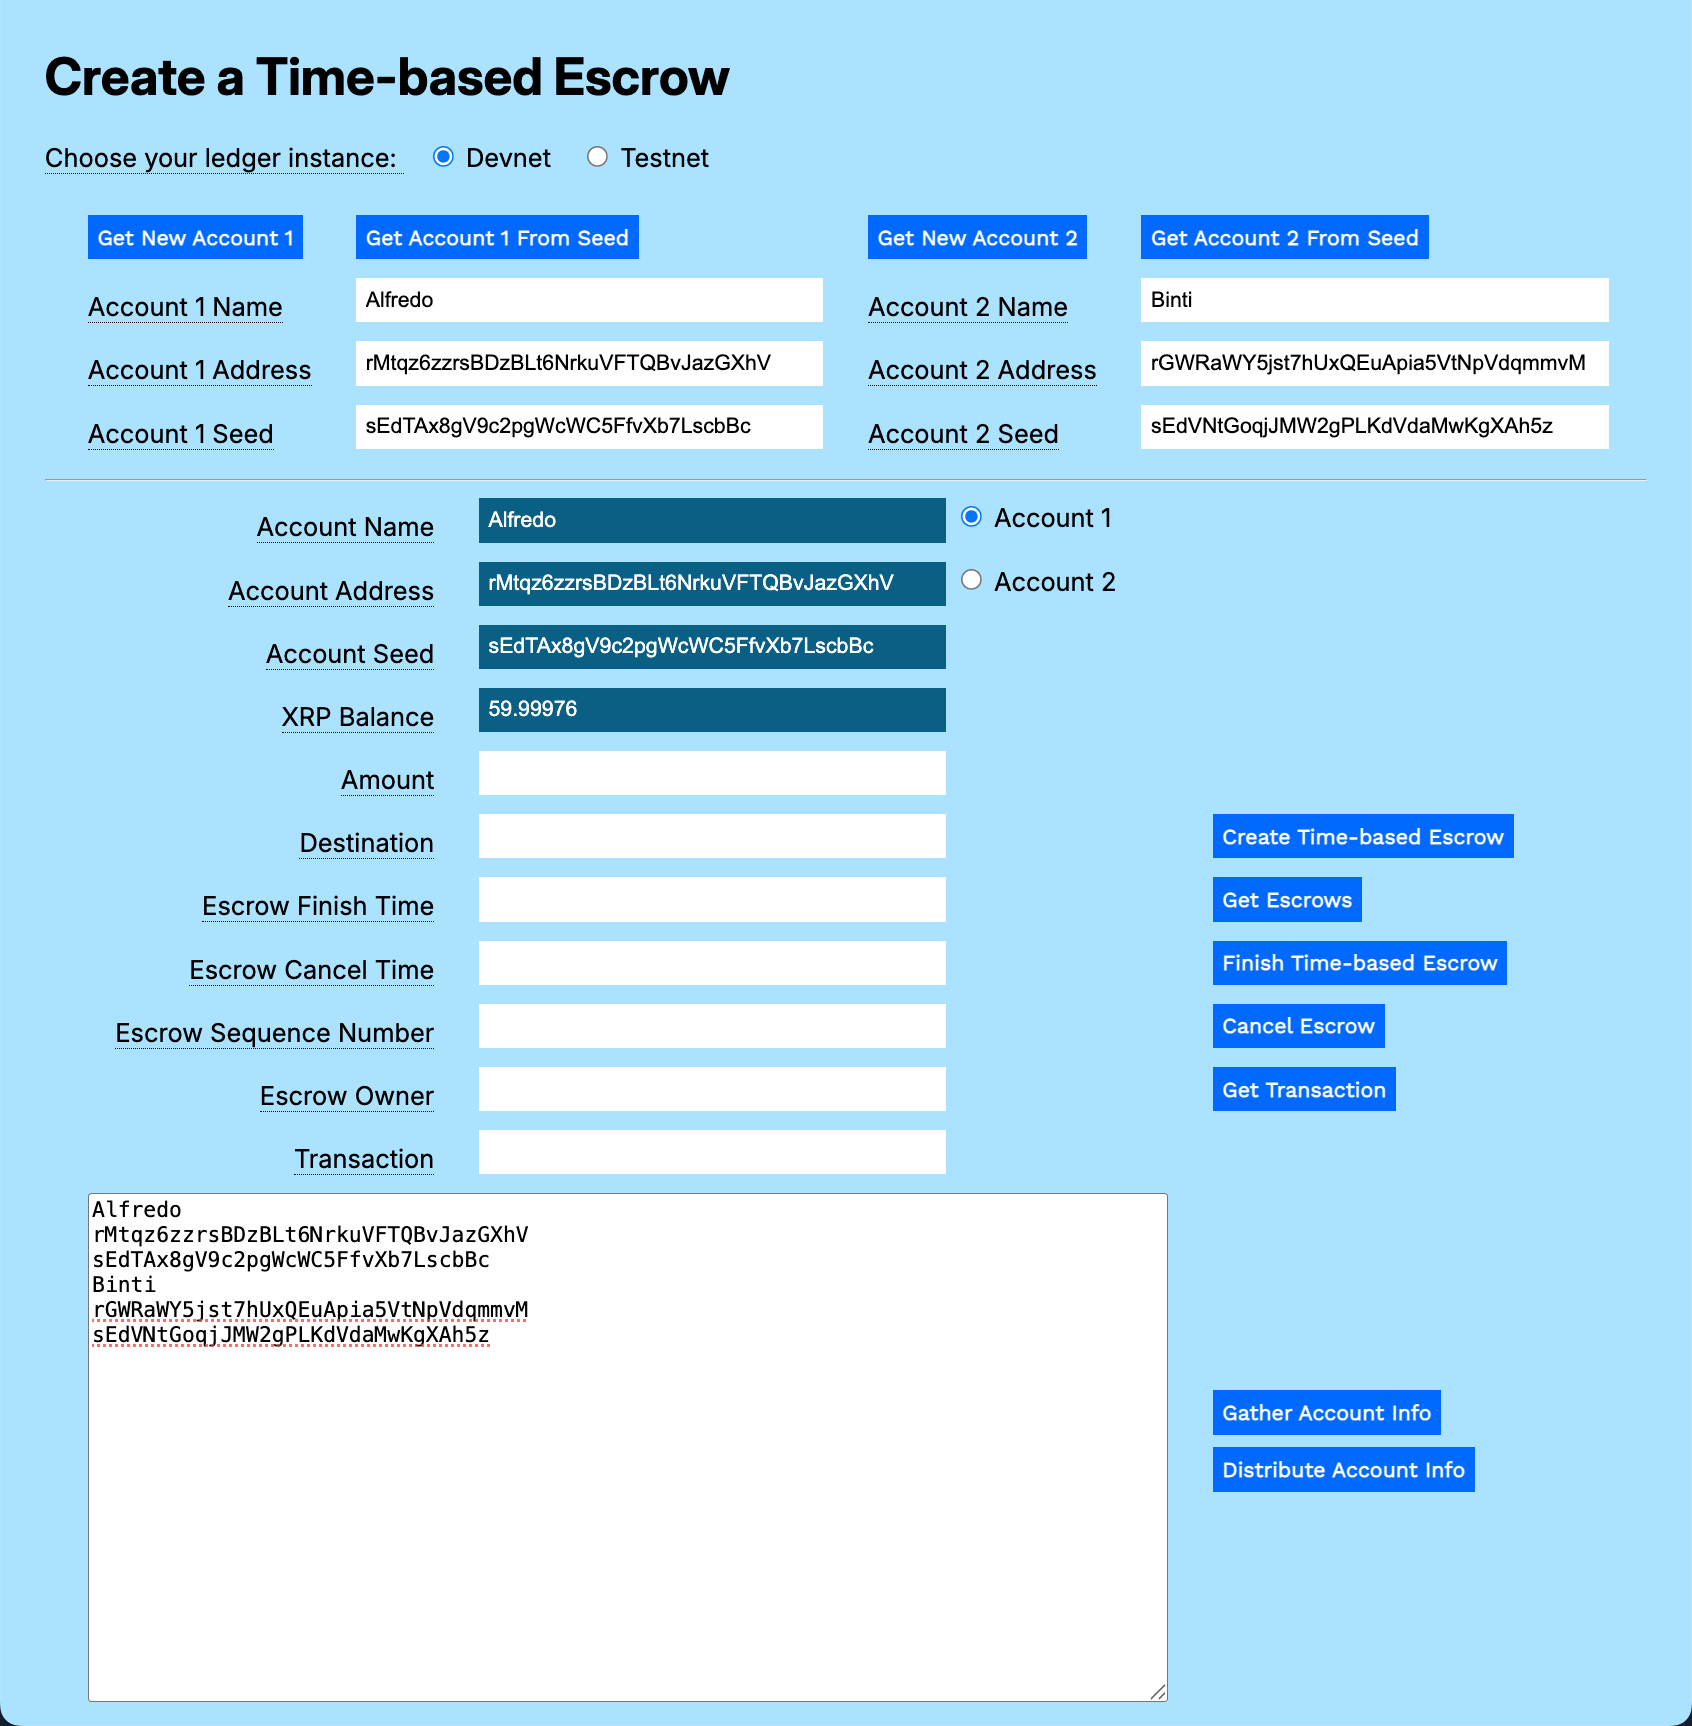](/assets/mt-time-escrow-2-form-with-accounts.d40af485b960da0edafd44b02d355f4f1a8448f9ff973f68f1742682e7973487.ac57e6ef.png)
## Create Escrow
You can create a time-based escrow with a minimum time to finish the escrow and a cancel time after which the funds in escrow are no longer available to the recipient. This is a test harness: while a practical scenario might express time in days or weeks, this form lets you set the finish and cancel times in seconds so that you can quickly run through a variety of scenarios. (There are 86,400 seconds in a day, if you want to play with longer term escrows.)
To create a time-based escrow:
1. Enter an **Amount** to transfer. For example, *10*.
2. Enter the **Destination**. (For example, the Account 2 address.)
3. Set the **Escrow Finish Time** value, in seconds. For example, enter *10*.
4. Set the **Escrow Cancel Time** value, in seconds. For example, enter *120*.
5. Click **Create Time-based Escrow**.
6. Copy the *Sequence Number* of the escrow called out in the **Standby Result** field.
The escrow is created on the XRP Ledger instance, reserving 10 XRP plus the transaction cost. When you create an escrow, capture and save the **Sequence Number** so that you can use it to finish the escrow transaction.
The escrow finish and cancel times are expressed in seconds here to let you experiment with scenarios where the escrows are outside the time constraints. In practice, escrow times might be expressed in days, weeks, months, or years.
[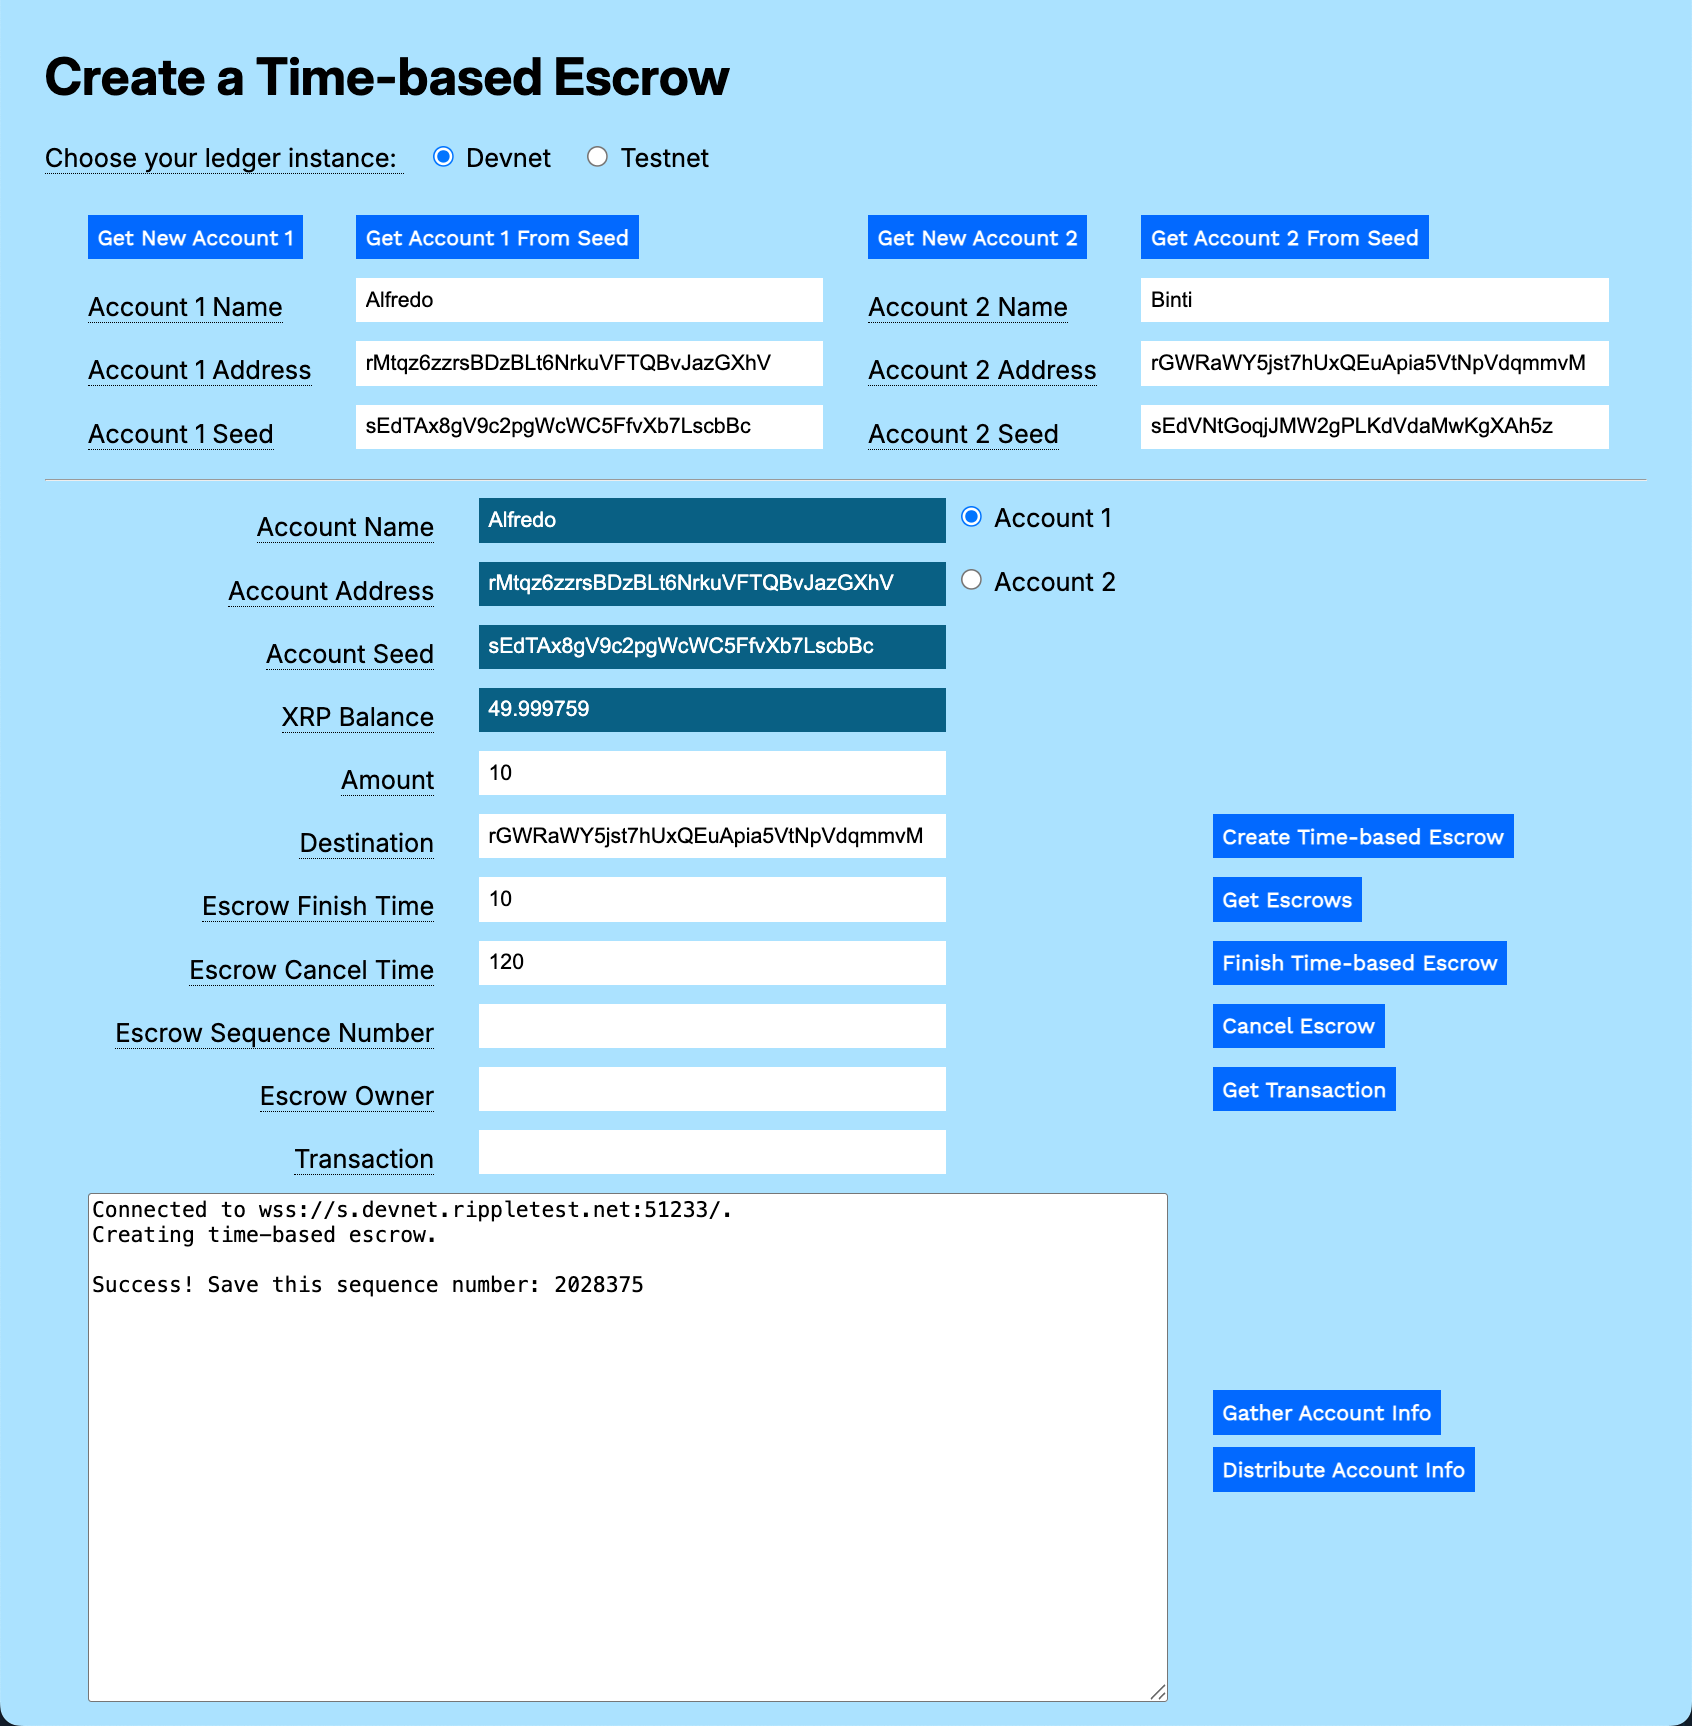](/assets/mt-time-escrow-3-create-escrow.45e0081bcb1a8f4a1a69c235ba90dd0b747dd611f5edf33392fca1fd2e58b5f7.ac57e6ef.png)
## Finish Escrow
The recipient of the XRP held in escrow can finish the transaction any time within the time window after the Escrow Finish date and time but before the Escrow Cancel date and time. Following on the example above, you can use the *Sequence Number* to finish the transaction once 10 seconds have passed.
To finish a time-based escrow:
1. Paste the sequence number in the Operational account **Escrow Sequence Number** field.
2. Copy and paste the address that created the escrow in the **Escrow Owner** field.
3. Click **Finish Time-based Escrow**.
The transaction completes and balances are updated for both the Standby and Operational accounts.
[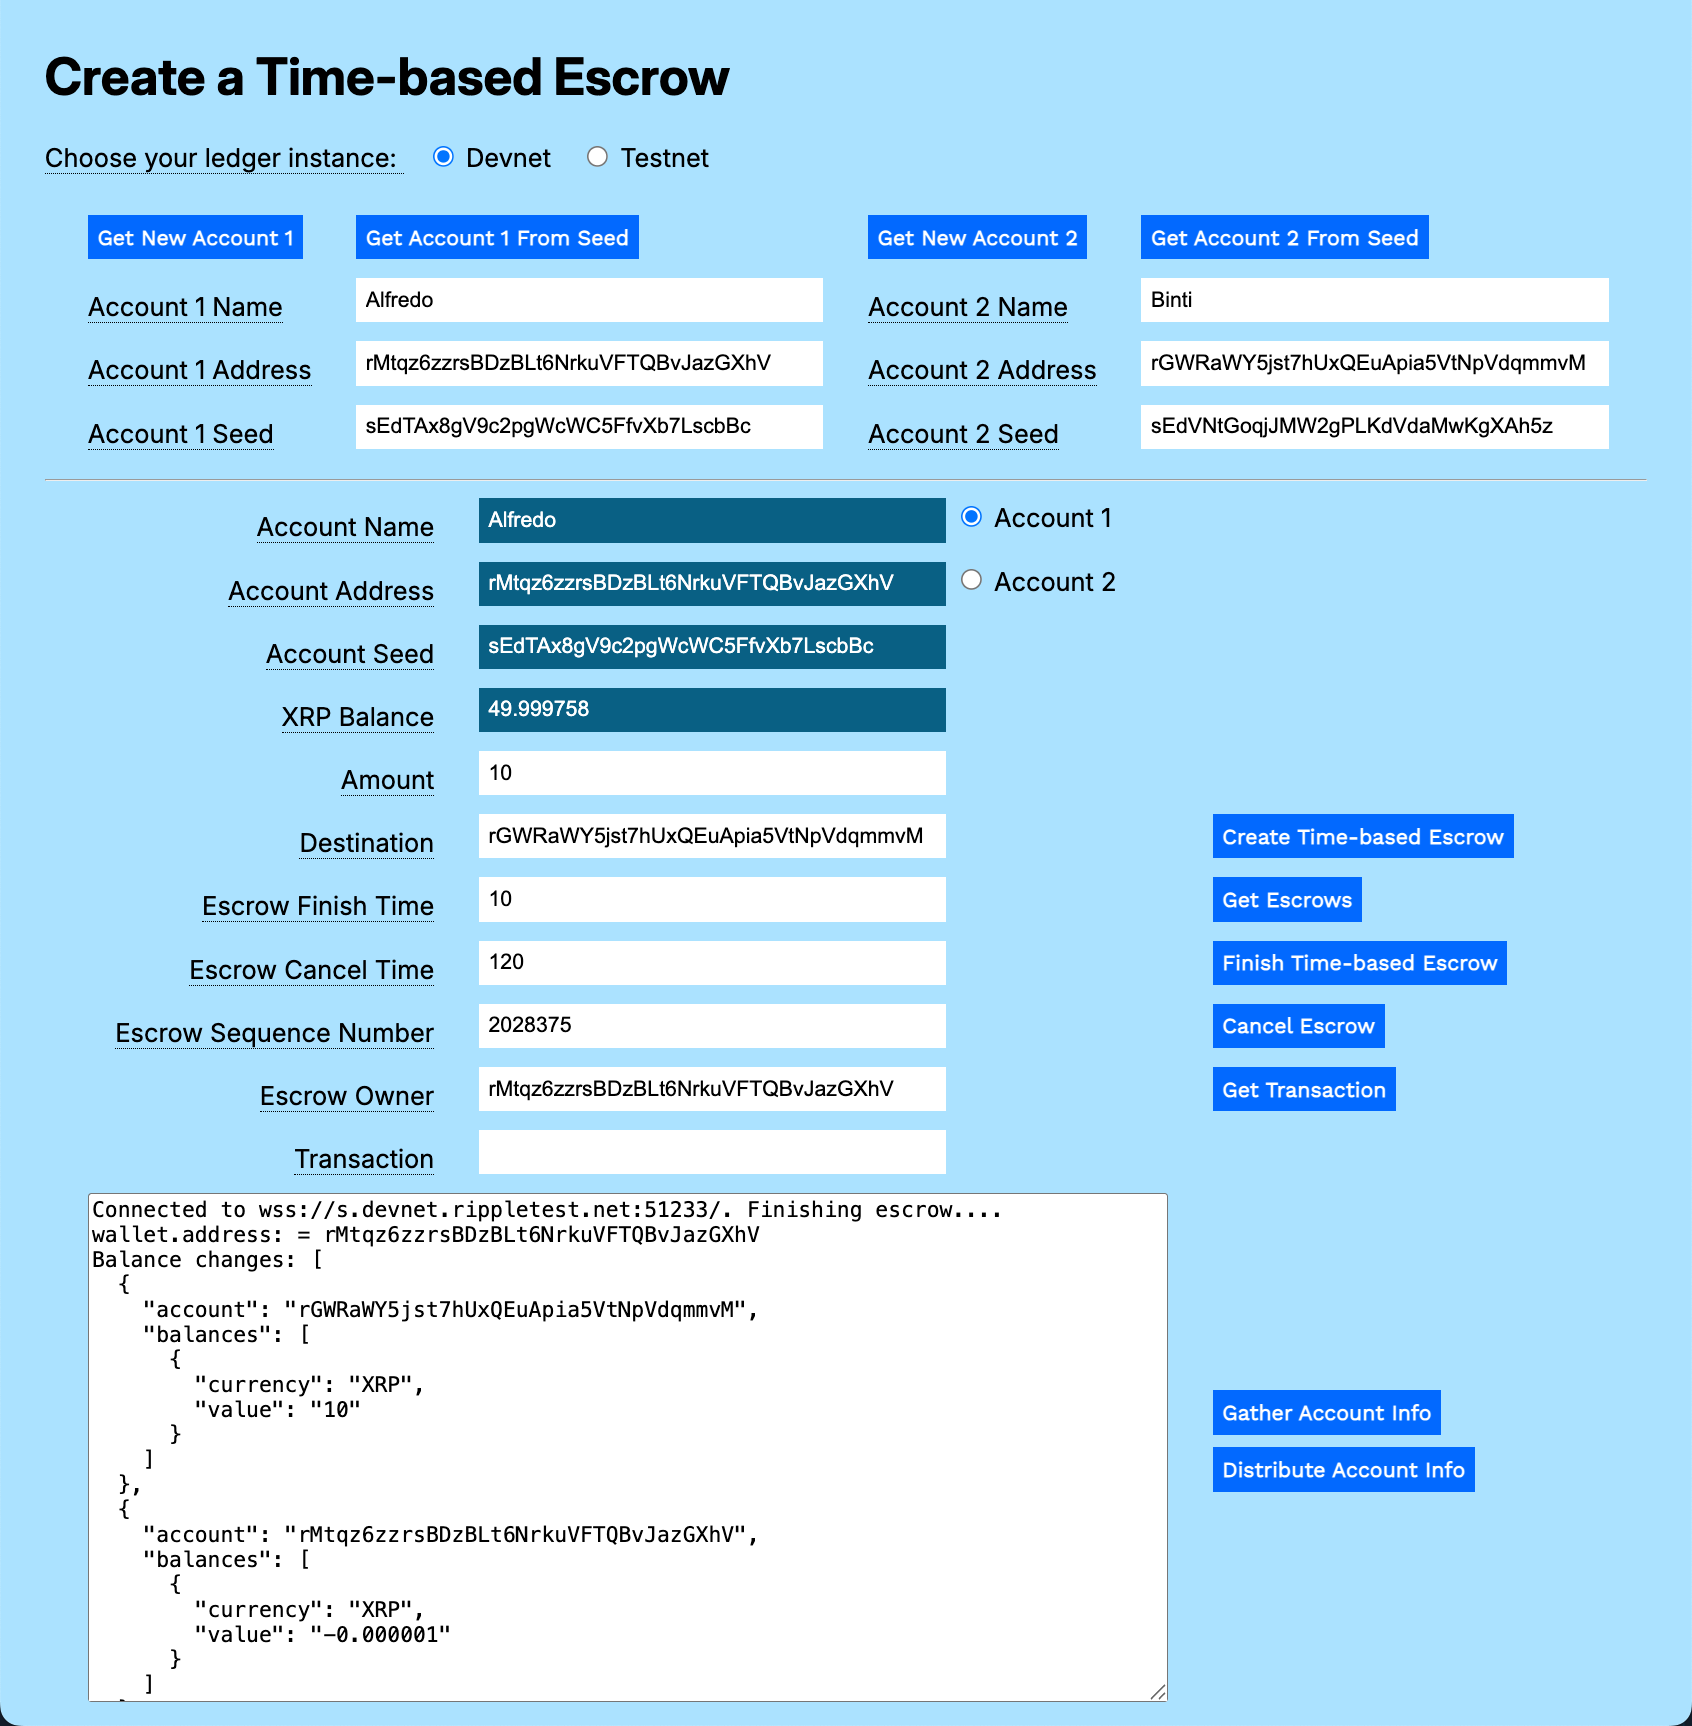](/assets/mt-time-escrow-4-fulfill-escrow.02a9562f73e25fb4739a11e03d13051328d672376ea344dbe2752509a1b610a2.ac57e6ef.png)
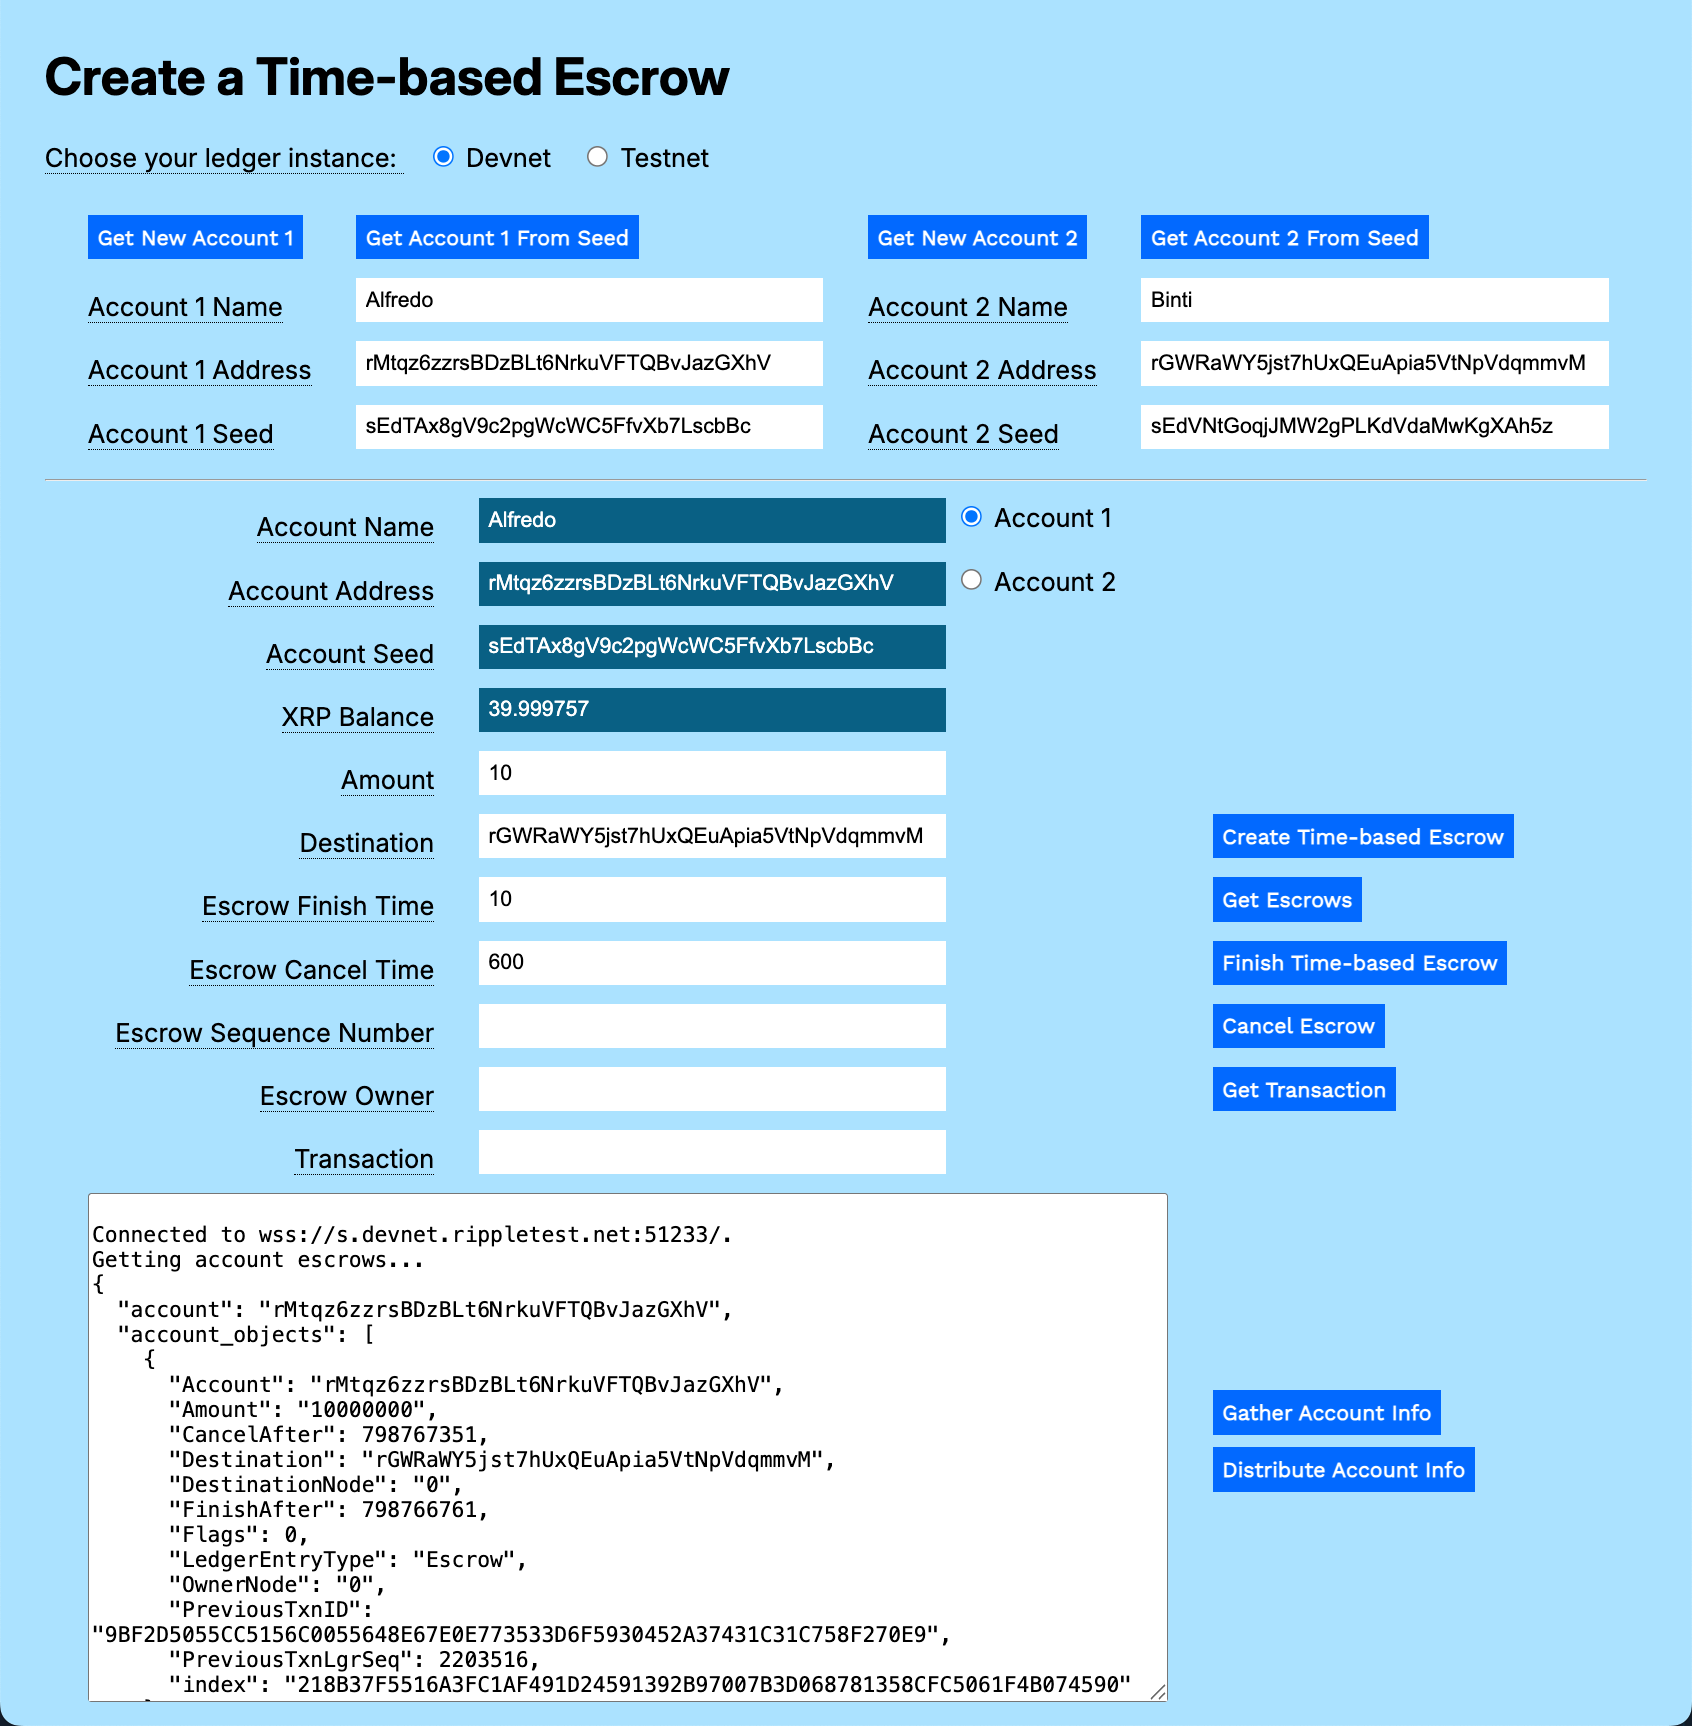
## Get Escrows
Click **Get Escrows** for either the Standby account or the Operational account to see their current list of escrows. If you click the buttons now, there are no escrows at the moment.
For the purposes of this tutorial, follow the steps in [Create Escrow](#create-escrow), above, to create a new escrow transaction, perhaps setting **Escrow Cancel (seconds)** field to *600* seconds to give you extra time to explore. Remember to capture the *Sequence Number* from the transaction results.
Click **Get Escrows**.
[](/assets/mt-time-escrow-5-get-escrows.696ab3e9588c71bbf3cbeeae99a572ae3dda67e57a9e186a1ae9602da05bb3b8.ac57e6ef.png)
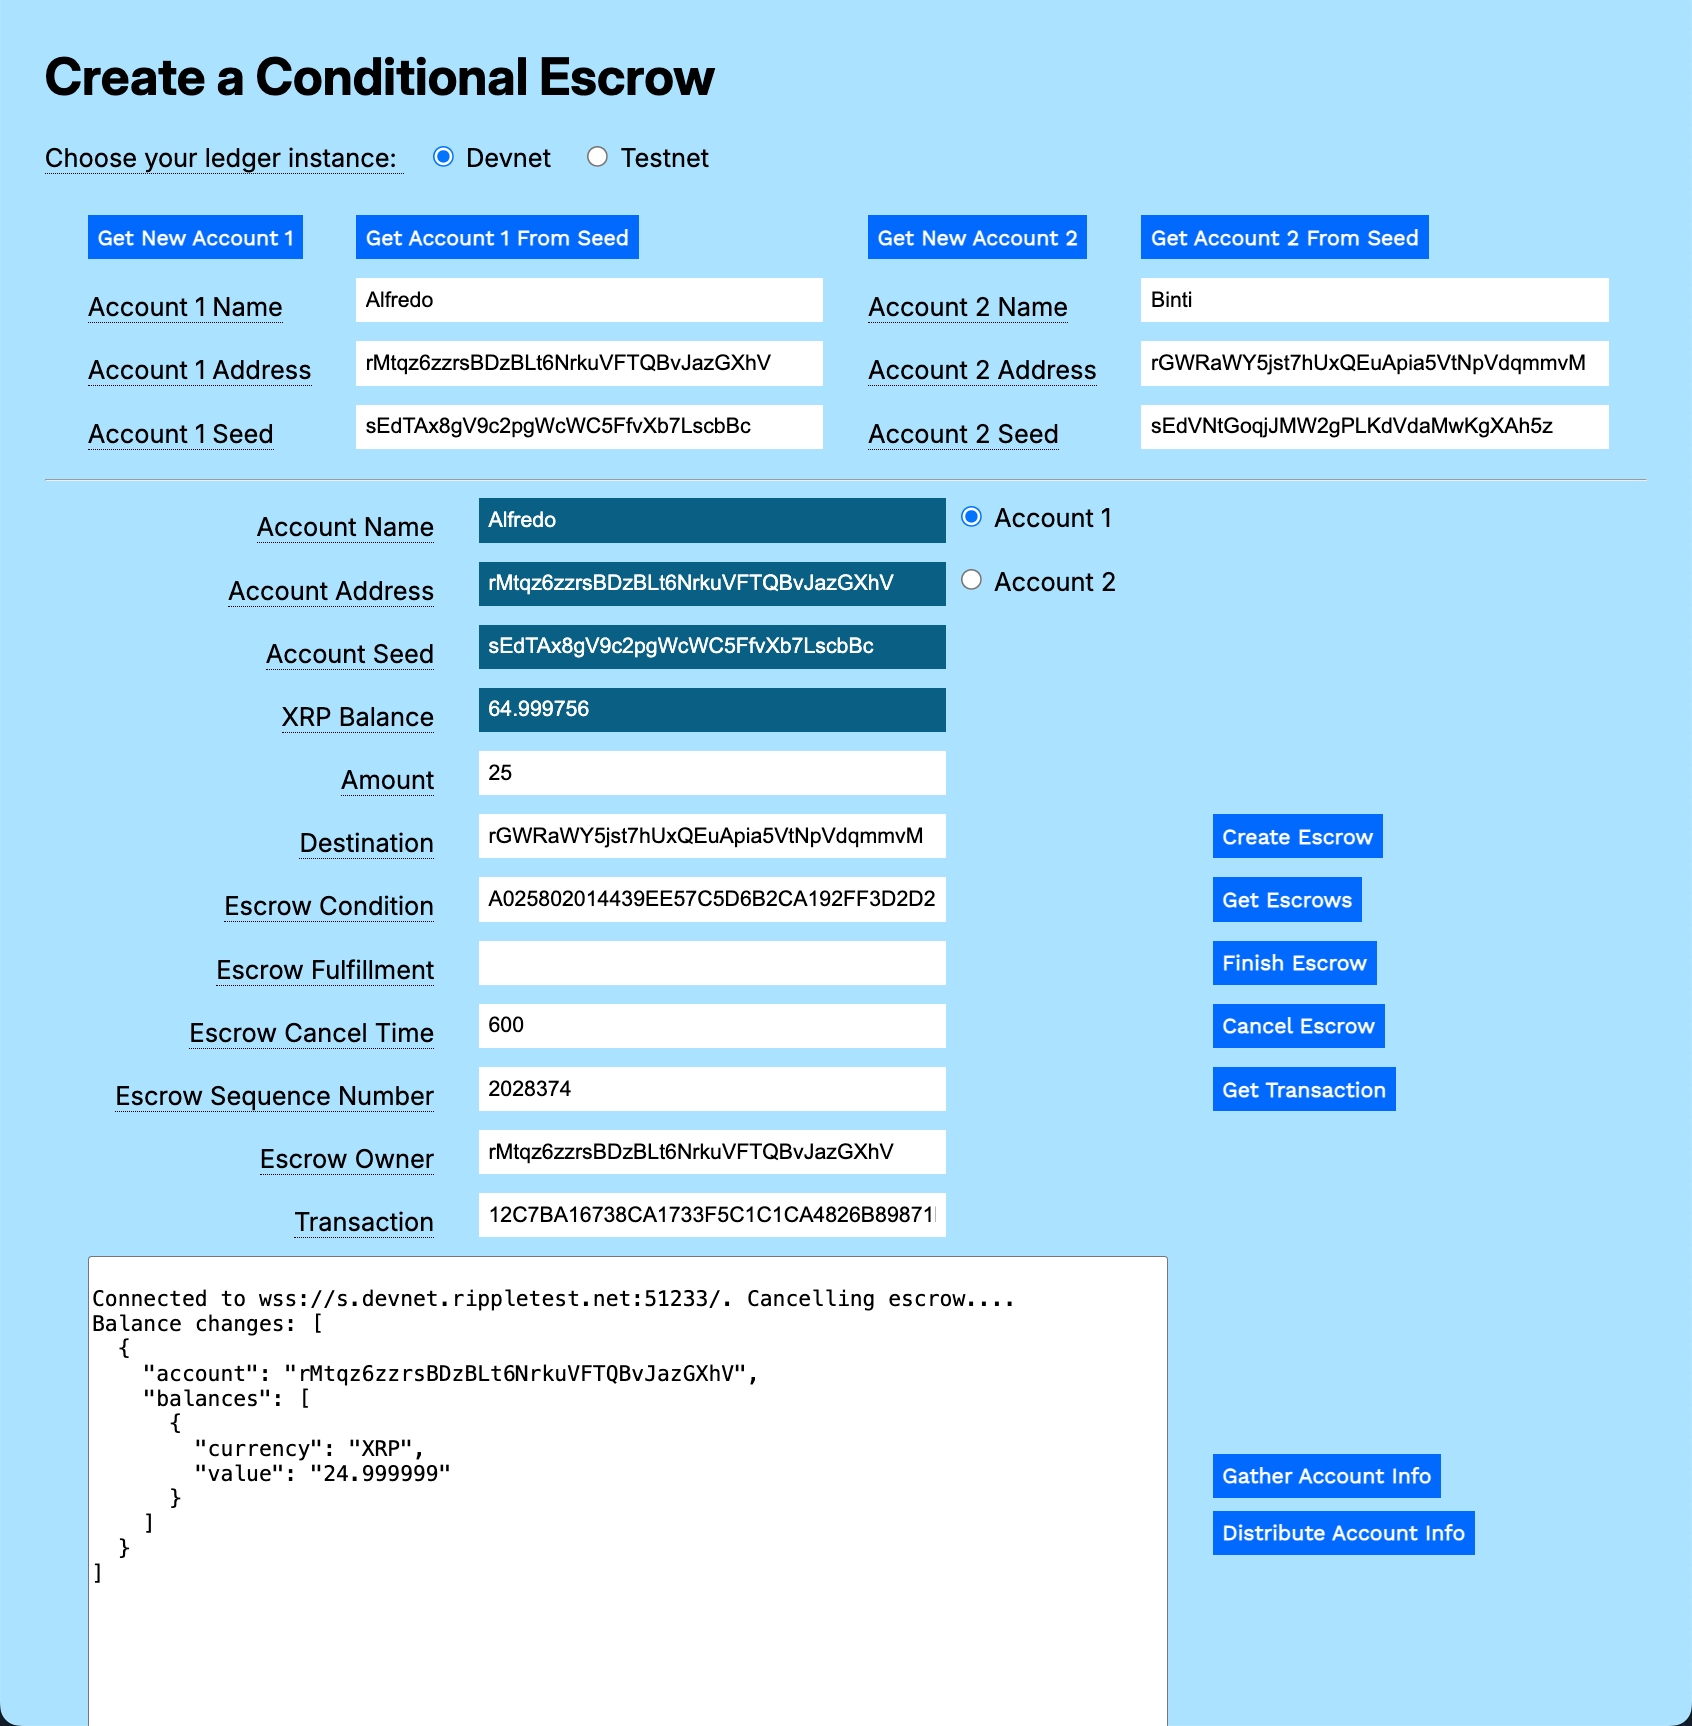
## Cancel Escrow
When the Escrow Cancel time passes, the escrow is no longer available to the recipient. The initiator of the escrow can reclaim the XRP, less the transaction fees. If you try to cancel the transaction prior to the **Escrow Cancel** time, you are charged for the transaction, but the actual escrow cannot be cancelled until the time limit is reached.
You can wait the allotted time for the escrow you created in the previous step, then use it to try out the **Cancel Escrow** button
To cancel an expired escrow:
1. Enter the sequence number in the **Escrow Sequence Number** field.
2. Enter the address of the account that created the escrow in the **Escrow Owner** field.
3. Click **Cancel Escrow**.
The funds are returned to the owner account, less the initial transaction fee.
[](/assets/mt-time-escrow-6-cancel-escrow.e71ae0a3acc55b31456b933dbb4b6117745fb51519960d5b69262fbb6bc3a10f.ac57e6ef.png)
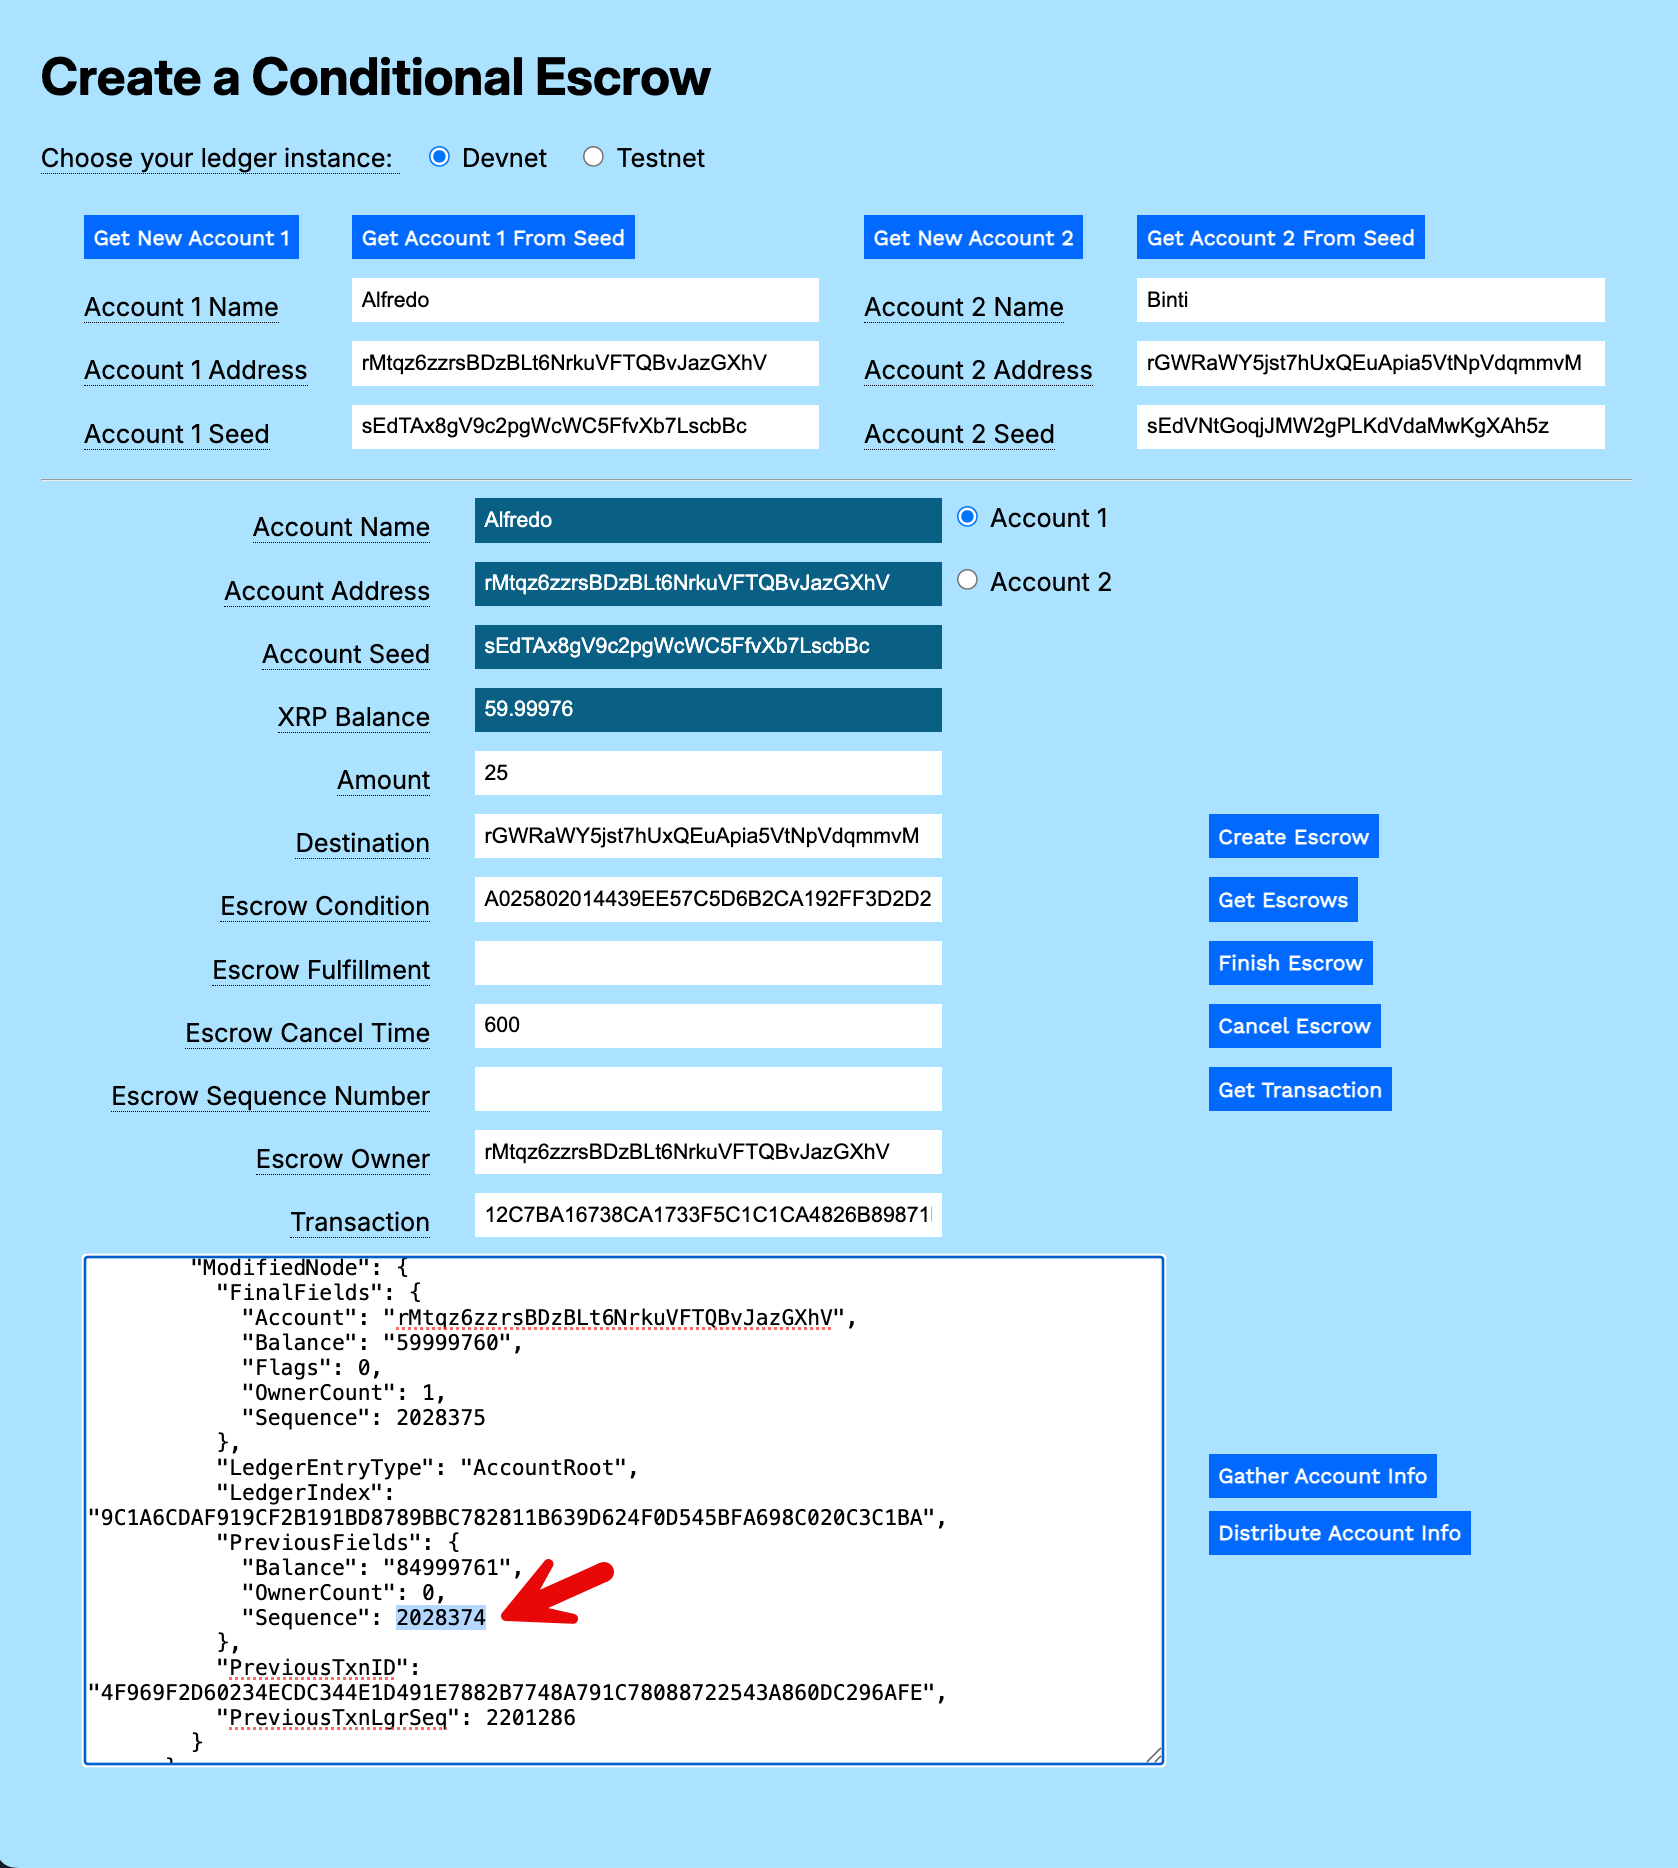
## Oh No! I Forgot to Save the Sequence Number!
If you forget to save the sequence number, you can find it in the escrow transaction record.
1. If needed, create a new escrow as described in [Create Escrow](#create-escrow), above.
2. Click **Get Escrows** to get the escrow information.
3. Copy the *PreviousTxnID* value from the results.
[](/assets/mt-conditional-escrow-6-get-escrows.283f68d80dac082ab69c6432a675ccaf153508853afaaa5ea219903655e3a086.ac57e6ef.png)
4. Paste the *PreviousTxnID* in the **Transaction** field.
5. Click **Get Transaction**.
6. Locate the *ModifiedNode.PreviousFields.Sequence* value in the results.
[](/assets/mt-conditional-escrow-7-sequence-value.e3ca1e1f9888c9bfd75f50a149fc02f76e4ac630eaa9c3af17275339db198d68.ac57e6ef.png)
# Code Walkthrough
Download and expand the [Modular Tutorials](/assets/payment-modular-tutorials.a27fd32656123cc667fdfb8949e8c79c60732fc4da4448548774646ed28d5e69.bb35afea.zip) archive.
## ripple8-escrow.js
This example can be used with any XRP Ledger network, *Testnet*, or *Devnet*. You can update the code to choose different or additional XRP Ledger networks.
### Add Seconds to Date
This function accomplishes two things. It creates a new date object and adds the number of seconds taken from a form field. Then, it adjusts the date from the JavaScript format to the XRP Ledger format.
You provide the *numOfSeconds* argument, the second parameter is a new Date object.
```javascript
function addSeconds(numOfSeconds, date = new Date()) {
```
Set the *seconds* value to the date seconds plus the number of seconds you provide.
```javascript
date.setSeconds(date.getSeconds() + numOfSeconds);
```
JavaScript dates are in milliseconds. Divide the date by 1000 to base it on seconds.
```javascript
date = Math.floor(date / 1000)
```
Subtract the number of seconds in the Ripple epoch to convert the value to an XRP Ledger compatible date value.
```javascript
date = date - 946684800
```
Return the result.
```javascript
return date;
}
```
### Create Time-based Escrow
```javascript
async function createTimeBasedEscrow() {
```
Instantiate two new date objects, then set the dates to the current date plus the set number of seconds for the finish and cancel dates.
```javascript
let escrow_finish_date = new Date()
let escrow_cancel_date = new Date()
escrow_finish_date = addSeconds(parseInt(escrowFinishTimeField.value))
escrow_cancel_date = addSeconds(parseInt(escrowCancelTimeField.value))
```
Connect to the ledger and get the account wallet.
```javascript
let net = getNet()
const client = new xrpl.Client(net)
await client.connect()
let results = `===Connected to ${net}.===\n\n===Creating time-based escrow.===\n`
resultField.value = results
```
Define the transaction object.
```javascript
try {
const wallet = xrpl.Wallet.fromSeed(accountSeedField.value)
const sendAmount = amountField.value
const escrowTx = await client.autofill({
"TransactionType": "EscrowCreate",
"Account": wallet.address,
"Amount": xrpl.xrpToDrops(sendAmount),
"Destination": destinationField.value,
"FinishAfter": escrow_finish_date,
"CancelAfter": escrow_cancel_date
})
```
Sign the prepared transaction object.
```javascript
const signed = wallet.sign(escrowTx)
}
```
Submit the signed transaction object and wait for the results.
```javascript
const tx = await client.submitAndWait(signed.tx_blob)
```
Report the results.
```javascript
results += "\n===Success! === *** Save this sequence number: " + tx.result.tx_json.Sequence
xrpBalanceField.value = (await client.getXrpBalance(wallet.address))
resultField.value = results
}
```
Catch and report any errors, then disconnect from the XRP Ledger.
```javascript
catch (error) {
results += "\n===Error: " + error.message
resultField.value = results
}
finally {
client.disconnect()
}
```
### Finish Time-based Escrow
```javascript
async function finishEscrow() {
```
Connect to the XRP Ledger.
```javascript
let net = getNet()
const client = new xrpl.Client(net)
await client.connect()
let results = `===Connected to ${net}. Finishing escrow.===\n`
resultField.value = results
```
Define the transaction. The *Owner* is the account that created the escrow. The *OfferSequence* is the sequence number of the escrow transaction. Automatically fill in the common fields for the transaction.
```javascript
const wallet = xrpl.Wallet.fromSeed(accountSeedField.value)
const prepared = await client.autofill({
"TransactionType": "EscrowFinish",
"Account": accountAddressField.value,
"Owner": escrowOwnerField.value,
"OfferSequence": parseInt(escrowSequenceNumberField.value)
})
```
Sign the transaction definition.
```javascript
const signed = wallet.sign(prepared)
```
Submit the signed transaction to the XRP ledger.
```javascript
const tx = await client.submitAndWait(signed.tx_blob)
```
Report the results.
```javascript
results += "\n===Balance changes===" +
JSON.stringify(xrpl.getBalanceChanges(tx.result.meta), null, 2)
resultField.value = results
```
Update the **XRP Balance** field.
```javascript
xrpBalanceField.value = (await client.getXrpBalance(wallet.address))
```
Catch and report any errors, then disconnect from the XRP Ledger.
```javascript
catch (error) {
results += "\n===Error: " + error.message + "==="
resultField.value = results
}
finally {
client.disconnect()
}
```
### Get Escrows
Get the escrows created by or destined to the current account.
```javascript
async function getEscrows() {
```
Connect to the network. The information you are looking for is public information, so there is no need to instantiate your wallet.
```javascript
let net = getNet()
const client = new xrpl.Client(net)
await client.connect()
let results = `\n===Connected to ${net}.\nGetting account escrows.===\n`
resultField.value = results
```
Create the `account_objects` request. Specify that you want objects of the type *escrow*.
```javascript
try {
const escrow_objects = await client.request({
"id": 5,
"command": "account_objects",
"account": accountAddressField.value,
"ledger_index": "validated",
"type": "escrow"
})
```
Report the results.
```javascript
results += JSON.stringify(escrow_objects.result, null, 2)
resultField.value = results
}
```
Catch and report any errors, then disconnect from the XRP Ledger.
```javascript
catch (error) {
results += "\nError: " + error.message
resultField.value = results
}
finally {
client.disconnect()
}
}
```
### Get Transaction Info
```javascript
async function getTransaction() {
```
Connect to the XRP Ledger.
```javascript
let net = getNet()
const client = new xrpl.Client(net)
await client.connect()
let results = `\n===Connected to ${net}.===\n===Getting transaction information.===\n`
resultField.value = results
```
Prepare and send the transaction information request. The only required parameter is the transaction ID.
```javascript
try {
const tx_info = await client.request({
"id": 1,
"command": "tx",
"transaction": transactionField.value,
})
```
Report the results.
```javascript
results += JSON.stringify(tx_info.result, null, 2)
resultField.value = results
}
```
Catch and report any errors, then disconnect from the XRP Ledger.
```javascript
catch (error) {
results += "\nError: " + error.message
resultField.value = results
}
finally {
client.disconnect()
}
} // End of getTransaction()
```
### Cancel Escrow
Cancel an escrow after it passes the expiration date and time.
```javascript
async function cancelEscrow() {
```
Connect to the XRP Ledger instance and get the account wallet.
```javascript
let net = getNet()
const client = new xrpl.Client(net)
await client.connect()
let results = `\n===Connected to ${net}. Cancelling escrow.===`
resultField.value = results
```
Prepare the EscrowCancel transaction, passing the escrow owner and offer sequence values.
```javascript
try {
const prepared = await client.autofill({
"TransactionType": "EscrowCancel",
"Account": accountAddressField.value,
"Owner": escrowOwnerField.value,
"OfferSequence": parseInt(escrowSequenceNumberField.value)
})
```
Sign the transaction.
```javascript
const wallet = xrpl.Wallet.fromSeed(accountSeedField.value)
const signed = wallet.sign(prepared)
```
Submit the transaction and wait for the response.
```
const tx = await client.submitAndWait(signed.tx_blob)
```
Report the results.
```javascript
results += "\n===Balance changes: " +
JSON.stringify(xrpl.getBalanceChanges(tx.result.meta), null, 2)
resultField.value = results
)
```
Catch and report any errors, then disconnect from the XRP Ledger instance.
```javascript
}
catch (error) {
results += "\n===Error: " + error.message
resultField.value = results
}
finally {
client.disconnect()
}
}
```
## create-time-escrow.html
```html
Create a Time-based Escrow