# Build a Desktop Wallet in JavaScript
This tutorial demonstrates how to build a desktop wallet for the XRP Ledger using the JavaScript programming language, the [Electron Framework](https://www.electronjs.org/) and various libraries. This application can be used as a starting point for building a more complex and powerful application, as a reference point for building comparable apps, or as a learning experience to better understand how to integrate XRP Ledger functionality into a larger project.
## Prerequisites
To complete this tutorial, you should meet the following requirements:
- You have [Node.js](https://nodejs.org/) 14+ installed.
- You are somewhat familiar with modern JavaScript programming and have completed the [Get Started Using JavaScript tutorial](/ja/docs/tutorials/javascript/build-apps/get-started).
- You have some understanding of the XRP Ledger, its capabilities, and of cryptocurrency in general. Ideally you have completed the [Basic XRPL guide](https://learn.xrpl.org/).
### Source Code
You can find the complete source code for all of this tutorial's examples in the code samples section of this website's repository. After a `npm install` in this directory you can run the application for each step as described in the `scripts` section of `package.json`, e.g, `npm run ledger-index`.
Be careful if you copy-and-paste the source code from these directly from these files. The sample code is split up into different files per step, so some shared imports and files are in different directories in the examples. This especially applies to the `library`, `bootstrap`, and `WALLET_DIR` contents.
## Rationale
This tutorial takes you through the process of creating an XRP Wallet application from scratch. It begins with a "Hello World"-like example with minimal functionality, and adds more features in each step.
## Goals
At the end of this tutorial, you will have built a JavaScript Wallet application that looks something like this:
The look and feel of the user interface should be roughly the same regardless of operating system, as the Electron Framework allows us to write cross-platform applications that are styled with HTML and CSS just like a web-based application.
The application we are going to build here will be capable of the following:
- Showing updates to the XRP Ledger in real-time.
- Viewing any XRP Ledger account's activity "read-only" including showing how much XRP was delivered by each transaction.
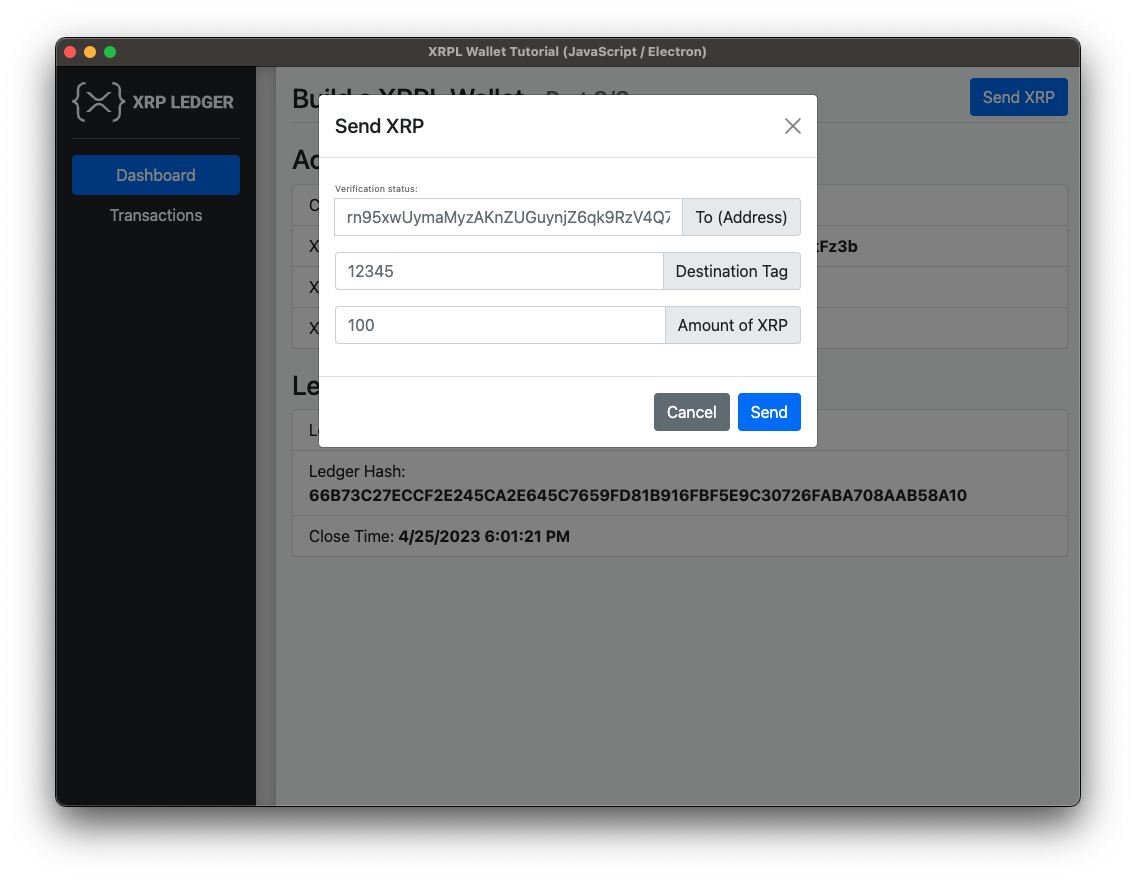
- Sending [direct XRP payments](/ja/docs/concepts/payment-types/direct-xrp-payments), and providing feedback about the intended destination address, including:
- Whether the intended destination already exists in the XRP Ledger, or the payment would have to fund its creation.
- If the address doesn't want to receive XRP (**Disallow XRP** flag enabled).
- If the address has a [verified domain name](/ja/docs/references/xrp-ledger-toml#account-verification) associated with it.
The application in this tutorial *doesn't* have the ability to send or trade [tokens](/ja/docs/concepts/tokens) or use other [payment types](/ja/docs/concepts/payment-types) like [Escrow](/ja/docs/concepts/payment-types/escrow) or [Payment Channels](/ja/docs/concepts/payment-types/payment-channels). However, it provides a foundation that you can implement those and other features on top of.
In addition to the above features, you'll also learn a bit about Events, IPC (inter-process-communication) and asynchronous (async) code in JavaScript.
## Steps
### 0. Project setup - Hello World
1. To initialize the project, create a file named `package.json` with the following content:
{
"name": "xrpl-javascript-desktop-wallet",
"version": "1.1.0",
"license": "MIT",
"scripts": {
"hello": "electron 0-hello/index.js",
"ledger-index": "electron 1-ledger-index/index.js",
"async": "electron 2-async/index.js",
"account": "electron 3-account/index.js",
"tx-history": "electron 4-tx-history/index.js",
"password": "electron 5-password/index.js",
"styling": "electron 6-styling/index.js",
"send-xrp": "electron 7-send-xrp/index.js",
"domain-verification": "electron 8-domain-verification/index.js"
},
"dependencies": {
"async": "^3.2.6",
"fernet": "=0.3.3",
"node-fetch": "^2.7.0",
"pbkdf2-hmac": "^1.2.1",
"open": "^8.4.0",
"toml": "^3.0.0",
"xrpl": "^4.4.2"
},
"devDependencies": {
"electron": "38.2.0"
}
}
Here we define the libraries our application will use in the `dependencies` section as well as shortcuts for running our application in the `scripts` section.
1. After you create your package.json file, install those dependencies by running the following command:
```console
npm install
```
This installs the Electron Framework, the xrpl.js client library and a couple of helpers we are going to need for our
application to work.
1. In the root folder, create an `index.js` file with the following content:
const { app, BrowserWindow } = require('electron')
const path = require('path')
/**
* Main function: create application window, preload the code to communicate
* between the renderer Process and the main Process, load a layout,
* and perform the main logic.
*/
const createWindow = () => {
// Create the application window
const appWindow = new BrowserWindow({
width: 1024,
height: 768
})
// Load a layout
appWindow.loadFile(path.join(__dirname, 'view', 'template.html'))
return appWindow
}
// Here we have to wait for the application to signal that it is ready
// to execute our code. In this case we just create a main window.
app.whenReady().then(() => {
createWindow()
})
1. Make a new folder named `view` in the root directory of the project.
2. Now, inside the `view` folder, add a `template.html` file with the following content:
XRPL Wallet Tutorial (JavaScript / Electron)
Build a XRPL Wallet - Part 0/8
Hello world!
1. Now, start the application with the following command:
```console
npm run start
```
When you need to debug the application, you can open Developer Tools by selecting "View / Toggle Developer Tools" from the application menu or using a keyboard shortcut (Ctrl+Shift+i on Windows or Linux; Option+Command+i on Mac).
You should see a window appear that displays the text "Build a XRPL Wallet" and "Hello world!"
To run the reference application for this step, run:
```console
npm run hello
```
In the next steps we will continually expand on this very basic setup. To better keep track of all the changes that will be made, the files in the reference section are numbered/prefixed with the respective step number:
**Full code for this step:**
`0-hello/index.js`,
`0-hello/view/template.html`,
### 1. Ledger Index
**Full code for this step:**
`1-ledger-index/index.js`,
`1-ledger-index/view/preload.js`,
`1-ledger-index/view/template.html`,
`1-ledger-index/view/renderer.js`.
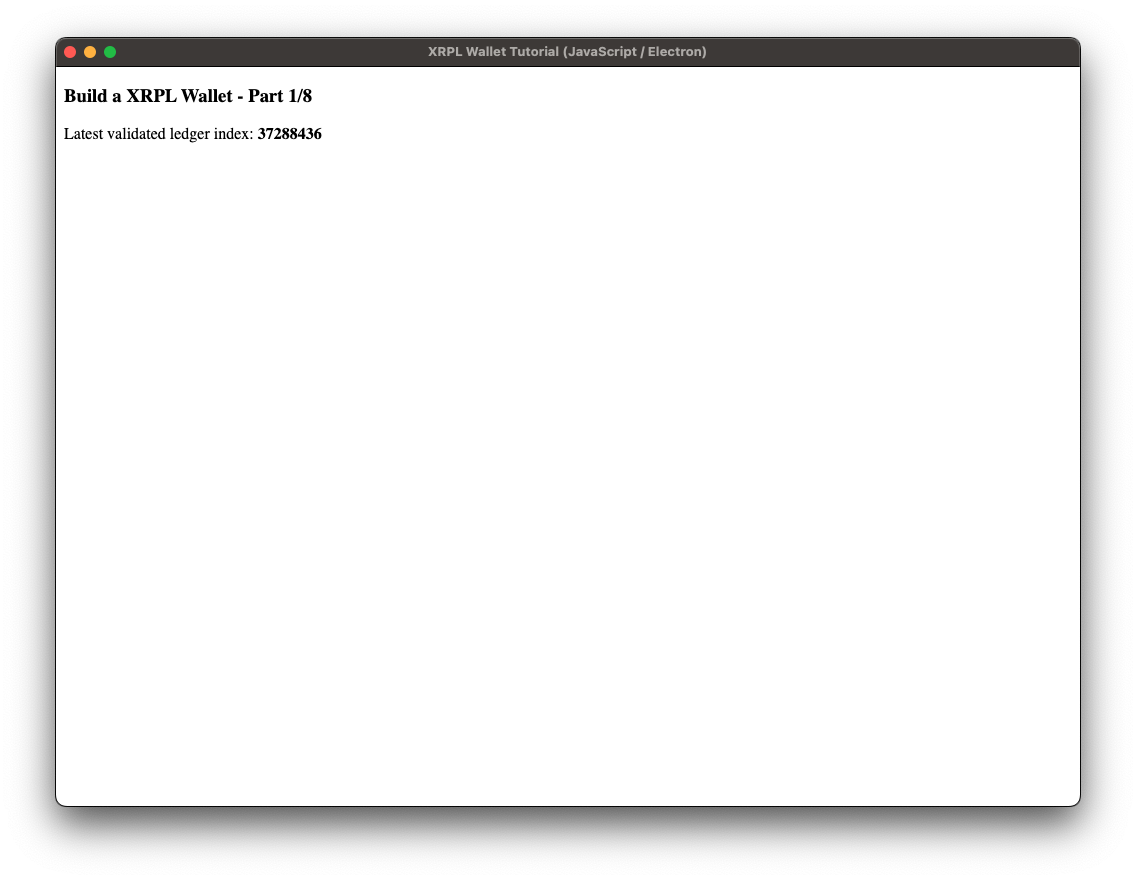
Our first step was to have a running "Hello World" application. Now we want to expand on that so that the application can interact on a very basic level with the XRP Ledger and display some information about the current ledger state on the screen. After completing this step, the application should look like this:
1. Update `index.js` by adding the following snippet in the import section at the top of the file below the `path` import:
// Ledger index code additions - start
const xrpl = require('xrpl')
const TESTNET_URL = 'wss://s.altnet.rippletest.net:51233'
/**
* Create a WebSocket client, connect to the XRPL, and fetch the latest ledger index.
*
* @returns {Promise}
*/
const getValidatedLedgerIndex = async () => {
const client = new xrpl.Client(TESTNET_URL)
await client.connect()
// Reference: https://xrpl.org/docs/references/http-websocket-apis/public-api-methods/ledger-methods/ledger
const ledgerRequest = {
"command": "ledger",
"ledger_index": "validated"
}
const ledgerResponse = await client.request(ledgerRequest)
await client.disconnect()
return ledgerResponse.result.ledger_index
}
This helper function does the following: It establishes a WebSocket connection to the XRP Ledger, calls the XRP Ledger API's [ledger method](/ja/docs/references/http-websocket-apis/public-api-methods/ledger-methods/ledger) and returns the ledger index from the response. We will wire up this function at the end of this step.
1. In order to attach a preloader script, modify the `createWindow` method in `index.js` by adding the following code:
```javascript
// Creates the application window
const appWindow = new BrowserWindow({
width: 1024,
height: 768,
// Step 1 code additions - start
webPreferences: {
preload: path.join(__dirname, 'view', 'preload.js'),
},
// Step 1 code additions - end
})
```
1. Now in the `view` folder, create a file `preload.js` with the following content:
```javascript
const { contextBridge, ipcRenderer } = require('electron');
// Expose functionality from main process (aka. "backend") to be used by the renderer process(aka. "backend")
contextBridge.exposeInMainWorld('electronAPI', {
// By calling "onUpdateLedgerIndex" in the frontend process we can now attach a callback function
// by making onUpdateLedgerIndex available at the window level.
// The subscribed function gets triggered whenever the backend process triggers the event 'update-ledger-index'
onUpdateLedgerIndex: (callback) => {
ipcRenderer.on('update-ledger-index', callback)
}
})
```
This preloader script is used to expose functions to the browser's window object, so that the user interface can react to events broadcast from the main logic in `index.js`.
In the browser, `window.electronAPI.onUpdateLedgerIndex(callback)` can now be used to pass a callback function via `ipcRenderer.on('eventName', callback)` that will be triggered by `appWindow.webContents.send('eventName', value)`.
1. Now, in `view/template.html`, replace the body in order to show a placeholder for the ledger index instead of "Hello world!"
```html
Build a XRPL Wallet
Latest validated ledger index:
```
1. In `view/template.html` add the following line at the bottom of the file:
```html