This tutorial demonstrates how to build a desktop wallet for the XRP Ledger using the JavaScript programming language, the Electron Framework and various libraries. This application can be used as a starting point for building a more complex and powerful application, as a reference point for building comparable apps, or as a learning experience to better understand how to integrate XRP Ledger functionality into a larger project.
To complete this tutorial, you should meet the following requirements:
- You have Node.js 14+ installed.
- You are somewhat familiar with modern JavaScript programming and have completed the Get Started Using JavaScript tutorial.
- You have some understanding of the XRP Ledger, its capabilities, and of cryptocurrency in general. Ideally you have completed the Basic XRPL guide.
You can find the complete source code for all of this tutorial's examples in the code samples section of this website's repository. After a npm install in this directory you can run the application for each step as described in the scripts section of package.json, e.g, npm run ledger-index.
library, bootstrap, and WALLET_DIR contents.This tutorial takes you through the process of creating an XRP Wallet application from scratch. It begins with a "Hello World"-like example with minimal functionality, and adds more features in each step.
At the end of this tutorial, you will have built a JavaScript Wallet application that looks something like this:
The look and feel of the user interface should be roughly the same regardless of operating system, as the Electron Framework allows us to write cross-platform applications that are styled with HTML and CSS just like a web-based application.
The application we are going to build here will be capable of the following:
- Showing updates to the XRP Ledger in real-time.
- Viewing any XRP Ledger account's activity "read-only" including showing how much XRP was delivered by each transaction.
- Sending direct XRP payments, and providing feedback about the intended destination address, including:
- Whether the intended destination already exists in the XRP Ledger, or the payment would have to fund its creation.
- If the address doesn't want to receive XRP (Disallow XRP flag enabled).
- If the address has a verified domain name associated with it.
The application in this tutorial doesn't have the ability to send or trade tokens or use other payment types like Escrow or Payment Channels. However, it provides a foundation that you can implement those and other features on top of.
In addition to the above features, you'll also learn a bit about Events, IPC (inter-process-communication) and asynchronous (async) code in JavaScript.
- To initialize the project, create a file named
package.jsonwith the following content:
{
  "name": "xrpl-javascript-desktop-wallet",
  "version": "1.1.0",
  "license": "MIT",
  "scripts": {
    "hello": "electron 0-hello/index.js",
    "ledger-index": "electron 1-ledger-index/index.js",
    "async": "electron 2-async/index.js",
    "account": "electron 3-account/index.js",
    "tx-history": "electron 4-tx-history/index.js",
    "password": "electron 5-password/index.js",
    "styling": "electron 6-styling/index.js",
    "send-xrp": "electron 7-send-xrp/index.js",
    "domain-verification": "electron 8-domain-verification/index.js"
  },
  "dependencies": {
    "async": "^3.2.6",
    "fernet": "=0.3.3",
    "node-fetch": "^2.7.0",
    "pbkdf2-hmac": "^1.2.1",
    "open": "^8.4.0",
    "toml": "^3.0.0",
    "xrpl": "^4.4.2"
  },
  "devDependencies": {
    "electron": "38.2.0"
  }
}
Here we define the libraries our application will use in the dependencies section as well as shortcuts for running our application in the scripts section.
- After you create your package.json file, install those dependencies by running the following command:
npm installThis installs the Electron Framework, the xrpl.js client library and a couple of helpers we are going to need for our application to work.
- In the root folder, create an
index.jsfile with the following content:
const { app, BrowserWindow } = require('electron')

const path = require('path')

/**
 * Main function: create application window, preload the code to communicate
 * between the renderer Process and the main Process, load a layout,
 * and perform the main logic.
 */
const createWindow = () => {
    // Create the application window
    const appWindow = new BrowserWindow({
        width: 1024,
        height: 768
    })

    // Load a layout
    appWindow.loadFile(path.join(__dirname, 'view', 'template.html'))
    return appWindow
}

// Here we have to wait for the application to signal that it is ready
// to execute our code. In this case we just create a main window.
app.whenReady().then(() => {
    createWindow()
})
Make a new folder named
viewin the root directory of the project.Now, inside the
viewfolder, add atemplate.htmlfile with the following content:
<!DOCTYPE html>
<html>

<head>
  <meta charset="UTF-8" />
  <meta http-equiv="Content-Security-Policy" content="default-src 'self'; script-src 'self'" />
  <meta http-equiv="X-Content-Security-Policy" content="default-src 'self'; script-src 'self'" />
  <title>XRPL Wallet Tutorial (JavaScript / Electron)</title>
</head>

<body>

  <h3>Build a XRPL Wallet - Part 0/8</h3>
  <span>Hello world!</span>

</body>

</html>- Now, start the application with the following command:
npm run startYou should see a window appear that displays the text "Build a XRPL Wallet" and "Hello world!" To run the reference application for this step, run:
npm run helloIn the next steps we will continually expand on this very basic setup. To better keep track of all the changes that will be made, the files in the reference section are numbered/prefixed with the respective step number:
Full code for this step: 0-hello/index.js, 0-hello/view/template.html,
Full code for this step: 1-ledger-index/index.js, 1-ledger-index/view/preload.js, 1-ledger-index/view/template.html, 1-ledger-index/view/renderer.js.
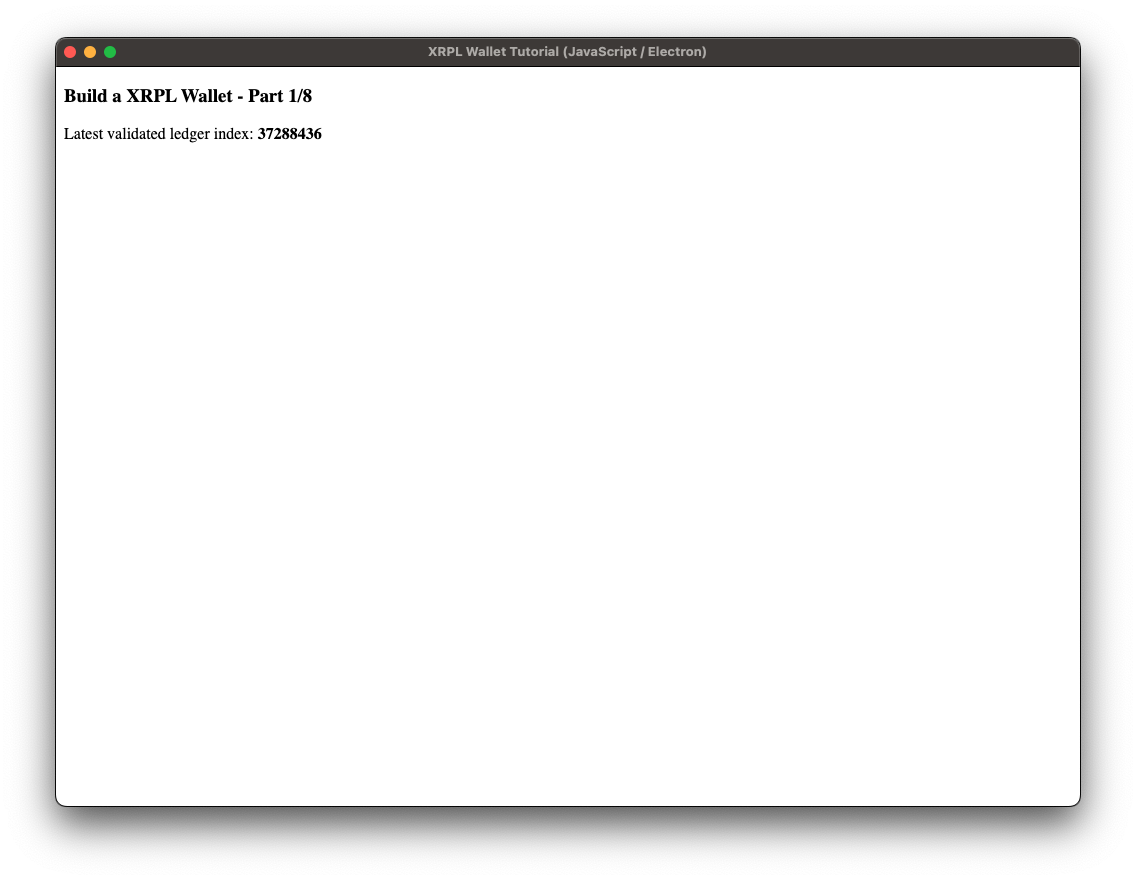
Our first step was to have a running "Hello World" application. Now we want to expand on that so that the application can interact on a very basic level with the XRP Ledger and display some information about the current ledger state on the screen. After completing this step, the application should look like this:
- Update
index.jsby adding the following snippet in the import section at the top of the file below thepathimport:
// Ledger index code additions - start
const xrpl = require('xrpl')

const TESTNET_URL = 'wss://s.altnet.rippletest.net:51233'

/**
 * Create a WebSocket client, connect to the XRPL, and fetch the latest ledger index.
 *
 * @returns {Promise<number>}
 */
const getValidatedLedgerIndex = async () => {
    const client = new xrpl.Client(TESTNET_URL)
    await client.connect()
    // Reference: https://xrpl.org/docs/references/http-websocket-apis/public-api-methods/ledger-methods/ledger
    const ledgerRequest = {
        "command": "ledger",
        "ledger_index": "validated"
    }
    const ledgerResponse = await client.request(ledgerRequest)
    await client.disconnect()
    return ledgerResponse.result.ledger_index
}
This helper function does the following: It establishes a WebSocket connection to the XRP Ledger, calls the XRP Ledger API's ledger method and returns the ledger index from the response. We will wire up this function at the end of this step.
- In order to attach a preloader script, modify the
createWindowmethod inindex.jsby adding the following code:
  // Creates the application window
  const appWindow = new BrowserWindow({
    width: 1024,
    height: 768,
    // Step 1 code additions - start
    webPreferences: {
      preload: path.join(__dirname, 'view', 'preload.js'),
    },
    // Step 1 code additions - end
})- Now in the
viewfolder, create a filepreload.jswith the following content:
const { contextBridge, ipcRenderer } = require('electron');

// Expose functionality from main process (aka. "backend") to be used by the renderer process(aka. "backend")
contextBridge.exposeInMainWorld('electronAPI', {
  // By calling "onUpdateLedgerIndex" in the frontend process we can now attach a callback function
  // by making onUpdateLedgerIndex available at the window level.
  // The subscribed function gets triggered whenever the backend process triggers the event 'update-ledger-index'
  onUpdateLedgerIndex: (callback) => {
    ipcRenderer.on('update-ledger-index', callback)
  }
})
This preloader script is used to expose functions to the browser's window object, so that the user interface can react to events broadcast from the main logic in index.js.
In the browser, window.electronAPI.onUpdateLedgerIndex(callback) can now be used to pass a callback function via ipcRenderer.on('eventName', callback) that will be triggered by appWindow.webContents.send('eventName', value).
- Now, in
view/template.html, replace the body in order to show a placeholder for the ledger index instead of "Hello world!"
<body>
    <!-- Step 1 code modifications - start -->
    <h3>Build a XRPL Wallet</h3>
    Latest validated ledger index: <strong id="ledger-index"></strong>
    <!-- Step 1 code modifications - end -->
</body>- In
view/template.htmladd the following line at the bottom of the file:
</body>
<!-- Step 1 code additions - start -->
<script src="renderer.js"></script>
<!-- Step 1 code additions - end -->
</html>- Now create the
renderer.jsfile in theviewfolder with the following code:
const ledgerIndexEl = document.getElementById('ledger-index')

// Here we define the callback function that performs the content update
// whenever 'update-ledger-index' is called by the main process
window.electronAPI.onUpdateLedgerIndex((_event, value) => {
    ledgerIndexEl.innerText = value
})- To wire up our main application to send the ledger index to the frontend, modify
index.jsby adding the following snippet replacing the last section in the file:
// Here we have to wait for the application to signal that it is ready
// to execute our code. In this case we create a main window, query
// the ledger for its latest index and submit the result to the main
// window where it will be displayed
app.whenReady().then(() => {
  // Step 1 code additions - start
  const appWindow = createWindow()

  getValidatedLedgerIndex().then((value) => {
    appWindow.webContents.send('update-ledger-index', value)
  })
  // Step 1 code additions - end

})
Here we first call our helper function getValidatedLedgerIndex() and then broadcast an event named update-ledger-index. This attaches a payload containing the latest ledger information which can be handled by the frontend.
This example shows how to do Inter Process Communication (IPC) in Electron. Technically, JavaScript has no true parallel processes or threading because it follows a single-threaded event-driven paradigm. Nonetheless Electron provides us with two IPC modules called ipcMain and ipcRenderer. We can roughly equate ipcMain to a backend process and ipcRenderer to a frontend process when we think in terms of client-server applications. It works as follows:
- We started by creating a function that enables the frontend to subscribe to backend events via the
ContextBridge(onUpdateLedgerIndexinview/preload.js) - Then we make the function available by putting it in a preloader script to ensure it is loaded and can be used by the frontend.
- On the frontend, we can then use that function to attach a callback that handles frontend updates when the event is dispatched. In this case, we created a separate file,
renderer.js, to define and attach the callback. - Lastly, we dispatch the event from the main logic in
index.jsusingappWindow.webContents.send('update-ledger-index', value).
To get the application running at this early stage of development, run the following command:
npm run startYou should see something like 'Latest validated ledger index: 39296259'. The number will be different since it is the latest ledger index as of when the app started. We'll make it continuously update later on.
To run the reference application found in _code-samples/build-a-desktop-wallet/desktop-js for this step, run:
npm run ledger-indexFull code for this step: 2-async/index.js, 2-async/view/preload.js, 2-async/view/renderer.js, 2-async/view/template.html.
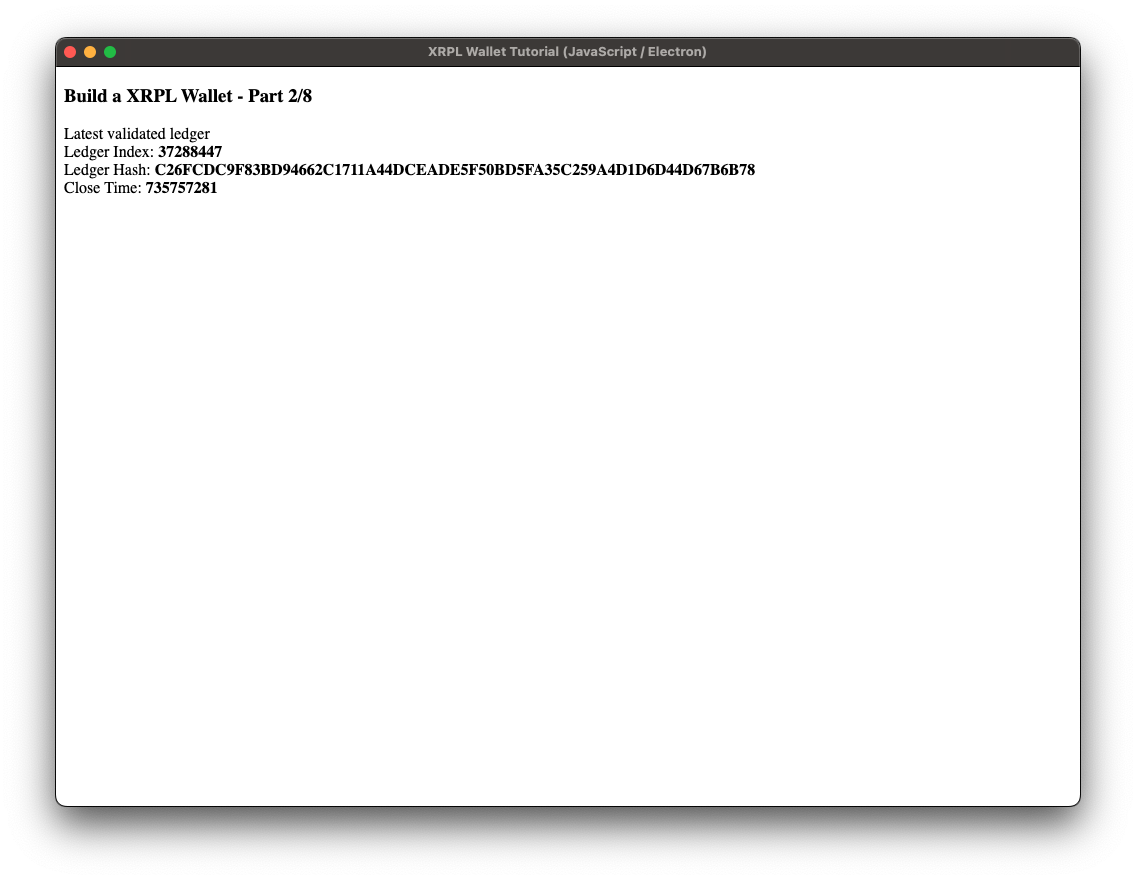
Our application so far only shows the latest validated ledger sequence at the time when we opened it. Let's take things up a notch and add some dashboard like functionality where our wallet app will keep in sync with the ledger and display the latest specs and stats like a clock that is keeping track of time. The result will look something like this:
In
index.jsremove thegetValidatedLedgerIndexfunction.Then update the
app.whenReady().then()section at the bottom of the file section in the following way:
// Step 2 changes - main whenReady function - start
/**
 * Create an XRPL client, subscribe to 'ledger' events, and broadcast those by
 * dispatching an 'update-ledger-data' event to the frontend.
 *
 * @returns {Promise<void>}
 */
const main = async () => {
    const appWindow = createWindow()

    const client = new xrpl.Client(TESTNET_URL)

    await client.connect()

    // Subscribe client to 'ledger' events
    // Reference: https://xrpl.org/docs/references/http-websocket-apis/public-api-methods/subscription-methods/subscribe
    await client.request({
        "command": "subscribe",
        "streams": ["ledger"]
    })

    // Dispatch 'update-ledger-data' event
    client.on("ledgerClosed", async (ledger) => {
        appWindow.webContents.send('update-ledger-data', ledger)
    })
}

app.whenReady().then(main)
Here, we have reduced the app.whenReady logic to an one-liner and put the necessary functionality into a separate main() function. The most relevant piece of code here is the swapping of a single call to the ledger for a subscription. Our client is now connecting to the XRPL via WebSockets. This establishes a permanent bidirectional connection to the XRPL, which allows us to subscribe to events that the server sends out. This saves resources on the server, which now only sends out data we explicitly asked for when a change happens, as well as the client which does not have to sort through incoming data for relevant changes. It also reduces the complexity of the application and saves us a couple of lines of code.
- Then, update
preload.jsby renaming theonUpdateLedgerIndextoonUpdateLedgerDataand theupdate-ledger-indexevent toupdate-ledger-data:
const { contextBridge, ipcRenderer } = require('electron');

contextBridge.exposeInMainWorld('electronAPI', {
  onUpdateLedgerData: (callback) => {
    ipcRenderer.on('update-ledger-data', callback)
  }
})
This renaming might seem a bit nit-picky, but now we actually pass on an object of values instead of a single integer.
- Next, modify the
view/template.htmlfile by adding placeholders to the<body>section:
<body>
    <!-- Step 2 code additions - start -->
    <h3>Build a XRPL Wallet - Part 2/8</h3>
    <b>Latest validated ledger stats</b><br />
    Ledger Index: <strong id="ledger-index"></strong><br />
    Ledger Hash: <strong id="ledger-hash"></strong><br />
    Close Time: <strong id="ledger-close-time"></strong><br />
    <!-- Step 2 code additions - end -->
</body>- Modify the
view/renderer.jsfile to handle the new placeholders. Note that the renamed preloader function is now reflected inwindow.electronAPI.onUpdateLedgerData:
const ledgerIndexEl = document.getElementById('ledger-index')
const ledgerHashEl = document.getElementById('ledger-hash')
const ledgerCloseTimeEl = document.getElementById('ledger-close-time')

window.electronAPI.onUpdateLedgerData((_event, value) => {
    ledgerIndexEl.innerText = value.ledger_index
    ledgerHashEl.innerText = value.ledger_hash
    ledgerCloseTimeEl.innerText = value.ledger_time
})
This should make our application listen to regular updates of the ledger and display them in the frontend.
Now run the application with the following command:
npm run startThis time the application should be the same as in the last step, with the difference that the latest ledger index value gets updated roughly very 3-5 seconds.
To run the reference application found in _code-samples/build-a-desktop-wallet/desktop-js for this step, run:
npm run asyncFull code for this step: library/3_helpers.js. 3-account/index.js, 3-account/view/preload.js, 3-account/view/renderer.js, 3-account/view/template.html.
We now have a permanent connection to the XRPL and some code to bring the delivered data to life on our screen, it's time to add some "wallet" functionality by managing an individual account.
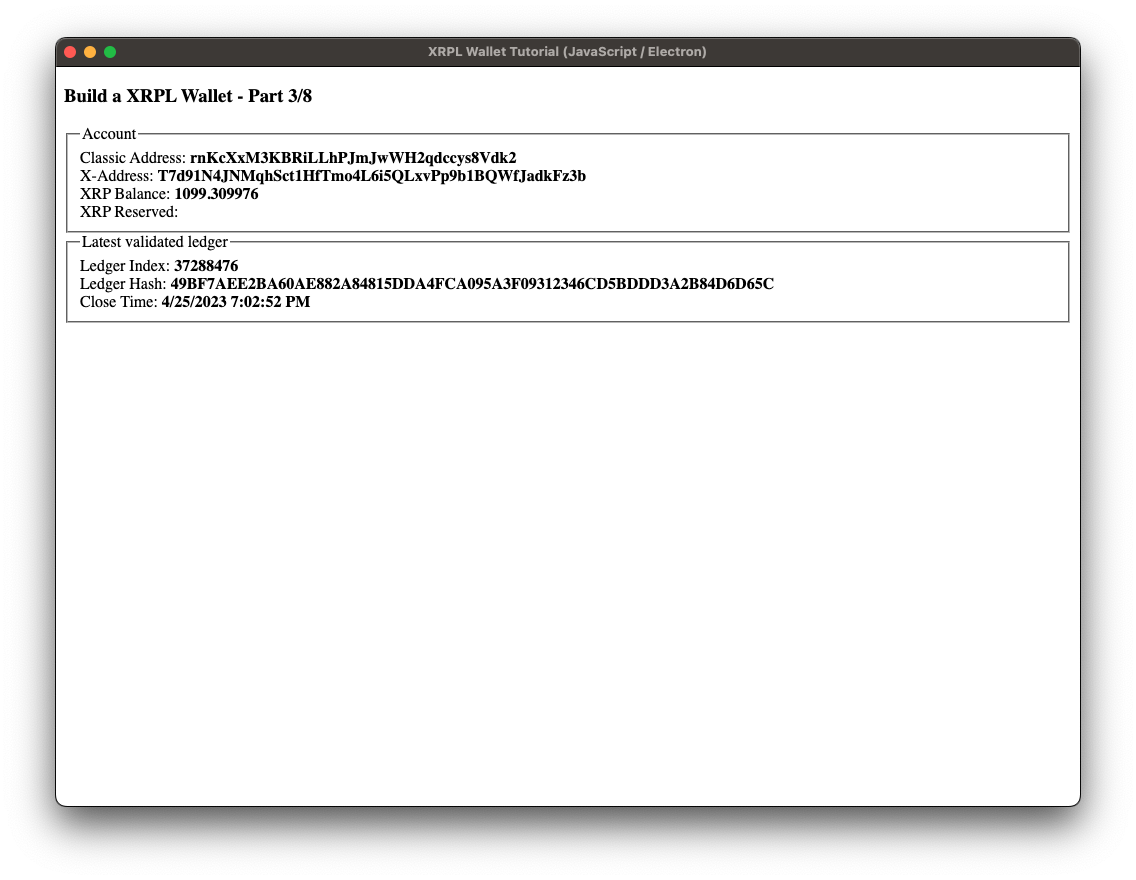
We will ask the user for address of the account to monitor by using a HTML dialog element. We will furthermore refactor the application by encapsulating some functionality in a library. After finishing this step the application should look like this:
- In the project root, create a new directory named
library. Inside this directory, create a file3_helpers.jswith the following content:
3_helpers.js
const xrpl = require("xrpl");

// The rippled server and its APIs represent time as an unsigned integer.
// This number measures the number of seconds since the "Ripple Epoch" of
// January 1, 2000 (00:00 UTC). This is like the way the Unix epoch  works,
// Reference: https://xrpl.org/docs/references/protocol/data-types/basic-data-types#specifying-time
const RIPPLE_EPOCH = 946684800;

const prepareAccountData = (rawAccountData) => {
    return {
        classicAddress: rawAccountData.Account,
        xAddress: xrpl.classicAddressToXAddress(rawAccountData.Account, false, true),
        xrpBalance: xrpl.dropsToXrp(rawAccountData.Balance)
    }
}

const prepareLedgerData = (rawLedgerData) => {
    const timestamp = RIPPLE_EPOCH + (rawLedgerData.ledger_time ?? rawLedgerData.close_time)
    const dateTime = new Date(timestamp * 1000)
    const dateTimeString = dateTime.toLocaleDateString() + ' ' + dateTime.toLocaleTimeString()

    return {
        ledgerIndex: rawLedgerData.ledger_index,
        ledgerHash: rawLedgerData.ledger_hash,
        ledgerCloseTime: dateTimeString
    }
}

module.exports = { prepareAccountData, prepareLedgerData }
Here we define three utility functions that will transform data we receive from the ledger into flat value objects for easy digestion in the frontend code. As we progress in this tutorial, we will keep this pattern of adding functionality by adding files that are prefixed by the step number.
- Modify
index.jsand addipcMainto the imports on therequire('electron')line. Then add the new helper file at the bottom of the include section:
// Step 3 code additions - start
const { app, BrowserWindow, ipcMain} = require('electron')
// Step 3 code additions - end
const path = require('path')
const xrpl = require("xrpl")
// Step 3 code additions - start
const { prepareAccountData, prepareLedgerData } = require('./library/3_helpers')
// Step 3 code additions - end

const TESTNET_URL = "wss://s.altnet.rippletest.net:51233"- Modify
index.jsin the following way:
const main = async () => {
  const appWindow = createWindow()

  // Step 3 code modifications - start
  ipcMain.on('address-entered', async (event, address) =>  {

    const client = new xrpl.Client(TESTNET_URL)

    await client.connect()

    // Reference: https://xrpl.org/subscribe.html
    await client.request({
      "command": "subscribe",
      "streams": ["ledger"],
      "accounts": [address]
    })

    // Reference: https://xrpl.org/subscribe.html#ledger-stream
    client.on("ledgerClosed", async (rawLedgerData) => {
      const ledger = prepareLedgerData(rawLedgerData)
      appWindow.webContents.send('update-ledger-data', ledger)
    })

    // Initial Ledger Request -> Get account details on startup
    // Reference: https://xrpl.org/ledger.html
    const ledgerResponse = await client.request({
      "command": "ledger"
    })
    const initialLedgerData = prepareLedgerData(ledgerResponse.result.closed.ledger)
    appWindow.webContents.send('update-ledger-data', initialLedgerData)

    // Reference: https://xrpl.org/subscribe.html#transaction-streams
    client.on("transaction", async (transaction) => {
      // Reference: https://xrpl.org/account_info.html
      const accountInfoRequest = {
        "command": "account_info",
        "account": address,
        "ledger_index": transaction.ledger_index
      }
      const accountInfoResponse = await client.request(accountInfoRequest)
      const accountData = prepareAccountData(accountInfoResponse.result.account_data)
      appWindow.webContents.send('update-account-data', accountData)
    })

    // Initial Account Request -> Get account details on startup
    // Reference: https://xrpl.org/account_info.html
    const accountInfoResponse = await client.request({
      "command": "account_info",
      "account": address,
      "ledger_index": "current"
    })
    const accountData = prepareAccountData(accountInfoResponse.result.account_data)
    appWindow.webContents.send('update-account-data', accountData)

  })
  // Step 3 code modifications - end
}
As the account we want to query is known only after the user enters an address, we had to wrap our application logic into an event handler:
ipcMain.on('address-entered', async (event, address) =>  {
  // ...
})
In addition to the subscription to the ledger stream we also can subscribe the client to specific addresses, and we use this feature here to subscribe to an account address which we are going to prompt the user for:
await client.request({
  "command": "subscribe",
  "streams": ["ledger"],
  "accounts": [address]
})
After this subscription our code attached listeners to the ledgerClosed and the transactions event. As soon as a transaction event is triggered, we do an account_info request to get the latest account status, as the transaction could have changed our account's state.
In addition to the subscriptions we added an initial ledger and accountInfo request to have some data at application startup. Otherwise we would see empty fields until something happened on the ledger that triggered one of our subscriptions.
- Now, add the following code to
preload.js:
const { contextBridge, ipcRenderer } = require('electron');

contextBridge.exposeInMainWorld('electronAPI', {
  onUpdateLedgerData: (callback) => {
    ipcRenderer.on('update-ledger-data', callback)
  },

  // Step 3 code additions - start
  onEnterAccountAddress: (address) => {
    ipcRenderer.send('address-entered', address)
  },
  onUpdateAccountData: (callback) => {
    ipcRenderer.on('update-account-data', callback)
  }
  //Step 3 code additions - end
})
Here is a notable difference from the previous step: previously we only used ipcRenderer to send events from the main logic to the frontend, but now we use it bidirectionally, also sending events from the frontend to the main logic:
onEnterAccountAddress: (address) => {
    ipcRenderer.send('address-entered', address)
}- Then, modify the
view/template.htmlby replacing the<body>with this markup:
<body>

    <h3>Build a XRPL Wallet - Part 3/8</h3>

    <fieldset>
        <legend>Account info</legend>
        Classic Address: <strong id="account-address-classic"></strong><br/>
        X-Address: <strong id="account-address-x"></strong><br/>
        XRP Balance: <strong id="account-balance"></strong><br/>
    </fieldset>

    <fieldset>
        <legend>Latest validated ledger stats</legend>
        Ledger Index: <strong id="ledger-index"></strong><br/>
        Ledger Hash: <strong id="ledger-hash"></strong><br/>
        Close Time: <strong id="ledger-close-time"></strong><br/>
    </fieldset>

    <dialog id="account-address-dialog">
        <form method="dialog">
            <div>
                <label for="address-input">Enter account address:</label>
                <input type="text" id="address-input" name="address-input" />
            </div>
            <div>
                <button type="submit">Confirm</button>
            </div>
        </form>
    </dialog>

</body>- To incorporate the refactored markup, handle the HTML dialog element and well as the new account data section replace the contents of
view/renderer.jswith the following code:
document.addEventListener('DOMContentLoaded', openAccountAddressDialog);

function openAccountAddressDialog(){
    const accountAddressDialog = document.getElementById('account-address-dialog');
    const accountAddressInput = accountAddressDialog.querySelector('input');
    const submitButton = accountAddressDialog.querySelector('button[type="submit"]');

    submitButton.addEventListener('click', () => {
        const address = accountAddressInput.value;
        window.electronAPI.onEnterAccountAddress(address)
        accountAddressDialog.close()
    });

    accountAddressDialog.showModal()
}

const ledgerIndexEl = document.getElementById('ledger-index')
const ledgerHashEl = document.getElementById('ledger-hash')
const ledgerCloseTimeEl = document.getElementById('ledger-close-time')

window.electronAPI.onUpdateLedgerData((_event, ledger) => {
    ledgerIndexEl.innerText = ledger.ledgerIndex
    ledgerHashEl.innerText = ledger.ledgerHash
    ledgerCloseTimeEl.innerText = ledger.ledgerCloseTime
})

const accountAddressClassicEl = document.getElementById('account-address-classic')
const accountAddressXEl = document.getElementById('account-address-x')
const accountBalanceEl = document.getElementById('account-balance')

window.electronAPI.onUpdateAccountData((_event, value) => {
    accountAddressClassicEl.innerText = value.classicAddress
    accountAddressXEl.innerText = value.xAddress
    accountBalanceEl.innerText = value.xrpBalance
})
The parts at the beginning and end are totally new, but the section in the middle is almost the same as before. The difference is that the names of a few fields have changed, since we're now passing them from prepareLedgerData(...). For example ledger.ledger_time is now ledger.ledgerCloseTime instead.
Now you need an XRPL account address to monitor. If you already have one or know where to find an example, you can now run the application by executing:
npm run startIf you need a Testnet address, you can get one from the faucet. Then you can paste that address into the Transaction Sender to send XRP transactions that your app can see.
On, startup, the application should display a simple dialog prompting the user for an XRPL account address. After entering the address the application should display some basic information about that account and about the ledger.
To run the reference application found in _code-samples/build-a-desktop-wallet/desktop-js for this step, run:
npm run accountFull code for this step: library/3_helpers.js, library/4_helpers.js, 4-tx-history/index.js, 4-tx-history/view/preload.js, 4-tx-history/view/renderer.js, 4-tx-history/view/template.html.
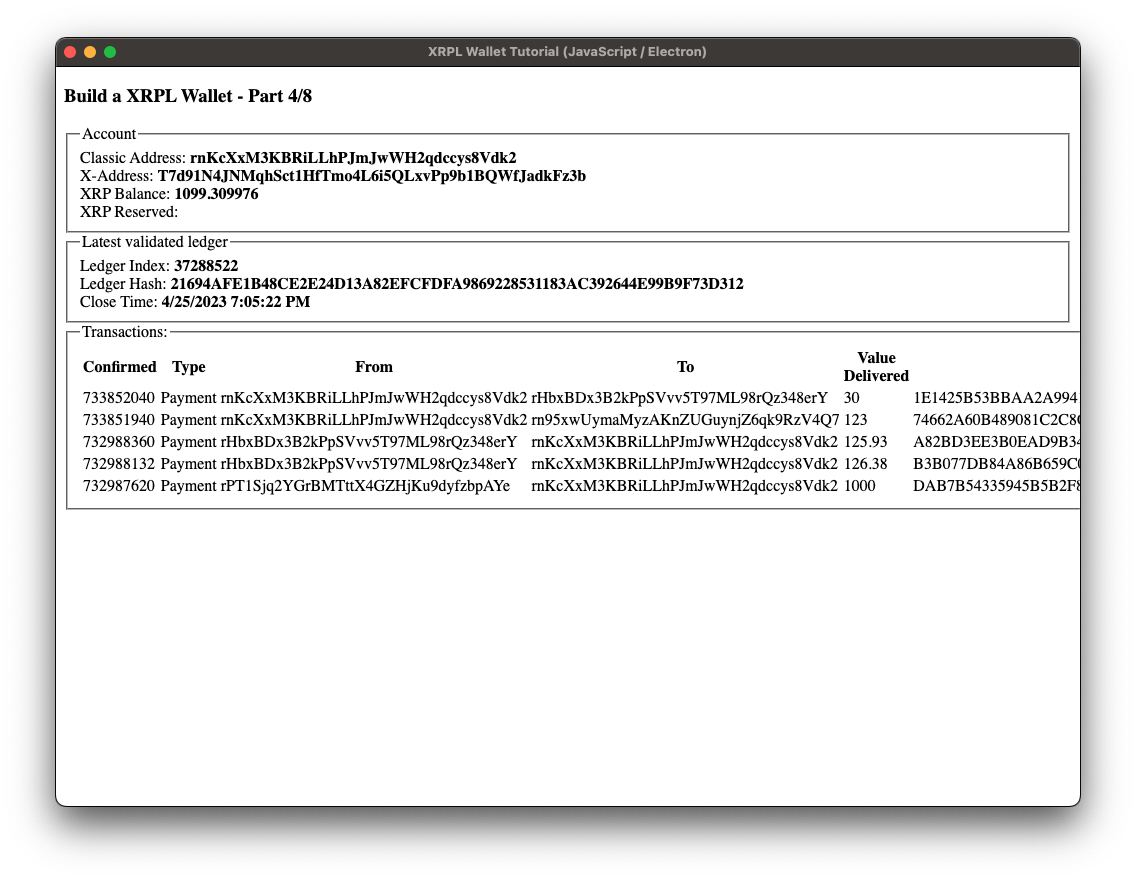
At this point, our wallet shows the account's balance getting updated, but doesn't give us any clue about how this state came about, namely the actual transactions that caused the updates. So, our next step is to display the account's up to date transaction history using subscriptions once again:
- In the
libraryfolder, add a new file4_helpers.js. Then add the following helper function to that file:
const xrpl = require("xrpl");

const prepareTxData = (transactions) => {
    return transactions.map(transaction => {
        let tx_value = "-"
        if (transaction.meta !== undefined && transaction.meta.delivered_amount !== undefined) {
            tx_value = getDisplayableAmount(transaction.meta.delivered_amount)
        }

        return {
            confirmed: transaction.close_time_iso,
            type: transaction.tx_json.TransactionType,
            from: transaction.tx_json.Account,
            to: transaction.tx_json.Destination ?? "-",
            value: tx_value,
            hash: transaction.hash
        }
    })
}

const getDisplayableAmount = (rawAmount) => {
    if (rawAmount === 'unavailable') {
        // Special case for pre-2014 partial payments.
        return rawAmount
    } else if (typeof rawAmount === 'string') {
        // It's an XRP amount in drops. Convert to decimal.
        return xrpl.dropsToXrp(rawAmount) + ' XRP'
    } else {
        //It's a token (IOU) amount.
        return rawAmount.value + ' ' + rawAmount.currency
    }
}

module.exports = { prepareTxData }- Now, in
index.js, require the new helper function at the bottom of the import section like so:
const { prepareAccountData, prepareLedgerData} = require('./library/3_helpers')
const { prepareTxData } = require('./library/4_helpers')- In
index.js, update the listener function subscribed to thetransactionto update the transaction table as new transactions come in:
// Wait for transaction on subscribed account and re-request account data
client.on("transaction", async (transaction) => {
  // Reference: https://xrpl.org/account_info.html
  const accountInfoRequest = {
    "command": "account_info",
    "account": address,
    "ledger_index": transaction.ledger_index
  }

  const accountInfoResponse = await client.request(accountInfoRequest)
  const accountData = prepareAccountData(accountInfoResponse.result.account_data)
  appWindow.webContents.send('update-account-data', accountData)

  // Step 4 code additions - start
  const transactions = prepareTxData([{tx: transaction.transaction}])
  appWindow.webContents.send('update-transaction-data', transactions)
  // Step 4 code additions - end

})- Still in
index.js, add a new section after the initial account request to populate the transactions table when the application starts:
// Initial Account Request -> Get account details on startup
// Reference: https://xrpl.org/account_info.html
const accountInfoResponse = await client.request({
    "command": "account_info",
    "account": address,
    "ledger_index": "current"
})
const accountData = prepareAccountData(accountInfoResponse.result.account_data)
appWindow.webContents.send('update-account-data', accountData)

// Step 4 code additions - start

// Initial Transaction Request -> List account transactions on startup
// Reference: https://xrpl.org/account_tx.html
const txResponse = await client.request({
    "command": "account_tx",
    "account": address
})
const transactions = prepareTxData(txResponse.result.transactions)
appWindow.webContents.send('update-transaction-data', transactions)

// Step 4 code additions - end- In
view/preload.js, add the following code at the bottom ofexposeInMainWorld():
contextBridge.exposeInMainWorld('electronAPI', {
  onUpdateLedgerData: (callback) => {
    ipcRenderer.on('update-ledger-data', callback)
  },
  onEnterAccountAddress: (address) => {
    ipcRenderer.send('address-entered', address)
  },
  onUpdateAccountData: (callback) => {
    ipcRenderer.on('update-account-data', callback)
  },

  // Step 4 code additions - start
  onUpdateTransactionData: (callback) => {
    ipcRenderer.on('update-transaction-data', callback)
  }
  // Step 4 code additions - end
})- Modify
view/template.htmlby adding a new fieldset below the ones that are already there:
        ...
        Close Time: <strong id="ledger-close-time"></strong><br/>
    </fieldset>

    <!-- Step 4 code additions - start -->
    <fieldset>
        <legend>Transactions:</legend>
        <table id="tx-table">
            <thead>
            <tr>
                <th>Confirmed</th>
                <th>Type</th>
                <th>From</th>
                <th>To</th>
                <th>Value Delivered</th>
                <th>Hash</th>
            </tr>
            </thead>
            <tbody></tbody>
        </table>
    </fieldset>
    <!-- Step 4 code additions - end -->

    <dialog id="account-address-dialog">
        <form method="dialog">
The table here will be filled dynamically with the account's transactions.
- Add the following code at the bottom of
view/renderer.js:
const txTableBodyEl = document.getElementById('tx-table').tBodies[0]
window.testEl = txTableBodyEl

window.electronAPI.onUpdateTransactionData((_event, transactions) => {
    for (let transaction of transactions) {
        txTableBodyEl.insertAdjacentHTML( 'beforeend',
        "<tr>" +
            "<td>" + transaction.confirmed + "</td>" +
            "<td>" + transaction.type + "</td>" +
            "<td>" + transaction.from + "</td>" +
            "<td>" + transaction.to + "</td>" +
            "<td>" + transaction.value + "</td>" +
            "<td>" + transaction.hash + "</td>" +
            "</tr>"
        )
    }
})
If you have come this far - congrats. Run the application by executing:
npm run startOur application should by now display all the stuff from the last step plus an additional list of transactions associated with the given account.
To run the reference application found in _code-samples/build-a-desktop-wallet/desktop-js for this step, run:
npm run tx-historyFull code for this step: library/3_helpers.js, library/4_helpers.js, library/5_helpers.js, 5-password/index.js, 5-password/view/preload.js, 5-password/view/template.html, 5-password/view/renderer.js.
After finishing this step the application should look like this:
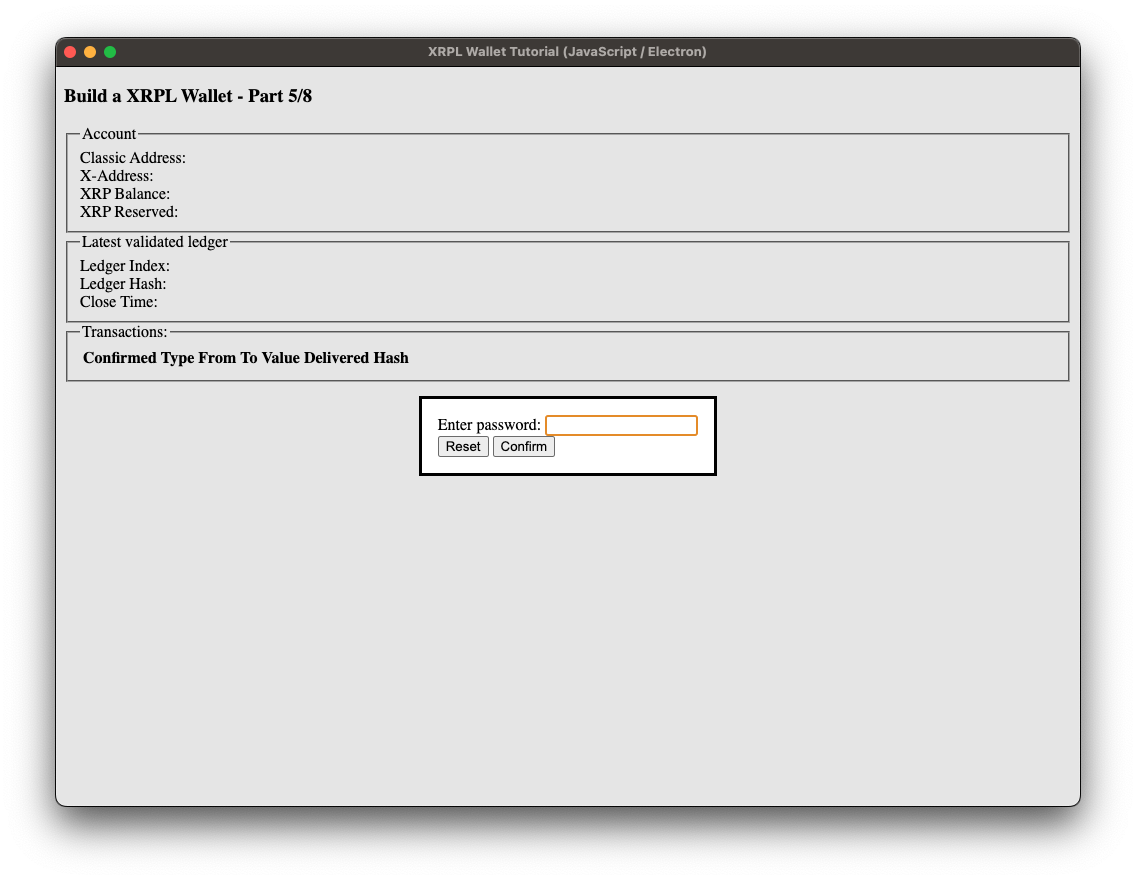
By now we always query the user for an account address at application startup. We more or less have a monitoring tool for accounts that queries publicly available data. Because we want to have real wallet functionality including sending XRP, we will have to deal with private keys and seeds.
In this step we will query the user for a seed and a password they can use to access it later. In order to protect the password, we'll add a salt to the password.
- In the
libraryfolder, add a new file5_helpers.jswith the following content:
const {prepareAccountData, prepareLedgerData} = require("./3_helpers");
const {prepareTxData} = require("./4_helpers");
const crypto = require("crypto");
const fs = require("fs");
const path = require("path");
const fernet = require("fernet");

/**
 * Fetches some initial data to be displayed on application startup
 *
 * @param client
 * @param wallet
 * @param appWindow
 * @returns {Promise<void>}
 */
const initialize = async (client, wallet, appWindow) => {
    // Reference: https://xrpl.org/docs/references/http-websocket-apis/public-api-methods/account-methods/account_info
    const accountInfoResponse = await client.request({
        "command": "account_info",
        "account": wallet.address,
        "ledger_index": "current"
    })
    const accountData = prepareAccountData(accountInfoResponse.result.account_data)
    appWindow.webContents.send('update-account-data', accountData)

    // Reference: https://xrpl.org/docs/references/http-websocket-apis/public-api-methods/account-methods/account_tx
    const txResponse = await client.request({
        "command": "account_tx",
        "account": wallet.address
    })
    const transactions = prepareTxData(txResponse.result.transactions)
    appWindow.webContents.send('update-transaction-data', transactions)
}

/**
 * Handles the subscriptions to ledger events and the internal routing of the responses
 *
 * @param client
 * @param wallet
 * @param appWindow
 * @returns {Promise<void>}
 */
const subscribe = async (client, wallet, appWindow) => {

    // Reference: https://xrpl.org/docs/references/http-websocket-apis/public-api-methods/subscription-methods/subscribe
    await client.request({
        "command": "subscribe",
        "streams": ["ledger"],
        "accounts": [wallet.address]
    })

    // Reference: https://xrpl.org/docs/references/http-websocket-apis/public-api-methods/subscription-methods/subscribe#ledger-stream
    client.on("ledgerClosed", async (rawLedgerData) => {
        const ledger = prepareLedgerData(rawLedgerData)
        appWindow.webContents.send('update-ledger-data', ledger)
    })

    // Wait for transaction on subscribed account and re-request account data
    client.on("transaction", async (transaction) => {
        // Reference: https://xrpl.org/docs/references/http-websocket-apis/public-api-methods/account-methods/account_info
        const accountInfoRequest = {
            "command": "account_info",
            "account": wallet.address,
            "ledger_index": transaction.ledger_index
        }

        const accountInfoResponse = await client.request(accountInfoRequest)
        const accountData = prepareAccountData(accountInfoResponse.result.account_data)
        appWindow.webContents.send('update-account-data', accountData)

        const transactions = prepareTxData([transaction])
        appWindow.webContents.send('update-transaction-data', transactions)
    })
}

/**
 * Saves the wallet seed using proper cryptographic functions
 *
 * @param WALLET_DIR
 * @param seed
 * @param password
 */
const saveSaltedSeed = (WALLET_DIR, seed, password)=> {
    const salt = crypto.randomBytes(20).toString('hex')

    fs.writeFileSync(path.join(__dirname, WALLET_DIR, 'salt.txt'), salt);

    // Hashing salted password using Password-Based Key Derivation Function 2
    const derivedKey = crypto.pbkdf2Sync(password, salt, 1000, 32, 'sha256')

    // Generate a Fernet secret we can use for symmetric encryption
    const secret = new fernet.Secret(derivedKey.toString('base64'));

    // Generate encryption token with secret, time and initialization vector
    // In a real-world use case we would have current time and a random IV,
    // but for demo purposes being deterministic is just fine
    const token = new fernet.Token({
        secret: secret,
        time: Date.parse(1),
        iv: [0, 1, 2, 3, 4, 5, 6, 7, 8, 9, 10, 11, 12, 13, 14, 15]
    })

    const privateKey = token.encode(seed)

    fs.writeFileSync(path.join(__dirname, WALLET_DIR, 'seed.txt'), privateKey)
}

/**
 * Loads the plaintext value of the encrypted seed
 *
 * @param WALLET_DIR
 * @param password
 * @returns {*}
 */
const loadSaltedSeed = (WALLET_DIR, password) => {
    const salt = fs.readFileSync(path.join(__dirname, WALLET_DIR, 'salt.txt')).toString()

    const encodedSeed = fs.readFileSync(path.join(__dirname, WALLET_DIR, 'seed.txt')).toString()

    // Hashing salted password using Password-Based Key Derivation Function 2
    const derivedKey = crypto.pbkdf2Sync(password, salt, 1000, 32, 'sha256')

    // Generate a Fernet secret we can use for symmetric encryption
    const secret = new fernet.Secret(derivedKey.toString('base64'));

    // Generate decryption token
    const token = new fernet.Token({
        secret: secret,
        token: encodedSeed,
        ttl: 0
    })

    return token.decode();
}

module.exports = { initialize, subscribe, saveSaltedSeed, loadSaltedSeed }- Modify the import section at the top of
index.jsto look like this:
const {app, BrowserWindow, ipcMain} = require('electron')
const fs = require('fs')
const path = require('path')
const xrpl = require("xrpl")
const { initialize, subscribe, saveSaltedSeed, loadSaltedSeed } = require('./library/5_helpers')

const TESTNET_URL = "wss://s.altnet.rippletest.net:51233"

const WALLET_DIR = 'Wallet'

const createWindow = () => {
Note that we have reduced the imports to one line since the new helper file imports and re-exports the other helper functions.
We also added a new constant containing the directory name where we are going to store our encrypted seed.
- In
index.jsreplace the existingmainfunction with the following one:
// Step 5 - new main function - start
const main = async () => {
    const appWindow = createWindow()

    // Create Wallet directory in case it does not exist yet
    if (!fs.existsSync(path.join(__dirname, WALLET_DIR))) {
        fs.mkdirSync(path.join(__dirname, WALLET_DIR));
    }

    let seed = null;

    ipcMain.on('seed-entered', async (event, providedSeed) => {
        seed = providedSeed
        appWindow.webContents.send('open-password-dialog')
    })

    ipcMain.on('password-entered', async (event, password) => {
        if (!fs.existsSync(path.join(__dirname, WALLET_DIR , 'seed.txt'))) {
            saveSaltedSeed(WALLET_DIR, seed, password)
        } else {
            try {
                seed = loadSaltedSeed(WALLET_DIR, password)
            } catch (error) {
                appWindow.webContents.send('open-password-dialog', true)
                return
            }
        }

        const wallet = xrpl.Wallet.fromSeed(seed)
        // For compatibility with seeds generated using secp256k1
        // (the old default algorithm), use the following instead:
        // const wallet = xrpl.Wallet.fromSeed(seed, {algorithm: "secp256k1"})

        const client = new xrpl.Client(TESTNET_URL)

        await client.connect()

        await subscribe(client, wallet, appWindow)

        await initialize(client, wallet, appWindow)
    })

    ipcMain.on('request-seed-change', (event) => {
        fs.rmSync(path.join(__dirname, WALLET_DIR , 'seed.txt'))
        fs.rmSync(path.join(__dirname, WALLET_DIR , 'salt.txt'))
        appWindow.webContents.send('open-seed-dialog')
    })

    // We have to wait for the application frontend to be ready, otherwise
    // we might run into a race condition and the open-dialog events
    // get triggered before the callbacks are attached
    appWindow.once('ready-to-show', () => {
        // If there is no seed present yet, ask for it, otherwise query for the password
        // for the seed that has been saved
        if (!fs.existsSync(path.join(__dirname, WALLET_DIR, 'seed.txt'))) {
            appWindow.webContents.send('open-seed-dialog')
        } else {
            appWindow.webContents.send('open-password-dialog')
        }
    })
}
Since we are now making this a full-fledged wallet, instead of asking the user for an address we will now be prompting the user for a seed and password to encrypt the seed. If there is already a seed, the user will only be asked for their password.
When using Wallet.fromSeed(...) you may get a different address than expected unless you explicitly specify the algorithm that was used when creating the key pair and funding the account. Versions 2.x and earlier of xrpl.js, as well as the rippled commandline and various other software, use the secp256k1 algorithm by default, but xrpl.js 3.x and up use Ed25519 by default. If you don't use the same algorithm, you won't be able to look up the correct account or send transactions.
- Then modify the
view/preload.jsfile (Note that theonEnterAccountAddressfunction is no longer needed):
contextBridge.exposeInMainWorld('electronAPI', {
  // Step 5 code additions - start
  onOpenSeedDialog: (callback) => {
    ipcRenderer.on('open-seed-dialog', callback)
  },
  onEnterSeed: (seed) => {
    ipcRenderer.send('seed-entered', seed)
  },
  onOpenPasswordDialog: (callback) => {
    ipcRenderer.on('open-password-dialog', callback)
  },
  onEnterPassword: (password) => {
    ipcRenderer.send('password-entered', password)
  },
  requestSeedChange: () => {
    ipcRenderer.send('request-seed-change')
  },
  // Step 5 code additions - end

  onUpdateLedgerData: (callback) => {
    ipcRenderer.on('update-ledger-data', callback)
},- Then, in
view/template.html, replace the existing HTML dialog element for the account with the new ones for seed and password:
    <dialog id="seed-dialog">
        <form method="dialog">
            <div>
                <label for="seed-input">Enter seed:</label>
                <input type="text" id="seed-input" name="seed-input" />
            </div>
            <div>
                <button type="submit">Confirm</button>
            </div>
        </form>
    </dialog>

    <dialog id="password-dialog">
        <form method="dialog">
            <div>
                <label for="password-input">Enter password (min-length 5):</label>
                <input type="text" id="password-input" name="password-input" /><br />
                <span class="invalid-password"></span>
            </div>
            <div>
                <button type="button">Change Seed</button>
                <button type="submit">Submit</button>
            </div>
        </form>
</dialog>- In
view/renderer.js, replace theopenAccountAddressDialogpart at the top:
// Remove the following section in Step 5
document.addEventListener('DOMContentLoaded', openAccountAddressDialog);

function openAccountAddressDialog(){
    const accountAddressDialog = document.getElementById('account-address-dialog');
    const accountAddressInput = accountAddressDialog.querySelector('input');
    const submitButton = accountAddressDialog.querySelector('button[type="submit"]');

    submitButton.addEventListener('click', () => {
        const address = accountAddressInput.value;
        window.electronAPI.onEnterAccountAddress(address)
        accountAddressDialog.close()
    });

    accountAddressDialog.showModal()
}
With this code:
const seedDialog = document.getElementById('seed-dialog')
const seedInput = seedDialog.querySelector('input')
const seedSubmitButton = seedDialog.querySelector('button[type="submit"]')

const seedSubmitFn = () => {
  const seed = seedInput.value
  window.electronAPI.onEnterSeed(seed)
  seedDialog.close()
}

window.electronAPI.onOpenSeedDialog((_event) => {
  seedSubmitButton.addEventListener('click', seedSubmitFn, {once : true});

  seedDialog.showModal()
})

const passwordDialog = document.getElementById('password-dialog')
const passwordInput = passwordDialog.querySelector('input')
const passwordError = passwordDialog.querySelector('span.invalid-password')
const passwordSubmitButton = passwordDialog.querySelector('button[type="submit"]')
const changeSeedButton = passwordDialog.querySelector('button[type="button"]')

const handlePasswordSubmitFn = () => {
  const password = passwordInput.value
  window.electronAPI.onEnterPassword(password)
  passwordDialog.close()
}

const handleChangeSeedFn = () => {
  passwordDialog.close()
  window.electronAPI.requestSeedChange()
}

window.electronAPI.onOpenPasswordDialog((_event, showInvalidPassword = false) => {
  if (showInvalidPassword) {
    passwordError.innerHTML = 'INVALID PASSWORD'
  }
  passwordSubmitButton.addEventListener('click', handlePasswordSubmitFn, {once : true});
  changeSeedButton.addEventListener('click', handleChangeSeedFn, {once : true});
  passwordDialog.showModal()
});
Start up the application:
npm run startOn first run, It should first prompt you for an account seed and then for a password.
You can generate a test account's seed via the testnet faucet.
After you have created a wallet this way, you should close the application and start it up a second time: On second run it should prompt you for the password, and you should see the same result as in the last step.
To run the reference application found in _code-samples/build-a-desktop-wallet/desktop-js for this step, run:
npm run passwordFull code for this step: library/3_helpers.js, library/4_helpers.js, library/5_helpers.js, 6-styling/index.js, 6-styling/view/preload.js, 6-styling/view/template.html, 6-styling/view/renderer.js, bootstrap/bootstrap.bundle.min.js, bootstrap/bootstrap.min.css, bootstrap/custom.css, bootstrap/XRPLedger_DevPortal-white.svg.
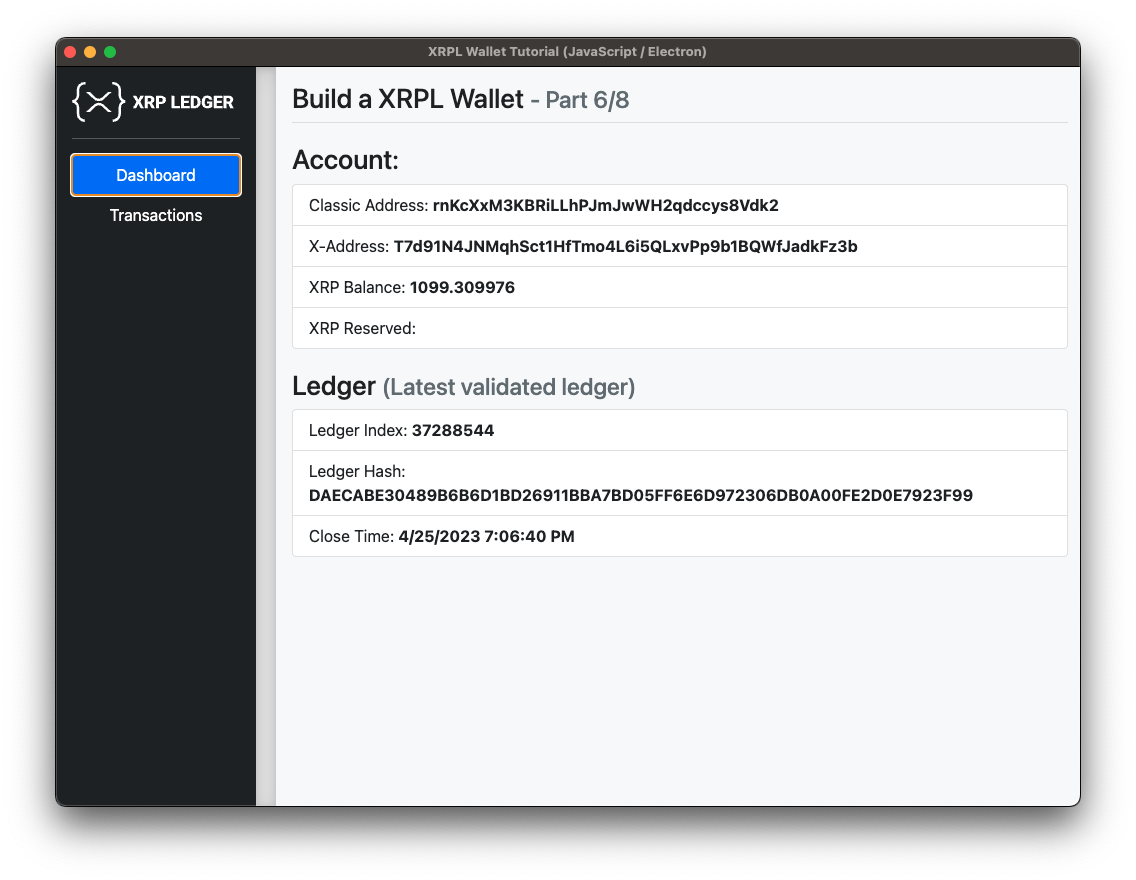
After finishing this step the application should look like this:
In the project root, create a new folder
bootstrapand add the following files into that directory:bootstrap.bundle.min.js,bootstrap.min.css,custom.css,XRPLedger_DevPortal-white.svgChange the content of
view/template.htmlto be the following code:
<!DOCTYPE html>
<html>

<head>
  <meta charset="UTF-8"/>
  <meta name="viewport" content="width=device-width, initial-scale=1">

  <title>XRPL Wallet Tutorial (JavaScript / Electron)</title>

  <link rel="stylesheet" href="../bootstrap/bootstrap.min.css"/>
  <link rel="stylesheet" href="../bootstrap/custom.css"/>
</head>

<body>

  <main class="bg-light">
    <div class="sidebar d-flex flex-column flex-shrink-0 p-3 text-white bg-dark">
      <a href="/" class="d-flex align-items-center mb-3 mb-md-0 me-md-auto text-white text-decoration-none">
        <img class="logo" height="40"/>
      </a>
      <hr>
      <ul class="nav nav-pills flex-column mb-auto" role="tablist">
        <li class="nav-item">
          <button class="nav-link active" id="dashboard-tab" data-bs-toggle="tab" data-bs-target="#dashboard"
                  type="button" role="tab" aria-controls="dashboard" aria-selected="true">
            Dashboard
          </button>
        </li>
        <li>
          <button class="nav-link" data-bs-toggle="tab" id="transactions-tab" data-bs-target="#transactions"
                  type="button" role="tab" aria-controls="transactions" aria-selected="false">
            Transactions
          </button>
        </li>
      </ul>
    </div>

    <div class="divider"></div>

    <div class="main-content tab-content d-flex flex-column flex-shrink-0 p-3">

      <div class="header border-bottom">
        <h3>
          Build a XRPL Wallet
          <small class="text-muted">- Part 6/8</small>
        </h3>
      </div>

      <div class="tab-pane fade show active" id="dashboard" role="tabpanel" aria-labelledby="dashboard-tab">
        <h3>Account:</h3>
        <ul class="list-group">
          <li class="list-group-item">Classic Address: <strong id="account-address-classic"></strong></li>
          <li class="list-group-item">X-Address: <strong id="account-address-x"></strong></li>
          <li class="list-group-item">XRP Balance: <strong id="account-balance"></strong></li>
        </ul>
        <div class="spacer"></div>
        <h3>
          Ledger
          <small class="text-muted">(Latest validated ledger)</small>
        </h3>
        <ul class="list-group">
          <li class="list-group-item">Ledger Index: <strong id="ledger-index"></strong></li>
          <li class="list-group-item">Ledger Hash: <strong id="ledger-hash"></strong></li>
          <li class="list-group-item">Close Time: <strong id="ledger-close-time"></strong></li>
        </ul>
      </div>

      <div class="tab-pane fade" id="transactions" role="tabpanel" aria-labelledby="transactions-tab">
        <h3>Transactions:</h3>
        <table id="tx-table" class="table">
          <thead>
          <tr>
            <th>Confirmed</th>
            <th>Type</th>
            <th>From</th>
            <th>To</th>
            <th>Value Delivered</th>
            <th>Hash</th>
          </tr>
          </thead>
          <tbody></tbody>
        </table>
      </div>

    </div>

  </main>

  <dialog id="seed-dialog">
    <form method="dialog">
      <div>
        <label for="seed-input">Enter seed:</label>
        <input type="text" id="seed-input" name="seed-input" />
      </div>
      <div>
        <button type="submit">Confirm</button>
      </div>
    </form>
  </dialog>

  <dialog id="password-dialog">
    <form method="dialog">
      <div>
        <label for="password-input">Enter password (min-length: 5):</label>
        <input type="text" id="password-input" name="password-input" />
      </div>
      <div>
        <button type="button">Change Seed</button>
        <button type="submit">Confirm</button>
      </div>
    </form>
  </dialog>

</body>

<script src="../bootstrap/bootstrap.bundle.min.js"></script>
<script src="renderer.js"></script>

</html>
Here we basically added the Boostrap Framework and a little custom styling to our application. We'll leave it at that for this Step - to get the application running at this stage of development, run the following command:
npm run startThis time the application should display a dashboard like layout with the XRP logo and a navigation ono the left side, and a content area comprising most of the screen. You should be able to switch from the dashboard to the transactions list and back.
To run the reference application found in _code-samples/build-a-desktop-wallet/desktop-js for this step, run:
npm run stylingFull code for this step: library/3_helpers.js, library/4_helpers.js, library/5_helpers.js, library/7_helpers.js, 7-send-xrp/index.js, 7-send-xrp/view/preload.js, 7-send-xrp/view/renderer.js, 7-send-xrp/view/template.html.
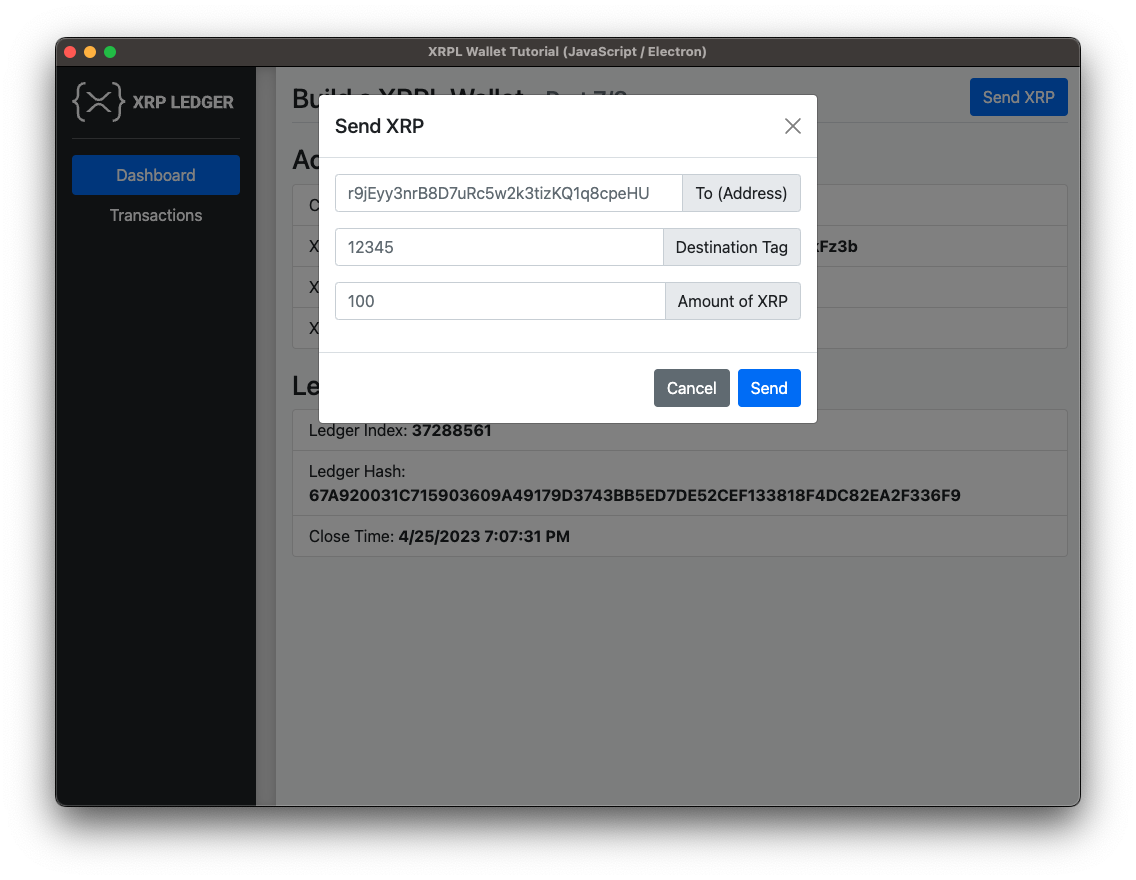
Up until now we have enabled our app to query and display data from the XRPL. Now it's time to actively participate in the ledger by enabling our application to send transactions. For now, we can stick to sending direct XRP payments because there are more complexities involved in sending issued tokens. After finishing this step the application should look like this:
- Create the file
library/7_helpers.jsand add the following contents:
const xrpl = require("xrpl");

/**
 * Prepares, signs and submits a payment transaction
 *
 * @param paymentData
 * @param client
 * @param wallet
 * @returns {Promise<*>}
 */
const sendXrp = async (paymentData, client, wallet) => {
    // Reference: https://xrpl.org/docs/references/protocol/transactions/types/payment
    const paymentTx = {
        "TransactionType": "Payment",
        "Account": wallet.address,
        "Amount": xrpl.xrpToDrops(paymentData.amount),
        "Destination": paymentData.destinationAddress,
        "DestinationTag": parseInt(paymentData.destinationTag)
    }

    const preparedTx = await client.autofill(paymentTx)

    const signedTx = wallet.sign(preparedTx)

    return  await client.submitAndWait(signedTx.tx_blob)
}

module.exports = { sendXrp }
(There was no 6-helpers.js, so don't worry!) 2. Add the new function to the import section in index.js:
const { initialize, subscribe, saveSaltedSeed, loadSaltedSeed } = require('./library/5_helpers')
const { sendXrp } = require('./library/7_helpers')- Still in
index.js, add an event listener handling thesend-xrp-eventfrom the frontend dialog:
        await initialize(client, wallet, appWindow)
        // Step 7 code additions - start
        ipcMain.on('send-xrp-action', (event, paymentData) => {
          sendXrp(paymentData, client, wallet).then((result) => {
            appWindow.webContents.send('send-xrp-transaction-finish', result)
          })
        })
// Step 7 code additions - start- Modify
view/preload.jsby adding two new functions:
    onClickSendXrp: (paymentData) => {
      ipcRenderer.send('send-xrp-action', paymentData)
    },
    onSendXrpTransactionFinish: (callback) => {
      ipcRenderer.on('send-xrp-transaction-finish', callback)
}- In
view/template.html, add a button to toggle the modal dialog housing the "Send XRP" logic:
    <div class="header border-bottom">
        <h3>
            Build a XRPL Wallet
            <small class="text-muted">- Part 7/8</small>
        </h3>
        <!-- Step 7 code additions - start -->
        <button type="button" class="btn btn-primary" id="send-xrp-modal-button">
            Send XRP
        </button>
        <!-- Step 7 code additions - end -->
</div>- In the same file, at the end of the
<main>section, add said modal dialog:
    <div class="modal fade" id="send-xrp-modal" tabindex="-1">
        <div class="modal-dialog">
            <div class="modal-content">
                <div class="modal-header">
                    <h1 class="modal-title fs-5" id="send-xrp-modal-label">Send XRP</h1>
                    <button type="button" class="btn-close" data-bs-dismiss="modal" aria-label="Close"></button>
                </div>
                <div class="modal-body">
                    <div class="input-group mb-3">
                        <input type="text" class="form-control" placeholder="r9jEyy3nrB8D7uRc5w2k3tizKQ1q8cpeHU" id="input-destination-address">
                        <span class="input-group-text">To (Address)</span>
                    </div>
                    <div class="input-group mb-3">
                        <input type="text" class="form-control" placeholder="12345" id="input-destination-tag">
                        <span class="input-group-text">Destination Tag</span>
                    </div>
                    <div class="input-group mb-3">
                        <input type="text" class="form-control" placeholder="100" id="input-xrp-amount">
                        <span class="input-group-text">Amount of XRP</span>
                    </div>
                </div>
                <div class="modal-footer">
                    <button type="button" class="btn btn-secondary" data-bs-dismiss="modal">Cancel</button>
                    <button type="button" class="btn btn-primary" id="send-xrp-submit-button">Send</button>
                </div>
            </div>
        </div>
</div>- Add the following code to the bottom of
view/renderer.js:
const modalButton = document.getElementById('send-xrp-modal-button')
const modalDialog = new bootstrap.Modal(document.getElementById('send-xrp-modal'))
modalButton.addEventListener('click', () => {
    modalDialog.show()
})

const destinationAddressEl = document.getElementById('input-destination-address')
const destinationTagEl = document.getElementById('input-destination-tag')
const amountEl = document.getElementById('input-xrp-amount')
const sendXrpButtonEl = document.getElementById('send-xrp-submit-button')

sendXrpButtonEl.addEventListener('click', () => {
    modalDialog.hide()
    const destinationAddress = destinationAddressEl.value
    const destinationTag = destinationTagEl.value
    const amount = amountEl.value

    window.electronAPI.onClickSendXrp({destinationAddress, destinationTag, amount})
})

window.electronAPI.onSendXrpTransactionFinish((_event, result) => {
    alert('Result: ' + result.result.meta.TransactionResult)
    destinationAddressEl.value = ''
    destinationTagEl.value = ''
    amountEl.value = ''
})
Now, Run the following command:
npm run startThe application should now display a "Send XRP" button in the top right corner, which should open a Modal dialog on clicking. You can use this Dialog to send XRP tokens from this account to another, and the balance update as well as the transaction should be reflected in the app.
If you need an account address to send the XRP to, you can create an account on the testnet.
To run the reference application found in _code-samples/build-a-desktop-wallet/desktop-js for this step, run:
npm run send-xrpFull code for this step: library/3_helpers.js, library/4_helpers.js, library/5_helpers.js, library/7_helpers.js, library/8_helpers.js, 8-domain-verification/index.js, 8-domain-verification/view/preload.js, 8-domain-verification/view/template.html, 8-domain-verification/view/renderer.js.
One of the biggest shortcomings of the wallet app from the previous step is that it doesn't provide a lot of protections or feedback for users to save them from human error and scams. These sorts of protections are extra important when dealing with the cryptocurrency space because decentralized systems like the XRP Ledger don't have an admin or support team one can ask to cancel or refund a payment if you made a mistake such as sending it to the wrong address.
This step shows how to add some checks on destination addresses to warn the user before sending XRP.
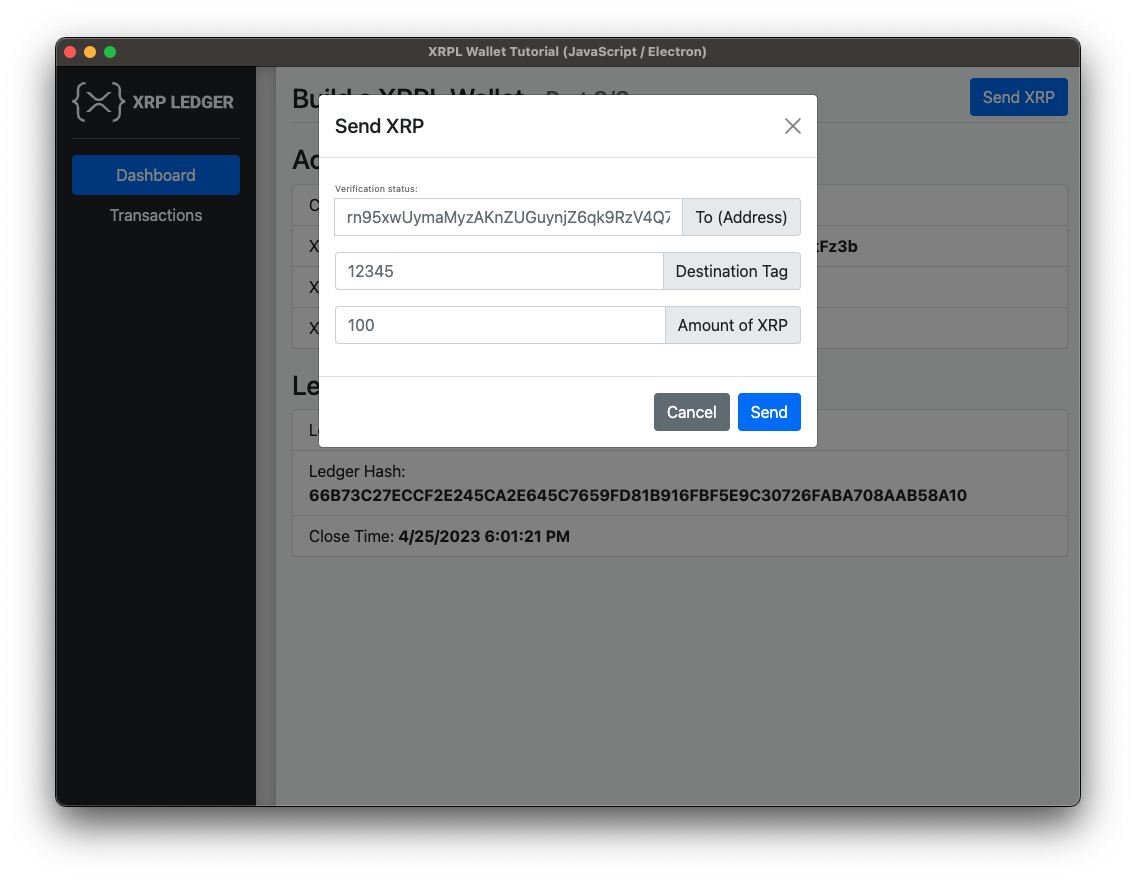
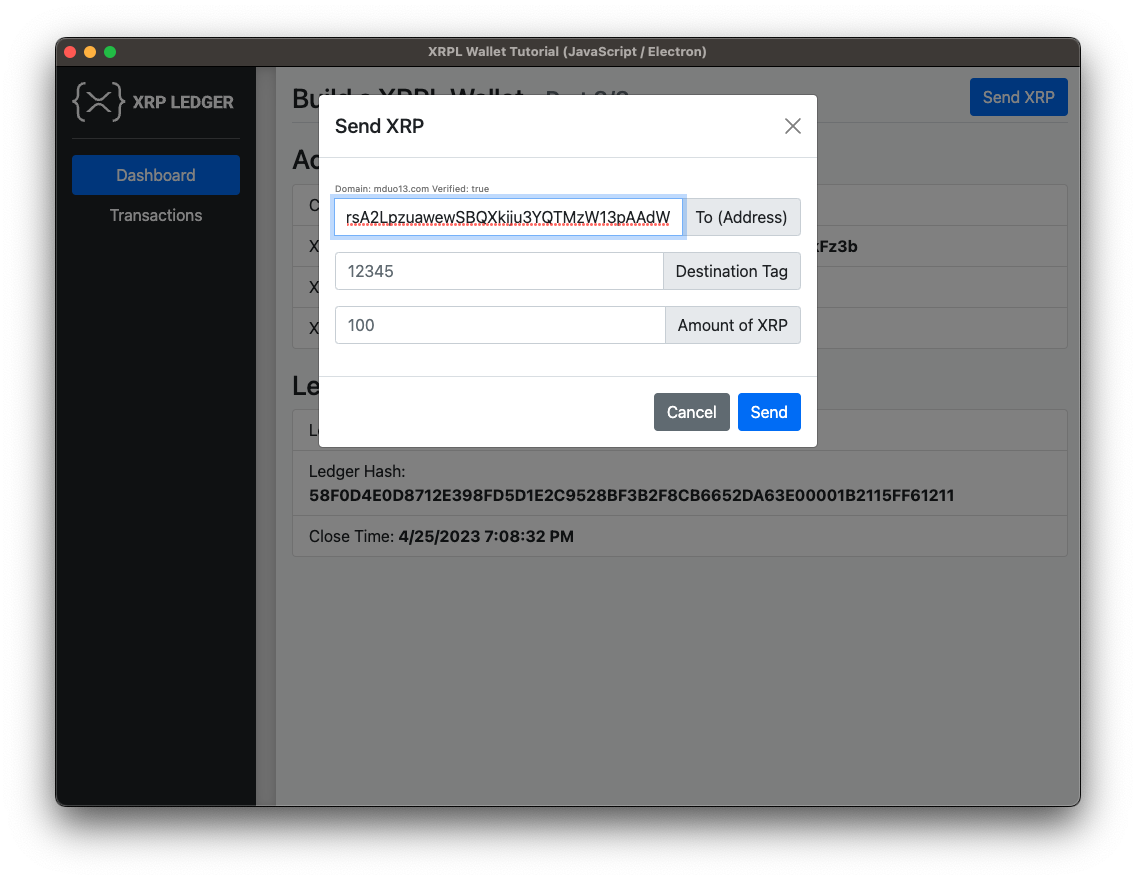
One type of check we could make is to verify the domain name associated with an XRP Ledger address; this is called account domain verification. When an account's domain is verified, we can could show it like this:
- In the
libraryfolder, add a new file8_helpers.js. Then add the following contents to that file:
const fetch = require('node-fetch')
const toml = require('toml');
const { convertHexToString } = require("xrpl/dist/npm/utils/stringConversion");

const lsfDisallowXRP = 0x00080000;

/*  Example lookups

    |------------------------------------|---------------|-----------|
    | Address                            | Domain        | Verified  |
    |------------------------------------|---------------|-----------|
    | rsA2LpzuawewSBQXkiju3YQTMzW13pAAdW | mduo13.com    | YES       |
    | rf1BiGeXwwQoi8Z2ueFYTEXSwuJYfV2Jpn | xrpl.org      | NO        |
    | rPT1Sjq2YGrBMTttX4GZHjKu9dyfzbpAYe | n/a           | NO        |
    |------------------------------------|---------------|-----------|
 */

/**
 * Check a potential destination address's details, and pass them back to the "Send XRP" dialog:
 * - Is the account funded? If not, payments below the reserve base will fail
 * - Do they have DisallowXRP enabled? If so, the user should be warned they don't want XRP, but can click through.
 * - Do they have a verified Domain? If so, we want to show the user the associated domain info.
 *
 * @param accountData
 * @returns {Promise<{domain: string, verified: boolean}|{domain: string, verified: boolean}>}
 */
async function checkDestination(accountData) {
    const accountStatus = {
        "funded": null,
        "disallow_xrp": null,
        "domain_verified": null,
        "domain_str": "" // the decoded domain, regardless of verification
    }

    accountStatus["disallow_xrp"] = !!(accountData & lsfDisallowXRP);

    return verifyAccountDomain(accountData)
}

/**
 * Verify an account using a xrp-ledger.toml file.
 * https://xrpl.org/docs/references/xrp-ledger-toml
 *
 * @param accountData
 * @returns {Promise<{domain: string, verified: boolean}>}
 */
async function verifyAccountDomain(accountData) {
    const domainHex = accountData["Domain"]
    if (!domainHex) {
        return {
            domain:"",
            verified: false
        }
    }

    let verified = false
    const domain = convertHexToString(domainHex)
    const tomlUrl = `https://${domain}/.well-known/xrp-ledger.toml`
    const tomlResponse = await fetch(tomlUrl)

    if (!tomlResponse.ok) {
        return {
            domain: domain,
            verified: false
        }
    }

    const tomlData = await tomlResponse.text()
    const parsedToml = toml.parse(tomlData)
    const tomlAccounts = parsedToml["ACCOUNTS"]

    for (const tomlAccount of tomlAccounts) {
        if (tomlAccount["address"] === accountData["Account"]) {
            verified = true
        }
    }

    return {
        domain: domain,
        verified: verified
    }
}

/**
 * Verifies if a given address has validated status
 *
 * @param accountAddress
 * @param client
 * @returns {Promise<{domain: string, verified: boolean}>}
 */
async function verify(accountAddress, client) {
    // Reference: https://xrpl.org/docs/references/http-websocket-apis/public-api-methods/account-methods/account_info
    const request = {
        "command": "account_info",
        "account": accountAddress,
        "ledger_index": "validated"
    }

    try {
        const response = await client.request(request)
        return await checkDestination(response.result.account_data)
    } catch (err) {
        return {
            domain: '',
            verified: false
        }
    }
}

module.exports = { verify }
The code in 8_helpers.js looks up the account on the ledger by sending an account_info request.
If the account does exist, the code checks for the lsfDisallowXRP flag.
- Import the new helper function in
index.js:
const { initialize, subscribe, saveSaltedSeed, loadSaltedSeed } = require('./library/5_helpers')
const { sendXrp } = require('./library/7_helpers')
// Step 8 code additions - start
const { verify } = require('./library/8_helpers')
// Step 8 code additions - end- After the callback function
ipcMain.on('send-xrp-action', callback)add the following event handler:
ipcMain.on('send-xrp-action', (event, paymentData) => {
  sendXrp(paymentData, client, wallet).then((result) => {
    appWindow.webContents.send('send-xrp-transaction-finish', result)
  })
})

// Step 8 code additions - start
ipcMain.on('destination-account-change', (event, destinationAccount) => {
  verify(destinationAccount, client).then((result) => {
    appWindow.webContents.send('update-domain-verification-data', result)
  })
})
// Step 8 code additions - end- Modify
view/preload.jsand add the following two functions to'electronAPI':
onDestinationAccountChange: (callback) => {
  ipcRenderer.send('destination-account-change', callback)
},
onUpdateDomainVerificationData: (callback) => {
  ipcRenderer.on('update-domain-verification-data', callback)
}
Finally, the code decodes the account's Domain field, if present, and performs domain verification using the method imported above.
- Update the view logic - in
view/template.htmladd the following lines just before the<input>element withid="input-destination-address:
<div class="input-group mb-3">
    <!-- Step 8 code additions - start -->
    <div class="accountVerificationIndicator">
        <span>Verification status:</span>
    </div>
    <!-- Step 8 code additions - end -->
    <input type="text" class="form-control" placeholder="r9jEyy3nrB8D7uRc5w2k3tizKQ1q8cpeHU" id="input-destination-address">
    <span class="input-group-text">To (Address)</span>
</div>- Lastly, modify the renderer as described below:
modalButton.addEventListener('click', () => {
    modalDialog.show()
})

// Step 8 code additions - start
const accountVerificationEl = document.querySelector('.accountVerificationIndicator span')
// Step 8 code additions - end

const destinationAddressEl = document.getElementById('input-destination-address')
const destinationTagEl = document.getElementById('input-destination-tag')
const amountEl = document.getElementById('input-xrp-amount')
const sendXrpButtonEl = document.getElementById('send-xrp-submit-button')

// Step 8 code additions - start
destinationAddressEl.addEventListener('input', (event) => {
    window.electronAPI.onDestinationAccountChange(destinationAddressEl.value)
})

window.electronAPI.onUpdateDomainVerificationData((_event, result) => {
    accountVerificationEl.textContent = `Domain: ${result.domain || 'n/a'} Verified: ${result.verified}`
})
// Step 8 code additions - end

sendXrpButtonEl.addEventListener('click', () => {
    modalDialog.hide()
    const destinationAddress = destinationAddressEl.value
    const destinationTag = destinationTagEl.value
    const amount = amountEl.value

    window.electronAPI.onClickSendXrp({destinationAddress, destinationTag, amount})
})
Run the following command:
npm run startTest your wallet app the same way you did in the previous steps. It should display a hint about the receiving account when opening up the "Send XRP" dialog and entering the address. To test domain verification, try entering the following addresses in the "To" box of the Send XRP dialog:
| Address | Domain | Verified? |
|---|---|---|
rsA2LpzuawewSBQXkiju3YQTMzW13pAAdW | mduo13.com | ✅ Yes |
rf1BiGeXwwQoi8Z2ueFYTEXSwuJYfV2Jpn | xrpl.org | ❌ No |
rPT1Sjq2YGrBMTttX4GZHjKu9dyfzbpAYe | (Not set) | ❌ No |
To run the reference application, run:
npm run domain-verificationCongratulations, you now have created your own wallet application! In completing this tutorial, you've not only learned how to interact with the XRP Ledger, but also which challenges this provokes when building a user facing application. So let's do a recap of what you have accomplished:

- First you set up the project and created a basic electron application.
- In Step 1 you did your first ledger query and had the application display the latest closed ledger index, using Electron's inter-process-communication.
- You expanded on that in Step 2, where you established a permanent subscription to the XRPL and had the application display ledger updates in real time.
- In Step 3 you had the application monitor a specific account, prompting the user for an account address and having data flow bi-directionally from
ipcRendertoipcMainand back. - You then added a dynamic list of the account's transaction to the application.
- In Step 5 you implemented a password-protected seed vault, so that secret information can remain protected when not in use.
- Then you gave the application a facelift by adding bootstrap and restructuring the template.
- In Step 7 you added wallet functionalities to what was so far a monitoring application by adding a dialog and the corresponding backend functionality to transfer XRP.
- Finally, you stepped into some finer details of XRPL development by implementing the domain verification check.