This tutorial demonstrates how to build a desktop wallet for the XRP Ledger using the Python programming language and various libraries. This application can be used as a starting point for building a more complete and powerful application, as a reference point for building comparable apps, or as a learning experience to better understand how to integrate XRP Ledger functionality into a larger project.
To complete this tutorial, you should meet the following guidelines:
- You have Python 3.7 or higher installed.
- You are somewhat familiar with object-oriented programming in Python and have completed the Get Started Using Python tutorial.
- You have some understanding of what the XRP Ledger can do and of cryptocurrency in general. You don't need to be an expert.
You can find the complete source code for all of this tutorial's examples in the code samples section of this website's repository.
At the end of this tutorial, you should have a Python application that looks something like this:
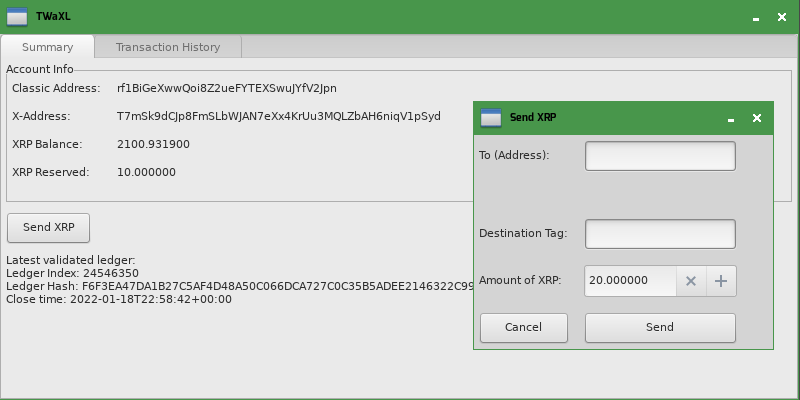
The exact look and feel of the user interface depend on your computer's operating system. This application is capable of the following:
- Shows updates to the XRP Ledger in real-time.
- Can view any XRP Ledger account's activity "read-only" including showing how much XRP was delivered by each transaction.
- Shows how much XRP is set aside for the account's reserve requirement.
- Can send direct XRP payments, and provides feedback about the intended destination address, including:
- Whether the intended destination already exists in the XRP Ledger, or the payment would have to fund its creation.
- If the address doesn't want to receive XRP (Disallow XRP flag enabled).
- If the address has a verified domain name associated with it.
The application in this tutorial doesn't have the ability to send or trade tokens or use other payment types like Escrow or Payment Channels. However, it provides a foundation that you can implement those and other features on top of.
Other topics mentioned in this tutorial include graphical user interface (GUI) programming, threading, and asynchronous (async) code in Python.
This tutorial depends on various programming libraries. Before you get started coding, you should install all of them as follows:
pip3 install --upgrade xrpl-py wxPython requests toml(On some systems, the command may be pip or you may need to use sudo pip3 instead.)
This installs and upgrades the following Python libraries:
- xrpl-py, a client library for the XRP Ledger. This tutorial requires version 1.3.0 or higher.
- wxPython, a cross-platform graphical toolkit.
- Requests, a library for making HTTP requests.
- toml, a library for parsing TOML-formatted files.
The requests and toml libraries are only needed for the domain verification in step 6, but you can install them now while you're installing other dependencies.
On Windows, you can build apps using either Windows natively or by using the Windows Subsystem for Linux (WSL).
On native Windows, the GUI uses native Windows controls and should run without any dependencies beyond those mentioned above.
On WSL, you may need to install libnotify-dev as follows:
apt-get install libnotify-devIf you have trouble installing wxPython on WSL, you can also try installing it this way:
python -m pip install -U -f https://extras.wxpython.org/wxPython4/extras/linux/gtk3/ubuntu-18.04 wxPythonThe first step is to build an app that combines the "hello world" equivalents for the XRP Ledger and wxPython programming. The code is as follows:
# "Build a Wallet" tutorial, step 1: slightly more than "Hello World"
# This step demonstrates a simple GUI and XRPL connectivity.
# License: MIT. https://github.com/XRPLF/xrpl-dev-portal/blob/master/LICENSE
import xrpl
import wx
class TWaXLFrame(wx.Frame):
"""
Tutorial Wallet for the XRP Ledger (TWaXL)
user interface, main frame.
"""
def __init__(self, url):
wx.Frame.__init__(self, None, title="TWaXL", size=wx.Size(800,400))
self.client = xrpl.clients.JsonRpcClient(url)
main_panel = wx.Panel(self)
self.ledger_info = wx.StaticText(main_panel,
label=self.get_validated_ledger())
def get_validated_ledger(self):
try:
response = self.client.request(xrpl.models.requests.Ledger(
ledger_index="validated"
))
except Exception as e:
return f"Failed to get validated ledger from server. ({e})"
if response.is_successful():
return f"Latest validated ledger: {response.result['ledger_index']}"
else:
# Connected to the server, but the request failed. This can
# happen if, for example, the server isn't synced to the network
# so it doesn't have the latest validated ledger.
return f"Server returned an error: {response.result['error_message']}"
if __name__ == "__main__":
JSON_RPC_URL = "https://s.altnet.rippletest.net:51234/"
app = wx.App()
frame = TWaXLFrame(JSON_RPC_URL)
frame.Show()
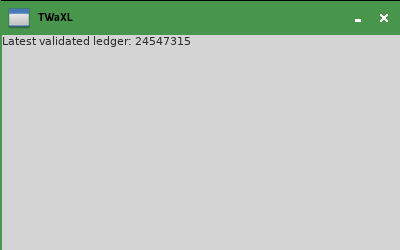
app.MainLoop()When you run this script, it displays a single window that (hopefully) shows the latest validated ledger index on the XRP Ledger Testnet. It looks like this:
Under the hood, the code makes a JSON-RPC client, connects to a public Testnet server, and uses the ledger method to get this information. Meanwhile, it creates a wx.Frame subclass as the base of the user interface. This class makes a window the user can see, with a wx.StaticText widget to display text to the user, and a wx.Panel to hold that widget.
Full code for this step: 2_threaded.py.
You may have noticed that the app in step 1 only shows the latest validated ledger at the time you opened it: the text displayed never changes unless you close the app and reopen it. The actual XRP Ledger is constantly making forward progress, so a more useful app would show it, something like this:
If you want to continually watch the ledger for updates (for example, waiting to see when new transactions have been confirmed), then you need to change the architecture of your app slightly. For reasons specific to Python, it's best to use two threads: a "GUI" thread to handle user input and display, and a "worker" thread for XRP Ledger network connectivity. The operating system can switch quickly between the two threads at any time, so the user interface can remain responsive while the background thread waits on information from the network that may take a while to arrive.
The main challenge with threads is that you have to be careful not to access data from one thread that another thread may be in the middle of changing. A straightforward way to do this is to design your program so that each thread has variables it "owns" and doesn't write to the other thread's variables. In this program, each thread is its own class, so each thread should only write to its own class attributes (anything starting with self.). When the threads need to communicate, they use specific, "thread-safe" methods of communication, namely:
- For GUI to worker thread, use
asyncio.run_coroutine_threadsafe(). - For worker to GUI communications, use
wx.CallAfter().
To make full use of the XRP Ledger's ability to push messages to the client, use xrpl-py's AsyncWebsocketClient instead of JsonRpcClient. This lets you "subscribe" to updates using asynchronous code, while also performing other request/response actions in response to various events such as user input.
Add these imports to the top of the file:
import asyncio
from threading import Thread
Then, the code for the monitor thread is as follows (put this in the same file as the rest of the app):
class XRPLMonitorThread(Thread):
    """
    A worker thread to watch for new ledger events and pass the info back to
    the main frame to be shown in the UI. Using a thread lets us maintain the
    responsiveness of the UI while doing work in the background.
    """
    def __init__(self, url, gui):
        Thread.__init__(self, daemon=True)
        # Note: For thread safety, this thread should treat self.gui as
        # read-only; to modify the GUI, use wx.CallAfter(...)
        self.gui = gui
        self.url = url
        self.loop = asyncio.new_event_loop()
        asyncio.set_event_loop(self.loop)
        self.loop.set_debug(True)

    def run(self):
        """
        This thread runs a never-ending event-loop that monitors messages coming
        from the XRPL, sending them to the GUI thread when necessary, and also
        handles making requests to the XRPL when the GUI prompts them.
        """
        self.loop.run_forever()

    async def watch_xrpl(self):
        """
        This is the task that opens the connection to the XRPL, then handles
        incoming subscription messages by dispatching them to the appropriate
        part of the GUI.
        """

        async with xrpl.asyncio.clients.AsyncWebsocketClient(self.url) as self.client:
            await self.on_connected()
            async for message in self.client:
                mtype = message.get("type")
                if mtype == "ledgerClosed":
                    wx.CallAfter(self.gui.update_ledger, message)

    async def on_connected(self):
        """
        Set up initial subscriptions and populate the GUI with data from the
        ledger on startup. Requires that self.client be connected first.
        """
        # Set up a subscriptions for new ledgers
        response = await self.client.request(xrpl.models.requests.Subscribe(
            streams=["ledger"]
        ))
        # The immediate response contains details for the last validated ledger.
        # We can use this to fill in that area of the GUI without waiting for a
        # new ledger to close.
        wx.CallAfter(self.gui.update_ledger, response.result)
This code defines a Thread subclass for the worker. When the thread starts, it sets up an event loop, which waits for async tasks to be created and run. The code uses asyncio's Debug Mode so that the console shows any errors that occur in async tasks.
The watch_xrpl() function is an example of a such a task (which the GUI thread starts when it's ready): it connects to the XRP Ledger, then calls the subscribe method to be notified whenever a new ledger is validated. It uses the immediate response and all later subscription stream messages to trigger updates of the GUI.
async def instead of def so that you can use the await keyword in them; you need to use await to get the response to the AsyncWebsocketClient.request() method. Normally, you would also need to use await or something similar to get the response from any function you define with async def; but, in this app, the run_bg_job() helper takes care of that in a different way.Update the code for the main thread and GUI frame to look like this:
class TWaXLFrame(wx.Frame):
    """
    Tutorial Wallet for the XRP Ledger (TWaXL)
    user interface, main frame.
    """
    def __init__(self, url):
        wx.Frame.__init__(self, None, title="TWaXL", size=wx.Size(800,400))

        self.build_ui()

        # Start background thread for updates from the ledger ------------------
        self.worker = XRPLMonitorThread(url, self)
        self.worker.start()
        self.run_bg_job(self.worker.watch_xrpl())

    def build_ui(self):
        """
        Called during __init__ to set up all the GUI components.
        """
        main_panel = wx.Panel(self)
        self.ledger_info = wx.StaticText(main_panel, label="Not connected")

        main_sizer = wx.BoxSizer(wx.VERTICAL)
        main_sizer.Add(self.ledger_info, 1, flag=wx.EXPAND|wx.ALL, border=5)
        main_panel.SetSizer(main_sizer)

    def run_bg_job(self, job):
        """
        Schedules a job to run asynchronously in the XRPL worker thread.
        The job should be a Future (for example, from calling an async function)
        """
        task = asyncio.run_coroutine_threadsafe(job, self.worker.loop)

    def update_ledger(self, message):
        """
        Process a ledger subscription message to update the UI with
        information about the latest validated ledger.
        """
        close_time_iso = xrpl.utils.ripple_time_to_datetime(message["ledger_time"]).isoformat()
        self.ledger_info.SetLabel(f"Latest validated ledger:\n"
                         f"Ledger Index: {message['ledger_index']}\n"
                         f"Ledger Hash: {message['ledger_hash']}\n"
                         f"Close time: {close_time_iso}")
The part that builds the GUI has been moved to a separate method, build_ui(self). This helps to divide the code into chunks that are easier to understand, because the __init__() constructor has other work to do now, too: it starts the worker thread, and gives it its first job. The GUI setup also now uses a sizer to control placement of the text within the frame.
There's a new helper method, run_bg_job(), which runs an asynchronous function (defined with async def) in the worker thread. Use this method any time you want the worker thread to interact with the XRP Ledger network.
Instead of a get_validated_ledger() method, the GUI class now has an update_ledger() method, which takes an object in the format of a ledger stream message and displays some of that information to the user. The worker thread calls this method using wx.CallAfter() whenever it gets a ledgerClosed event from the ledger.
Finally, change the code to start the app (at the end of the file) slightly:
if __name__ == "__main__":
    WS_URL = "wss://s.altnet.rippletest.net:51233" # Testnet
    app = wx.App()
    frame = TWaXLFrame(WS_URL)
    frame.Show()
    app.MainLoop()
Since the app uses a WebSocket client instead of the JSON-RPC client now, the code has to use a WebSocket URL to connect.
xrpld server you can connect to it using ws://localhost:6006 as the URL. You can also use the WebSocket URLs of public servers to connect to the Mainnet or other test networks.If you get an error like this, you may need to make sure your operating system's certificate authority store is updated:
[SSL: CERTIFICATE_VERIFY_FAILED] certificate verify failed: unable to get local issuer certificateOn macOS, run the Install Certificates.command for your Python version.
On Windows, open Edge or Chrome and browse to https://s1.ripple.com, then close the page. This should be enough to update your system's certificates. (It doesn't work if you use Firefox or Safari, because those browser's don't use Windows' certificate validation APIs.)
Full code for this step: 3_account.py
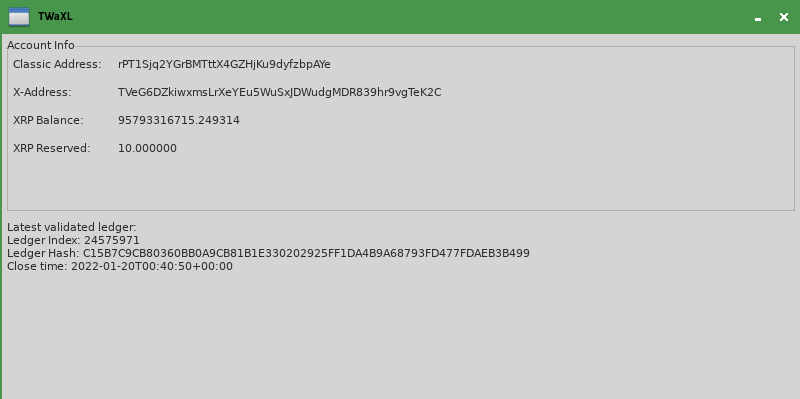
Now that you have a working, ongoing connection to the XRP Ledger, it's time to start adding some "wallet" functionality that lets you manage an individual account. For this step, you should prompt the user to input their address or master seed, then use that to display information about their account including how much XRP is set aside for the reserve requirement.
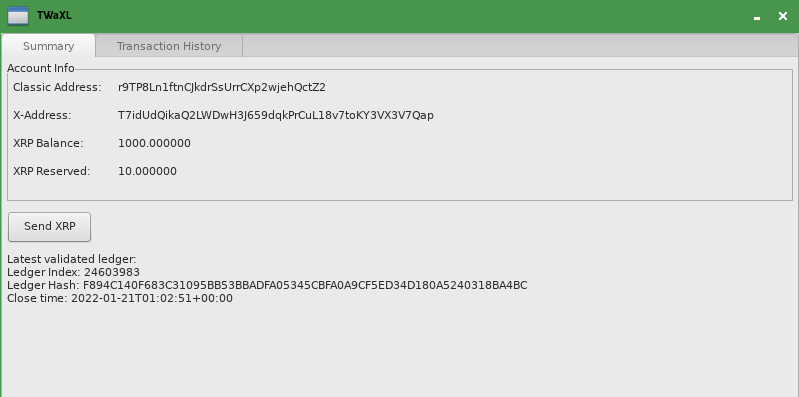
The prompt is in a pop-up dialog like this:

After the user inputs the prompt, the updated GUI looks like this:
When you do math on XRP amounts, you should use the Decimal class so that you don't get rounding errors. Add this to the top of the file, with the other imports:
from decimal import DecimalIn the XRPLMonitorThread class, rename and update the watch_xrpl() method as follows:
    async def watch_xrpl_account(self, address, wallet=None):
        """
        This is the task that opens the connection to the XRPL, then handles
        incoming subscription messages by dispatching them to the appropriate
        part of the GUI.
        """
        self.account = address
        self.wallet = wallet

        async with xrpl.asyncio.clients.AsyncWebsocketClient(self.url) as self.client:
            await self.on_connected()
            async for message in self.client:
                mtype = message.get("type")
                if mtype == "ledgerClosed":
                    wx.CallAfter(self.gui.update_ledger, message)
                elif mtype == "transaction":
                    response = await self.client.request(xrpl.models.requests.AccountInfo(
                        account=self.account,
                        ledger_index=message["ledger_index"]
                    ))
                    wx.CallAfter(self.gui.update_account, response.result["account_data"])
The newly renamed watch_xrpl_account() method now takes an address and optional wallet and saves them for later. (The GUI thread provides these based on user input.) This method also adds a new case for transaction stream messages. When it sees a new transaction, the worker does not yet do anything with the transaction itself, but it uses that as a trigger to get the account's latest XRP balance and other info using the account_info method. When that response arrives, the worker passes the account data to the GUI for display.
Still in the XRPLMonitorThread class, update the on_connected() method as follows:
    async def on_connected(self):
        """
        Set up initial subscriptions and populate the GUI with data from the
        ledger on startup. Requires that self.client be connected first.
        """
        # Set up 2 subscriptions: all new ledgers, and any new transactions that
        # affect the chosen account.
        response = await self.client.request(xrpl.models.requests.Subscribe(
            streams=["ledger"],
            accounts=[self.account]
        ))
        # The immediate response contains details for the last validated ledger.
        # We can use this to fill in that area of the GUI without waiting for a
        # new ledger to close.
        wx.CallAfter(self.gui.update_ledger, response.result)

        # Get starting values for account info.
        response = await self.client.request(xrpl.models.requests.AccountInfo(
            account=self.account,
            ledger_index="validated"
        ))
        if not response.is_successful():
            print("Got error from server:", response)
            # This most often happens if the account in question doesn't exist
            # on the network we're connected to. Better handling would be to use
            # wx.CallAfter to display an error dialog in the GUI and possibly
            # let the user try inputting a different account.
            exit(1)
        wx.CallAfter(self.gui.update_account, response.result["account_data"])
The on_connected() method now subscribes to transactions for the provided account (and the ledger stream too). Furthermore, it now calls account_info on startup, and passes the response to the GUI for display.
The new GUI has a lot more fields that need to be laid out in two dimensions. The following subclass of wx.GridBagSizer provides a quick way to do so, setting the appropriate padding and sizing values for a two-dimensional list of widgets. Add this code to the same file:
class AutoGridBagSizer(wx.GridBagSizer):
    """
    Helper class for adding a bunch of items uniformly to a GridBagSizer.
    """
    def __init__(self, parent):
        wx.GridBagSizer.__init__(self, vgap=5, hgap=5)
        self.parent = parent

    def BulkAdd(self, ctrls):
        """
        Given a two-dimensional iterable `ctrls`, add all the items in a grid
        top-to-bottom, left-to-right, with each inner iterable being a row. Set
        the total number of columns based on the longest iterable.
        """
        flags = wx.EXPAND|wx.ALL|wx.RESERVE_SPACE_EVEN_IF_HIDDEN|wx.ALIGN_CENTER_VERTICAL
        for x, row in enumerate(ctrls):
            for y, ctrl in enumerate(row):
                self.Add(ctrl, (x,y), flag=flags, border=5)
        self.parent.SetSizer(self)
Update the TWaXLFrame's constructor as follows:
    def __init__(self, url, test_network=True):
        wx.Frame.__init__(self, None, title="TWaXL", size=wx.Size(800,400))

        self.test_network = test_network
        # The ledger's current reserve settings. To be filled in later.
        self.reserve_base = None
        self.reserve_inc = None

        self.build_ui()

        # Pop up to ask user for their account ---------------------------------
        address, wallet = self.prompt_for_account()
        self.classic_address = address

        # Start background thread for updates from the ledger ------------------
        self.worker = XRPLMonitorThread(url, self)
        self.worker.start()
        self.run_bg_job(self.worker.watch_xrpl_account(address, wallet))
Now the constructor takes a boolean to indicate whether it's connecting to a test network. (If you provide a Mainnet URL, you should also pass False.) It uses this to encode and decode X-addresses and warn if they're intended for a different network. It also calls a new method, prompt_for_account() to get an address and wallet, and passes those to the renamed watch_xrpl_account() background job.
Update the build_ui() method definition as follows:
    def build_ui(self):
        """
        Called during __init__ to set up all the GUI components.
        """
        main_panel = wx.Panel(self)

        self.acct_info_area = wx.StaticBox(main_panel, label="Account Info")

        lbl_address = wx.StaticText(self.acct_info_area, label="Classic Address:")
        self.st_classic_address = wx.StaticText(self.acct_info_area, label="TBD")
        lbl_xaddress = wx.StaticText(self.acct_info_area, label="X-Address:")
        self.st_x_address = wx.StaticText(self.acct_info_area, label="TBD")
        lbl_xrp_bal = wx.StaticText(self.acct_info_area, label="XRP Balance:")
        self.st_xrp_balance = wx.StaticText(self.acct_info_area, label="TBD")
        lbl_reserve = wx.StaticText(self.acct_info_area, label="XRP Reserved:")
        self.st_reserve = wx.StaticText(self.acct_info_area, label="TBD")

        aia_sizer = AutoGridBagSizer(self.acct_info_area)
        aia_sizer.BulkAdd( ((lbl_address, self.st_classic_address),
                           (lbl_xaddress, self.st_x_address),
                           (lbl_xrp_bal, self.st_xrp_balance),
                           (lbl_reserve, self.st_reserve)) )

        self.ledger_info = wx.StaticText(main_panel, label="Not connected")

        main_sizer = wx.BoxSizer(wx.VERTICAL)
        main_sizer.Add(self.acct_info_area, 1, flag=wx.EXPAND|wx.ALL, border=5)
        main_sizer.Add(self.ledger_info, 1, flag=wx.EXPAND|wx.ALL, border=5)
        main_panel.SetSizer(main_sizer)
This adds a wx.StaticBox with several new widgets, then uses the AutoGridBagSizer (defined above) to lay them out in 2×4 grid within the box. These new widgets are all static text to display details of the account, though some of them start with placeholder text. (Since they require data from the ledger, you have to wait for the worker thread to send that data back.)
wallet variable, it does not save it as a property of the object. This is because the wallet mostly needs to be managed by the worker thread, not the GUI thread, and updating it in both places might not be thread-safe.Add a new prompt_for_account() method to the TWaXLFrame class:
    def prompt_for_account(self):
        """
        Prompt the user for an account to use, in a base58-encoded format:
        - master key seed: Grants read-write access.
          (assumes the master key pair is not disabled)
        - classic address. Grants read-only access.
        - X-address. Grants read-only access.

        Exits with error code 1 if the user cancels the dialog, if the input
        doesn't match any of the formats, or if the user inputs an X-address
        intended for use on a different network type (test/non-test).

        Populates the classic address and X-address labels in the UI.

        Returns (classic_address, wallet) where wallet is None in read-only mode
        """
        account_dialog = wx.TextEntryDialog(self,
                "Please enter an account address (for read-only)"
                " or your secret (for read-write access)",
                caption="Enter account",
                value="rPT1Sjq2YGrBMTttX4GZHjKu9dyfzbpAYe")
        account_dialog.Bind(wx.EVT_TEXT, self.toggle_dialog_style)

        if account_dialog.ShowModal() != wx.ID_OK:
            # If the user presses Cancel on the account entry, exit the app.
            exit(1)

        value = account_dialog.GetValue().strip()
        account_dialog.Destroy()

        classic_address = ""
        wallet = None
        x_address = ""

        if xrpl.core.addresscodec.is_valid_xaddress(value):
            x_address = value
            classic_address, dest_tag, test_network = xrpl.core.addresscodec.xaddress_to_classic_address(value)
            if test_network != self.test_network:
                on_net = "a test network" if self.test_network else "Mainnet"
                print(f"X-address {value} is meant for a different network type"
                      f"than this client is connected to."
                      f"(Client is on: {on_net})")
                exit(1)

        elif xrpl.core.addresscodec.is_valid_classic_address(value):
            classic_address = value
            x_address = xrpl.core.addresscodec.classic_address_to_xaddress(
                    value, tag=None, is_test_network=self.test_network)

        else:
            try:
                # Check if it's a valid seed
                seed_bytes, alg = xrpl.core.addresscodec.decode_seed(value)
                wallet = xrpl.wallet.Wallet.from_seed(seed=value)
                x_address = wallet.get_xaddress(is_test=self.test_network)
                classic_address = wallet.address
            except Exception as e:
                print(e)
                exit(1)

        # Update the UI with the address values
        self.st_classic_address.SetLabel(classic_address)
        self.st_x_address.SetLabel(x_address)

        return classic_address, wallet
The constructor calls this method to prompt the user for their address or master seed, then processes the user input to decode whatever value the user put in, and use it accordingly. With wxPython, you usually follow this pattern with dialog boxes:
- Create a new instance of a dialog class, such as a
wx.TextEntryDialog. - Use
showModal()to display it to the user and get a return code based on which button the user clicked. - If the user clicked OK, get a value the user input. This example gets the text the user entered in the box.
- Destroy the dialog instance. If you forget to do this, the application can leak memory whenever the user opens a new dialog.
From there, the prompt_for_account() code branches based on whether the input is a classic address, X-address, seed, or not a valid value at all. Assuming the value decodes successfully, it updates the wx.StaticText widgets with both the classic and X-address equivalents of the address and returns them. (As noted above, the constructor passes these values to the worker thread.)
This code also binds an event handler, which is a method that is called whenever a certain type of thing happens to a particular part of the GUI, usually based on the user's actions. In this case, the trigger is wx.EVT_TEXT on the dialog, which triggers immediately when the user types or pastes anything into the dialog's text box.
Add the following method to TWaXLFrame class to define the handler:
    def toggle_dialog_style(self, event):
        """
        Automatically switches to a password-style dialog if it looks like the
        user is entering a secret key, and display ***** instead of s12345...
        """
        dlg = event.GetEventObject()
        v = dlg.GetValue().strip()
        if v[:1] == "s":
            dlg.SetWindowStyle(wx.TE_PASSWORD)
        else:
            dlg.SetWindowStyle(wx.TE_LEFT)
Event handlers generally take one positional argument, a wx.Event object which describes the exact event that occurred. In this case, the handler uses this object to find out what value the user input. If the input looks like a master seed (it starts with the letter "s"), the handler switches the dialog to a "password" style that masks the user input, so people viewing the user's screen won't see the secret. And, if the user erases it and switches back to inputting an address, the handler toggles the style back.
Add the following lines at the end of the update_ledger() method:
        # Save reserve settings so we can calculate account reserve
        self.reserve_base = xrpl.utils.drops_to_xrp(str(message["reserve_base"]))
        self.reserve_inc = xrpl.utils.drops_to_xrp(str(message["reserve_inc"]))
This saves the ledger's current reserves settings, so that you can use them to calculate the account's total amount of XRP reserved. Add the following method to the TWaXLFrame class, to do exactly that:
    def calculate_reserve_xrp(self, owner_count):
        """
        Calculates how much XRP the user needs to reserve based on the account's
        OwnerCount and the reserve values in the latest ledger.
        """
        if self.reserve_base == None or self.reserve_inc == None:
            return None
        oc_decimal = Decimal(owner_count)
        reserve_xrp = self.reserve_base + (self.reserve_inc * oc_decimal)
        return reserve_xrp
Add an update_account() method to the TWaXLFrame class:
    def update_account(self, acct):
        """
        Update the account info UI based on an account_info response.
        """
        xrp_balance = str(xrpl.utils.drops_to_xrp(acct["Balance"]))
        self.st_xrp_balance.SetLabel(xrp_balance)

        # Display account reserve.
        reserve_xrp = self.calculate_reserve_xrp(acct.get("OwnerCount", 0))
        if reserve_xrp != None:
            self.st_reserve.SetLabel(str(reserve_xrp))
The worker thread calls this method to pass account details to the GUI for display.
Lastly, towards the end of the file, in the if __name__ == "__main__": block, update the line that instantiates the TWaXLFrame class to pass the new test_net parameter:
frame = TWaXLFrame(WS_URL, test_network=True)
(If you change the code to connect to a Mainnet server URL, also change this value to False.)
To test your wallet app with your own test account, first go to the Testnet Faucet and Get Testnet credentials. Save the address and secret key somewhere, and try your wallet app with either one. Then, to see balance changes, go to the Transaction Sender and paste your address into the Destination Address field. Click Initialize and try out some of the transaction types there, and see if the balance displayed by your wallet app updates as you expect.
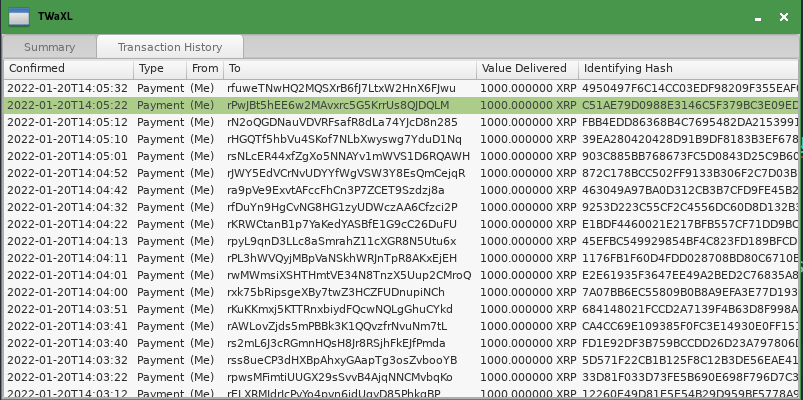
Full code for this step: 4_tx_history.py
At this point, your wallet shows the account's balance getting updated, but doesn't show you anything about the actual transactions that caused the updates. So, the next step is to display the account's transaction history (and keep it updated).
The new transaction history displays in a new tab, like this:
Additionally, the app can produce desktop notifications (sometimes called "toasts"), which might look like this depending on your operating system:

First, add the following imports to get GUI classes for the table view and notifications:
import wx.dataview
import wx.adv
Next, update the watch_xrpl_account() method of the worker class to pass transaction details to the GUI when you receive a transaction subscription message. This requires only one line:
wx.CallAfter(self.gui.add_tx_from_sub, message)The complete method should look like this:
    async def watch_xrpl_account(self, address, wallet=None):
        """
        This is the task that opens the connection to the XRPL, then handles
        incoming subscription messages by dispatching them to the appropriate
        part of the GUI.
        """
        self.account = address
        self.wallet = wallet

        async with xrpl.asyncio.clients.AsyncWebsocketClient(self.url) as self.client:
            await self.on_connected()
            async for message in self.client:
                mtype = message.get("type")
                if mtype == "ledgerClosed":
                    wx.CallAfter(self.gui.update_ledger, message)
                elif mtype == "transaction":
                    wx.CallAfter(self.gui.add_tx_from_sub, message)
                    response = await self.client.request(xrpl.models.requests.AccountInfo(
                        account=self.account,
                        ledger_index=message["ledger_index"]
                    ))
                    wx.CallAfter(self.gui.update_account, response.result["account_data"])
Have the worker use the account_tx method to look up the account's transaction history and pass it to the GUI. This method gets a list of transactions that affected an account, including transactions from, to, or passing through the account in question, starting with the most recent by default. Add new code to the end of the XRPLMonitorThread's on_connected() method, as follows:
        # Get the first page of the account's transaction history. Depending on
        # the server we're connected to, the account's full history may not be
        # available.
        response = await self.client.request(xrpl.models.requests.AccountTx(
            account=self.account
        ))
wx.CallAfter(self.gui.update_account_tx, response.result)Now, edit the build_ui() method of the TWaXLFrame class. Update the beginning of the method to add a new wx.Notebook, which makes a "tabs" interface, and make the main_panel into the first tab, as follows:
    def build_ui(self):
        """
        Called during __init__ to set up all the GUI components.
        """
        self.tabs = wx.Notebook(self, style=wx.BK_DEFAULT)
        # Tab 1: "Summary" pane ------------------------------------------------
        main_panel = wx.Panel(self.tabs)
        self.tabs.AddPage(main_panel, "Summary")
Additionally, add a new tab for the transaction history to the end of the build_ui() method, as follows:
{{ include_code("_code-samples/build-a-desktop-wallet/py/4_tx_history.py", language="py", start_with="Tab 2: "Transaction History"", end_before="def run_bg_job") }}
This adds a second tab containing a wx.dataview.DataViewListCtrl, which is capable of displaying a bunch of info as a table. It sets up the table columns to show some relevant details of the account's transactions.
Add the following helper method to the TWaXLFrame class:
    def displayable_amount(self, a):
        """
        Convert an arbitrary amount value from the XRPL to a string to be
        displayed to the user:
        - Convert drops of XRP to 6-decimal XRP (e.g. '12.345000 XRP')
        - For issued tokens, show amount, currency code, and issuer. For
          example, 100 USD issued by address r12345... is returned as
          '100 USD.r12345...'

        Leaves non-standard (hex) currency codes as-is.
        """
        if a == "unavailable":
            # Special case for pre-2014 partial payments.
            return a
        elif type(a) == str:
            # It's an XRP amount in drops. Convert to decimal.
            return f"{xrpl.utils.drops_to_xrp(a)} XRP"
        else:
            # It's a token amount.
            return f"{a['value']} {a['currency']}.{a['issuer']}"
This method takes a currency amount and converts it into a string for display to a human. Since it's used with the delivered_amount field in particular, it also handles the special case for pre-2014 partial payments where the delivered amount is unavailable.
After that, add another helper method to the TWaXLFrame class:
    def add_tx_row(self, t, prepend=False):
        """
        Add one row to the account transaction history control. Helper function
        called by other methods.
        """
        conf_dt = xrpl.utils.ripple_time_to_datetime(t["tx"]["date"])
        # Convert datetime to locale-default representation & time zone
        confirmation_time = conf_dt.astimezone().strftime("%c")

        tx_hash = t["tx"]["hash"]
        tx_type = t["tx"]["TransactionType"]
        from_acct = t["tx"].get("Account") or ""
        if from_acct == self.classic_address:
            from_acct = "(Me)"
        to_acct = t["tx"].get("Destination") or ""
        if to_acct == self.classic_address:
            to_acct = "(Me)"

        delivered_amt = t["meta"].get("delivered_amount")
        if delivered_amt:
            delivered_amt = self.displayable_amount(delivered_amt)
        else:
            delivered_amt = ""

        cols = (confirmation_time, tx_type, from_acct, to_acct, delivered_amt,
                tx_hash, str(t))
        if prepend:
            self.tx_list.PrependItem(cols)
        else:
            self.tx_list.AppendItem(cols)
This method takes a transaction object, parses some of its fields into formats more suitable for displaying to users, and then adds it to the DataViewListCtrl in the transaction history tab.
Add a method to the TWaXLFrame class to update the transaction history based on the account_tx response from the worker thread, as follows:
    def update_account_tx(self, data):
        """
        Update the transaction history tab with information from an account_tx
        response.
        """
        txs = data["transactions"]
        # Note: if you extend the code to do paginated responses, you might want
        # to keep previous history instead of deleting the contents first.
        self.tx_list.DeleteAllItems()
        for t in txs:
            self.add_tx_row(t)
Lastly, add a similar method to the TWaXLFrame to add a single transaction to the transaction history table whenever the worker thread passes a transaction subscription message:
    def add_tx_from_sub(self, t):
        """
        Add 1 transaction to the history based on a subscription stream message.
        Assumes only validated transaction streams (e.g. transactions, accounts)
        not proposed transaction streams.

        Also, send a notification to the user about it.
        """
        # Convert to same format as account_tx results
        t["tx"] = t["transaction"]

        self.add_tx_row(t, prepend=True)
        # Scroll to top of list.
        self.tx_list.EnsureVisible(self.tx_list.RowToItem(0))

        # Send a notification message (aka a "toast") about the transaction.
        # Note the transaction stream and account_tx include all transactions
        # that "affect" the account, no just ones directly from/to the account.
        # For example, if the account has issued tokens, it gets notified when
        # other users transfer those tokens among themselves.
        notif = wx.adv.NotificationMessage(title="New Transaction", message =
                f"New {t['tx']['TransactionType']} transaction confirmed!")
        notif.SetFlags(wx.ICON_INFORMATION)
        notif.Show()
As before, you can test your wallet app with your own test account if you use the Testnet Faucet and the Transaction Sender. On the Faucet page, select Get Testnet credentials (or use the same credentials from before). Input either the address or secret when you open your wallet app. On the Transaction Sender page, paste your address into the Destination Address field, click Initialize, then click various transaction buttons to see how your wallet displays the results.
Full code for this step: 5_send_xrp.py
Until now, you've made the app able to view data from the ledger, and it's capable of showing the transactions an account has received. Now it's finally time to make the app capable of sending transactions. For now, you can stick to sending direct XRP payments because there are more complexities involved in sending issued tokens.
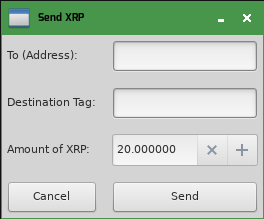
The main window gets a new "Send XRP" button:
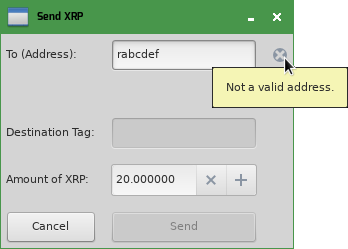
Clicking this button opens a dialog where the user can enter the details of the payment:
First, add the regular expressions library to the list of imports at the top of the file:
import reIn the XRPLMonitorThread class, add the following lines to the on_connected() method, anywhere after getting a successful account_info response:
        if self.wallet:
            wx.CallAfter(self.gui.enable_readwrite)
Add a new method to the XRPLMonitorThread class to send an XRP payment based on data the user provides, and alert the GUI when it has been sent:
    async def send_xrp(self, paydata):
        """
        Prepare, sign, and send an XRP payment with the provided parameters.
        Expects a dictionary with:
        {
            "dtag": Destination Tag, as a string, optional
            "to": Destination address (classic or X-address)
            "amt": Amount of decimal XRP to send, as a string
        }
        """
        dtag = paydata.get("dtag", "")
        if dtag.strip() == "":
            dtag = None
        if dtag is not None:
            try:
                dtag = int(dtag)
                if dtag < 0 or dtag > 2**32-1:
                    raise ValueError("Destination tag must be a 32-bit unsigned integer")
            except ValueError as e:
                print("Invalid destination tag:", e)
                print("Canceled sending payment.")
                return

        tx = xrpl.models.transactions.Payment(
            account=self.account,
            destination=paydata["to"],
            amount=xrpl.utils.xrp_to_drops(paydata["amt"]),
            destination_tag=dtag
        )
        # Autofill provides a sequence number, but this may fail if you try to
        # send too many transactions too fast. You can send transactions more
        # rapidly if you track the sequence number more carefully.
        tx_signed = await xrpl.asyncio.transaction.autofill_and_sign(
                tx, self.client, self.wallet)
        await xrpl.asyncio.transaction.submit(tx_signed, self.client)
        wx.CallAfter(self.gui.add_pending_tx, tx_signed)
In this flow, the app sends the transaction without waiting for it to be confirmed by the consensus process. You should be careful to mark any results from the initial submission as "pending" or "tentative" since the actual result of the transaction isn't final until it's confirmed. Since the app is also subscribed to the account's transactions, it automatically gets notified when the transaction is confirmed.
Now, create a custom dialog for the user to input the necessary details for the payment:
class SendXRPDialog(wx.Dialog):
    """
    Pop-up dialog that prompts the user for the information necessary to send a
    direct XRP-to-XRP payment on the XRPL.
    """
    def __init__(self, parent):
        wx.Dialog.__init__(self, parent, title="Send XRP")
        sizer = AutoGridBagSizer(self)
        self.parent = parent

        lbl_to = wx.StaticText(self, label="To (Address):")
        lbl_dtag = wx.StaticText(self, label="Destination Tag:")
        lbl_amt = wx.StaticText(self, label="Amount of XRP:")
        self.txt_to = wx.TextCtrl(self)
        self.txt_dtag = wx.TextCtrl(self)
        self.txt_amt = wx.SpinCtrlDouble(self, value="20.0", min=0.000001)
        self.txt_amt.SetDigits(6)
        self.txt_amt.SetIncrement(1.0)

        # The "Send" button is functionally an "OK" button except for the text.
        self.btn_send = wx.Button(self, wx.ID_OK, label="Send")
        btn_cancel = wx.Button(self, wx.ID_CANCEL)

        sizer.BulkAdd(((lbl_to, self.txt_to),
                       (lbl_dtag, self.txt_dtag),
                       (lbl_amt, self.txt_amt),
                       (btn_cancel, self.btn_send)) )
        sizer.Fit(self)

        self.txt_dtag.Bind(wx.EVT_TEXT, self.on_dest_tag_edit)
        self.txt_to.Bind(wx.EVT_TEXT, self.on_to_edit)

    def get_payment_data(self):
        """
        Construct a dictionary with the relevant payment details to pass to the
        worker thread for making a payment. Called after the user clicks "Send".
        """
        return {
            "to": self.txt_to.GetValue().strip(),
            "dtag": self.txt_dtag.GetValue().strip(),
            "amt": self.txt_amt.GetValue(),
        }
This subclass of wx.Dialog has several custom widgets, which are laid out using the GridBagSizer defined earlier. Notably, it has text boxes for the "To" address, the amount of XRP, and the destination tag to use, if any. (A destination tag is kind of like a phone extension for an XRP Ledger address: for addresses owned by individuals, you don't need it, but if the destination address has many users then you need to specify it so that the destination knows which recipient you intended. It's common to need a destination tag to deposit at a cryptocurrency exchange.) The dialog also has OK and Cancel buttons, which automatically function to cancel or complete the dialog, although the "OK" button is labeled "Send" instead to make it clearer what the app does when the user clicks it.
The SendXRPDialog constructor also binds two event handlers for when the user inputs text in the "to" and "destination tag" fields, so you need the definitions for those handlers to the same class. First, add on_to_edit():
    def on_to_edit(self, event):
        """
        When the user edits the "To" field, check that the address is valid.
        """
        v = self.txt_to.GetValue().strip()

        if not (xrpl.core.addresscodec.is_valid_classic_address(v) or
                xrpl.core.addresscodec.is_valid_xaddress(v) ):
            self.btn_send.Disable()
        elif v == self.parent.classic_address:
            self.btn_send.Disable()
        else:
            self.btn_send.Enable()
This checks the "To" address to ensure that it matches two conditions:
- It's a validly formatted classic address or X-address.
- It's not the user's own address—you can't send XRP to yourself.
If either condition is not met, the handler disables the "Send" button for this dialog. If both conditions are met, it enables the "Send" button.
Next, add the on_dest_tag_edit() handler, also as a method of the SendXRPDialog class:
    def on_dest_tag_edit(self, event):
        """
        When the user edits the Destination Tag field, strip non-numeric
        characters from it.
        """
        v = self.txt_dtag.GetValue().strip()
        v = re.sub(r"[^0-9]", "", v)
        self.txt_dtag.ChangeValue(v) # SetValue would generate another EVT_TEXT
        self.txt_dtag.SetInsertionPointEnd()
In other GUI toolkits, you might be able to use a dedicated number entry control for the Destination Tag field, but with wxPython there is only a generic text entry field, so the on_dest_tag_edit() handler makes it behave more like a number-only control by instantly deleting any non-numeric characters the user tries to enter in the field.
From here, you need to edit the TWaXLFrame class. First, in the build_ui() method, you need to add a new "Send XRP" button, and bind it to a new event handler. Add the following lines before the code to add things to the sizer:
        # Send XRP button. Disabled until we have a secret key & network connection
        self.sxb = wx.Button(main_panel, label="Send XRP")
        self.sxb.SetToolTip("Disabled in read-only mode.")
        self.sxb.Disable()
        self.Bind(wx.EVT_BUTTON, self.click_send_xrp, source=self.sxb)
Still in the build_ui() method, add the new button to the main_sizer so it fits nicely in between the account info area and the ledger info area. The sizer code at the end of the "Tab 1" section should look like the following, including one new line and the previous (unchanged) lines:
        main_sizer = wx.BoxSizer(wx.VERTICAL)
        main_sizer.Add(self.acct_info_area, 1, flag=wx.EXPAND|wx.ALL, border=5)
        main_sizer.Add(self.sxb, 0, flag=wx.ALL, border=5)
        main_sizer.Add(self.ledger_info, 1, flag=wx.EXPAND|wx.ALL, border=5)
        main_panel.SetSizer(main_sizer)
Also in the build_ui() method, initialize a dictionary to hold rows with pending transaction details, so that you can replace them with the confirmed results when those are available. Add this line anywhere near the "Tab 2" section that sets up self.tx_list code:
self.pending_tx_rows = {} # Map pending tx hashes to rows in the history UI
The "Send XRP" button starts out disabled, so you need to add a new method to the TWaXLFrame class to enable it when the right conditions are met:
    def enable_readwrite(self):
        """
        Enable buttons for sending transactions.
        """
        self.sxb.Enable()
        self.sxb.SetToolTip("")
The changes you made to on_connected() earlier in this step call this method after successfully receiving account data, but only if the worker class has a Wallet instance—meaning the user input the secret key to an account that really exists. If the user input an address, this method never gets called.
Add the handler for when the user clicks the "Send XRP" button as a method of the TWaXLFrame class:
    def click_send_xrp(self, event):
        """
        Pop up a dialog for the user to input how much XRP to send where, and
        send the transaction (if the user doesn't cancel).
        """
        dlg = SendXRPDialog(self)
        dlg.CenterOnScreen()
        resp = dlg.ShowModal()
        if resp != wx.ID_OK:
            print("Send XRP canceled")
            dlg.Destroy()
            return

        paydata = dlg.get_payment_data()
        dlg.Destroy()
        self.run_bg_job(self.worker.send_xrp(paydata))
        notif = wx.adv.NotificationMessage(title="Sending!", message =
                f"Sending a payment for {paydata['amt']} XRP!")
        notif.SetFlags(wx.ICON_INFORMATION)
        notif.Show()
This dialog opens a new "Send XRP" dialog using the custom SendXRPDialog class defined earlier in this step. If the user clicks the "Send" button, it passes the details to the worker thread to send the payment, and displays a notification that indicates the transaction is sending. (Note, the transaction can still fail after this point, so the notification does not say what the transaction did.)
Also add a new method to the TWaXLFrame class to display the pending transaction in the Transaction History pane when the worker thread sends it, as follows:
    def add_pending_tx(self, txm):
        """
        Add a "pending" transaction to the history based on a transaction model
        that was (presumably) just submitted.
        """
        confirmation_time = "(pending)"
        tx_type = txm.transaction_type
        from_acct = txm.account
        if from_acct == self.classic_address:
            from_acct = "(Me)"
        # Some transactions don't have a destination, so we need to handle that.
        to_acct = getattr(txm, "destination", "")
        if to_acct == self.classic_address:
            to_acct = "(Me)"
        # Delivered amount is only known after a transaction is processed, so
        # leave this column empty in the display for pending transactions.
        delivered_amt = ""
        tx_hash = txm.get_hash()
        cols = (confirmation_time, tx_type, from_acct, to_acct, delivered_amt,
                tx_hash, str(txm.to_xrpl()))
        self.tx_list.PrependItem(cols)
        self.pending_tx_rows[tx_hash] = self.tx_list.RowToItem(0)
This method is similar to the add_tx_row() method in that it processes a transaction for display and adds it to the Transaction History table. The differences are that it takes one of xrpl-py's Transaction models rather than a JSON-like API response; and it handles certain columns differently because the transaction has not yet been confirmed. Importantly, it saves a reference to table row containing this transaction to the pending_tx_rows dictionary, so that later on when the transaction is confirmed, you can remove the table row for the pending version and replace it with the final version of the transaction.
Lastly, update the add_tx_from_sub() method so that it finds and updates pending transactions with their final results when those transactions are confirmed. Add the following lines right before the call to self.add_tx_row():
{{ include_code("_code-samples/build-a-desktop-wallet/py/5_send_xrp.py", language="py", start_with="if t["tx"]["hash"] in", end_before="self.add_tx_row(t, prepend=True)") }}
You can now use your wallet to send XRP! You can even fund an entirely new account. To do that:
Open the Python interpreter.
python3CautionDepending on your OS, the command may bepythonorpython3. You want to open Python 3, not a Python 2.x version.Run the following commands in the Python interpreter:
import xrpl
w = xrpl.wallet.Wallet.create()
print(w.address)
print(w.seed)
exit()
Save the classic address and seed somewhere.
Open your wallet app and provide a Secret (seed) value from an already-funded address, such as one you got from the Testnet Faucet.
Send at least the base reserve (currently 1 XRP) to the brand-new classic address you generated in the Python interpreter.
Wait for the transaction to be confirmed, then close your wallet app.
Open your wallet app and provide the seed value you generated in the Python interpreter.
You should see the balance and transaction history of your newly-funded account, matching the address you generated in the interpreter.
Full code for this step: 6_verification_and_polish.py
One of the biggest shortcomings of the wallet app from the previous step is that it doesn't provide a lot of protections or feedback for users to save them from human error and DeFi scams. These sorts of protections are extra important when dealing with the cryptocurrency space, because decentralized systems like the XRP Ledger don't have an admin or support team you can ask to cancel or refund a payment if you made a mistake such as sending it to the wrong address. This step shows how to add some checks on destination addresses to warn the user before sending.
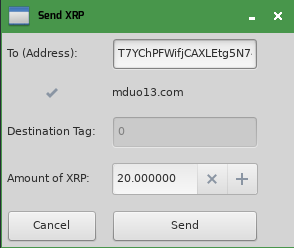
One type of check you can make is to verify the domain name associated with an XRP Ledger address; this is called account domain verification. When an account's domain is verified, you could show it like this:
When there are other errors, you can expose them to the user with an icon and a tooltip, which looks like this:
The following code implements account domain verification; save it as a new file named verify_domain.py in the same folder as your app's main file:
# Domain verification of XRP Ledger accounts using xrp-ledger.toml file.
# For information on this process, see:
#   https://xrpl.org/xrp-ledger-toml.html#account-verification
# License: MIT. https://github.com/XRPLF/xrpl-dev-portal/blob/master/LICENSE

import requests
import toml
import xrpl

def verify_account_domain(account):
    """
    Verify an account using an xrp-ledger.toml file.

    Params:
        account:dict - the AccountRoot object to verify
    Returns (domain:str, verified:bool)
    """
    domain_hex = account.get("Domain")
    if not domain_hex:
        return "", False
    verified = False
    domain = xrpl.utils.hex_to_str(domain_hex)
    toml_url = f"https://{domain}/.well-known/xrp-ledger.toml"
    toml_response = requests.get(toml_url)
    if toml_response.ok:
        parsed_toml = toml.loads(toml_response.text)
        toml_accounts = parsed_toml.get("ACCOUNTS", [])
        for t_a in toml_accounts:
            if t_a.get("address") == account.get("Account"):
                verified = True
                break
    return domain, verified


if __name__ == "__main__":
    from argparse import ArgumentParser
    parser = ArgumentParser()
    parser.add_argument("address", type=str,
            help="Classic address to check domain verification of")
    args = parser.parse_args()
    client = xrpl.clients.JsonRpcClient("https://xrplcluster.com")
    r = xrpl.account.get_account_info(args.address, client,
            ledger_index="validated")
    print(verify_account_domain(r.result["account_data"]))
In your app's main file, import the verify_account_domain function:
from verify_domain import verify_account_domainIn the XRPLMonitorThread class, add a new check_destination() method to check the destination address, as follows:
    async def check_destination(self, destination, dlg):
        """
        Check a potential destination address's details, and pass them back to
        a "Send XRP" dialog:
        - Is the account funded?
            If not, payments below the reserve base will fail
        - Do they have DisallowXRP enabled?
            If so, the user should be warned they don't want XRP, but can click
            through.
        - Do they have a verified Domain?
            If so, we want to show the user the associated domain info.

        Requires that self.client be connected first.
        """

        # The data to send back to the GUI thread: None for checks that weren't
        # performed, True/False for actual results except where noted.
        account_status = {
            "funded": None,
            "disallow_xrp": None,
            "domain_verified": None,
            "domain_str": "" # the decoded domain, regardless of verification
        }

        # Look up the account. If this fails, the account isn't funded.
        try:
            response = await xrpl.asyncio.account.get_account_info(destination,
                    self.client, ledger_index="validated")
            account_status["funded"] = True
            dest_acct = response.result["account_data"]
        except xrpl.asyncio.clients.exceptions.XRPLRequestFailureException:
            # Not funded, so the other checks don't apply.
            account_status["funded"] = False
            wx.CallAfter(dlg.update_dest_info, account_status)
            return

        # Check DisallowXRP flag
        lsfDisallowXRP = 0x00080000
        if dest_acct["Flags"] & lsfDisallowXRP:
            account_status["disallow_xrp"] = True
        else:
            account_status["disallow_xrp"] = False

        # Check domain verification
        domain, verified = verify_account_domain(dest_acct)
        account_status["domain_verified"] = verified
        account_status["domain_str"] = domain

        # Send data back to the main thread.
        wx.CallAfter(dlg.update_dest_info, account_status)
This code uses xrpl.asyncio.account.get_account_info() to look up the account in the ledger; unlike using the client's request() method, get_account_info() raises an exception if the account is not found.
If the account does exist, the code checks for the lsfDisallowXRP flag. Note that this is an lsf (ledger state flag) value because this is an object from the ledger state data; these are different than the flag values the AccountSet transaction uses to configure the same settings.
Finally, the code decodes the account's Domain field, if present, and performs domain verification using the method imported above.
dlg) as a parameter, since each dialog is a separate instance, but does not modify the dialog directly since that might not be thread-safe. (It only uses wx.CallAfter to pass the results of the check back to the dialog.)After this, it's time to update the SendXRPDialog class to make it capable of displaying these errors. You can also set a more specific upper bound for how much XRP the account can actually send. Change the constructor to take a new parameter:
def __init__(self, parent, max_send=100000000.0):
Add some icon widgets to the UI, also in the SendXRPDialog constructor:
        # Icons to indicate a validation error
        bmp_err = wx.ArtProvider.GetBitmap(wx.ART_ERROR, wx.ART_CMN_DIALOG, size=(16,16))
        self.err_to = wx.StaticBitmap(self, bitmap=bmp_err)
        self.err_dtag = wx.StaticBitmap(self, bitmap=bmp_err)
        self.err_amt = wx.StaticBitmap(self, bitmap=bmp_err)
        self.err_to.Hide()
        self.err_dtag.Hide()
        self.err_amt.Hide()

        # Icons for domain verification
        bmp_check = wx.ArtProvider.GetBitmap(wx.ART_TICK_MARK, wx.ART_CMN_DIALOG, size=(16,16))
        self.domain_text = wx.StaticText(self, label="")
        self.domain_verified = wx.StaticBitmap(self, bitmap=bmp_check)
        self.domain_verified.Hide()

        if max_send <= 0:
            max_send = 100000000.0
            self.err_amt.Show()
            self.err_amt.SetToolTip("Not enough XRP to pay the reserve and transaction cost!")
Still in the SendXRPDialog constructor, add a maximum value to the line that creates the self.txt_amt widget:
self.txt_amt = wx.SpinCtrlDouble(self, value="20.0", min=0.000001, max=max_send)
Don't forget to add all the new widgets to the SendXRPDialog's sizer so they fit in the right places. Update the BulkAdd call in the constructor as follows:
        sizer.BulkAdd(((lbl_to, self.txt_to, self.err_to),
                       (self.domain_verified, self.domain_text),
                       (lbl_dtag, self.txt_dtag, self.err_dtag),
                       (lbl_amt, self.txt_amt, self.err_amt),
                       (btn_cancel, self.btn_send)) )
Next, refactor the on_to_edit() handler in the SendXRPDialog class to perform more checks, including the new background check on the destination address. The updated handler should be as follows:
    def on_to_edit(self, event):
        """
        When the user edits the "To" field, check that the address is well-
        formatted. If it's an X-address, fill in the destination tag and disable
        it. Also, start a background check to confirm more details about the
        address.
        """
        v = self.txt_to.GetValue().strip()
        # Reset warnings / domain verification
        err_msg = ""
        self.err_to.SetToolTip("")
        self.err_to.Hide()
        self.domain_text.SetLabel("")
        self.domain_verified.Hide()

        if xrpl.core.addresscodec.is_valid_xaddress(v):
            cl_addr, tag, is_test = xrpl.core.addresscodec.xaddress_to_classic_address(v)
            if tag is None: # Not the same as tag = 0
                tag = ""
            self.txt_dtag.ChangeValue(str(tag))
            self.txt_dtag.Disable()

            if cl_addr == self.parent.classic_address:
                err_msg = "Can't send XRP to self."
            elif is_test != self.parent.test_network:
                err_msg = "This address is intended for a different network."

        elif not self.txt_dtag.IsEditable():
            self.txt_dtag.Clear()
            self.txt_dtag.Enable()

        if not (xrpl.core.addresscodec.is_valid_classic_address(v) or
                xrpl.core.addresscodec.is_valid_xaddress(v) ):
            self.btn_send.Disable()
            err_msg = "Not a valid address."
        elif v == self.parent.classic_address:
            self.btn_send.Disable()
            err_msg = "Can't send XRP to self."
        else:
            self.parent.run_bg_job(self.parent.worker.check_destination(v, self))

        if err_msg:
            self.err_to.SetToolTip(err_msg)
            self.err_to.Show()
        else:
            self.err_to.Hide()
In addition to starting the background check, this handler does some checks immediately. Any check that doesn't require getting data from the network is probably fast enough to run directly in the handler; if the check requires network access, you have to run it in the worker thread instead.
One of the new checks is to decode X-addresses to pull out the additional data they encode:
- If the X-address includes a destination tag, show it in the destination tag field.
- If the X-address is not intended for a test network and the app is connected to a test network (or the other way around), show an error.
One tricky bit of writing handlers like this in GUI code is that you have to be ready for the handler to be called many times as the user inputs and erases data. For example, if you disable a field when some input is invalid, you also have to enable it if the user changes their input to be valid.
The code shows the error icons when it finds errors (and hides them when it doesn't), and adds tooltips with the error message. You could, of course, display errors to the user in another way as well, such as additional pop-up dialogs or a status bar.
Moving on, you also need a new method in the SendXRPDialog class to process the results from the background check. Add the following code:
    def update_dest_info(self, dest_status):
        """
        Update the UI with details provided by a background job to check the
        destination address.
        """
        # Keep existing error message if there is one
        try:
            err_msg = self.err_to.GetToolTip().GetTip().strip()
        except RuntimeError:
            # This method can be called after the dialog it belongs to has been
            # closed. In that case, there's nothing to do here.
            return

        if not dest_status["funded"]:
            err_msg = ("Warning: this account does not exist. The payment will "
                      "fail unless you send enough to fund it.")
        elif dest_status["disallow_xrp"]:
            err_msg = "This account does not want to receive XRP."

        # Domain verification
        bmp_err = wx.ArtProvider.GetBitmap(wx.ART_ERROR, wx.ART_CMN_DIALOG, size=(16,16))
        bmp_check = wx.ArtProvider.GetBitmap(wx.ART_TICK_MARK, wx.ART_CMN_DIALOG, size=(16,16))
        domain = dest_status["domain_str"]
        verified = dest_status["domain_verified"]
        if not domain:
            self.domain_text.Hide()
            self.domain_verified.Hide()
        elif verified:
            self.domain_text.SetLabel(domain)
            self.domain_text.Show()
            self.domain_verified.SetToolTip("Domain verified")
            self.domain_verified.SetBitmap(bmp_check)
            self.domain_verified.Show()
        else:
            self.domain_text.SetLabel(domain)
            self.domain_text.Show()
            self.domain_verified.SetToolTip("Failed to verify domain")
            self.domain_verified.SetBitmap(bmp_err)
            self.domain_verified.Show()

        if err_msg:
            # Disabling the button is optional. These types of errors can be
            # benign, so you could let the user "click through" them.
            # self.btn_send.Disable()
            self.err_to.SetToolTip(err_msg)
            self.err_to.Show()
        else:
            self.btn_send.Enable()
            self.err_to.SetToolTip("")
            self.err_to.Hide()
This code takes the dictionary passed by the check_destination() and uses it to update various widgets in the Send XRP dialog's GUI.
You need to make a few small updates to configure the maximum send amount in the Send XRP dialog. Start by adding these lines to the TWaXLFrame class's constructor:
        # This account's total XRP reserve including base + owner amounts
        self.reserve_xrp = None
Then modify the update_account() method of the TWaXLFrame to save the latest calculated reserve. Modify the last few lines to look like this:
        # Display account reserve and save for calculating max send.
        reserve_xrp = self.calculate_reserve_xrp(acct.get("OwnerCount", 0))
        if reserve_xrp != None:
            self.st_reserve.SetLabel(str(reserve_xrp))
            self.reserve_xrp = reserve_xrp
Finally, calculate the maximum amount the user can send and provide it to the Send XRP dialog. Modify the beginning of the click_send_xrp() handler as follows:
        xrp_bal = Decimal(self.st_xrp_balance.GetLabelText())
        tx_cost = Decimal("0.000010")
        reserve = self.reserve_xrp or Decimal(0.000000)
        dlg = SendXRPDialog(self, max_send=float(xrp_bal - reserve - tx_cost))
The formula this code uses to calculate the maximum amount the user can send is the account's XRP balance, minus its reserve and minus the transaction cost. The calculation uses the Decimal class to avoid rounding errors, but ultimately it has to be converted down to a float because that's what wxPython's wx.SpinCtrlDouble accepts for minimum and maximum values. Still there is less opportunity for floating-point rounding errors to occur if the conversion happens after the other calculations.
Test your wallet app the same way you did in the previous steps. To test domain verification, try entering the following addresses in the "To" box of the Send XRP dialog:
| Address | Domain | Verified? |
|---|---|---|
rsA2LpzuawewSBQXkiju3YQTMzW13pAAdW | mduo13.com | ✅ Yes |
rf1BiGeXwwQoi8Z2ueFYTEXSwuJYfV2Jpn | xrpl.org | ❌ No |
rPT1Sjq2YGrBMTttX4GZHjKu9dyfzbpAYe | (Not set) | ❌ No |
To test X-addresses, try the following addresses:
| Address | Destination Tag | Test Net? |
|---|---|---|
T7YChPFWifjCAXLEtg5N74c7fSAYsvPKxzQAET8tbZ8q3SC | 0 | Yes |
T7YChPFWifjCAXLEtg5N74c7fSAYsvJVm6xKZ14AmjegwRM | None | Yes |
X7d3eHCXzwBeWrZec1yT24iZerQjYLjJrFT7A8ZMzzYWCCj | 0 | No |
X7d3eHCXzwBeWrZec1yT24iZerQjYLeTFXz1GU9RBnWr7gZ | None | No |
Now that you have a functional wallet, you can take it in several new directions. The following are a few ideas:
- You could support more of the XRP Ledger's transaction types including tokens and cross-currency payments
- Example code for displaying token balances and other objects:
7_owned_objects.py
- Example code for displaying token balances and other objects:
- Allow the user to trade in the decentralized exchange
- Add a way to request payments, such as with QR codes or URIs that open in your wallet.
- Support better account security including regular key pairs or multi-signing.