Build a Browser Wallet in JavaScript
This tutorial demonstrates how to build a browser wallet for the XRP Ledger using the Javascript programming language and various libraries. This application can be used as a starting point for building a more complete and powerful application, as a reference point for building comparable apps, or as a learning experience to better understand how to integrate XRP Ledger functionality into a larger project.
Prerequisites
To complete this tutorial, you should meet the following guidelines:
- You have Node.js v14 or higher installed.
- You have Yarn (v1.17.3 or higher) installed.
- You are somewhat familiar with coding with JavaScript and have completed the Get Started Using JavaScript tutorial.
Source Code
You can find the complete source code for all of this tutorial's examples in the code samples section of this website's repository.
Goals
At the end of this tutorial, you should be able to build a simple XRP wallet displayed below.
This application can:
- Show updates to the XRP Ledger in real-time.
- View any XRP Ledger account's activity, including showing how much XRP was delivered by each transaction.
- Show how much XRP is set aside for the account's reserve requirement.
- Send direct XRP payments, and provide feedback about the intended destination address, including:
- Displaying your account's available balance
- Verifying that the destination address is valid
- Validating the account has enough XRP to send
- Allowing you to specify a destination tag
Steps
Before you begin, make sure you have the prerequisites installed. Check your node version by running node -v. If necessary, download Node.js.
1. Set up the project
- Navigate to the directory that you want to create the project in.
- Create a new Vite project:
yarn create vite simple-xrpl-wallet --template vanilla- Create or modify the file
package.jsonto have the following contents:
{
    "name": "simple-xrpl-wallet",
    "type": "module",
    "scripts": {
        "dev": "vite"
    },
    "devDependencies": {
        "crypto-browserify": "^3.12.0",
        "events": "^3.3.0",
        "https-browserify": "^1.0.0",
        "stream-browserify": "^3.0.0",
        "stream-http": "^3.2.0",
        "vite": "^4.5.14"
    },
    "dependencies": {
        "dotenv": "^16.0.3",
        "xrpl": "^4.0.0"
    }
}- Alternatively you can also do
yarn add <package-name>for each individual package to add them to yourpackage.jsonfile.
- Install dependencies:
yarn- Create a new file
.envin the root directory of the project and add the following variables:
CLIENT="wss://s.altnet.rippletest.net:51233/"
EXPLORER_NETWORK="testnet"
SEED="s████████████████████████████"
Change the seed to your own seed. You can get credentials from the Testnet faucet.
Set up a Vite bundler. Create a file named
vite.config.jsin the root directory of the project and fill it with the following code:
import { defineConfig, loadEnv } from 'vite';

const viteConfig = ({ mode }) => {
    process.env = { ...process.env, ...loadEnv(mode, '', '') };
    return defineConfig({
        define: {
            'process.env': process.env,
        },
        resolve: {
            alias: {
                ws: 'xrpl/dist/npm/client/WSWrapper',
            },
        },
    });
};

export default viteConfig;- Add script to
package.json
In your package.json file, add the following section if it's not there already:
"scripts": {
    "dev": "vite"
}
2. Create the Home Page (Displaying Account & Ledger Details)
In this step, we create a home page that displays account and ledger details.
If not already present, create new files in the root folder named
index.html,index.jsandindex.css.Make a new folder named
srcin the root directory of the project.Copy the contents of index.html in your code.
Add styling to your index.css file by following the link.
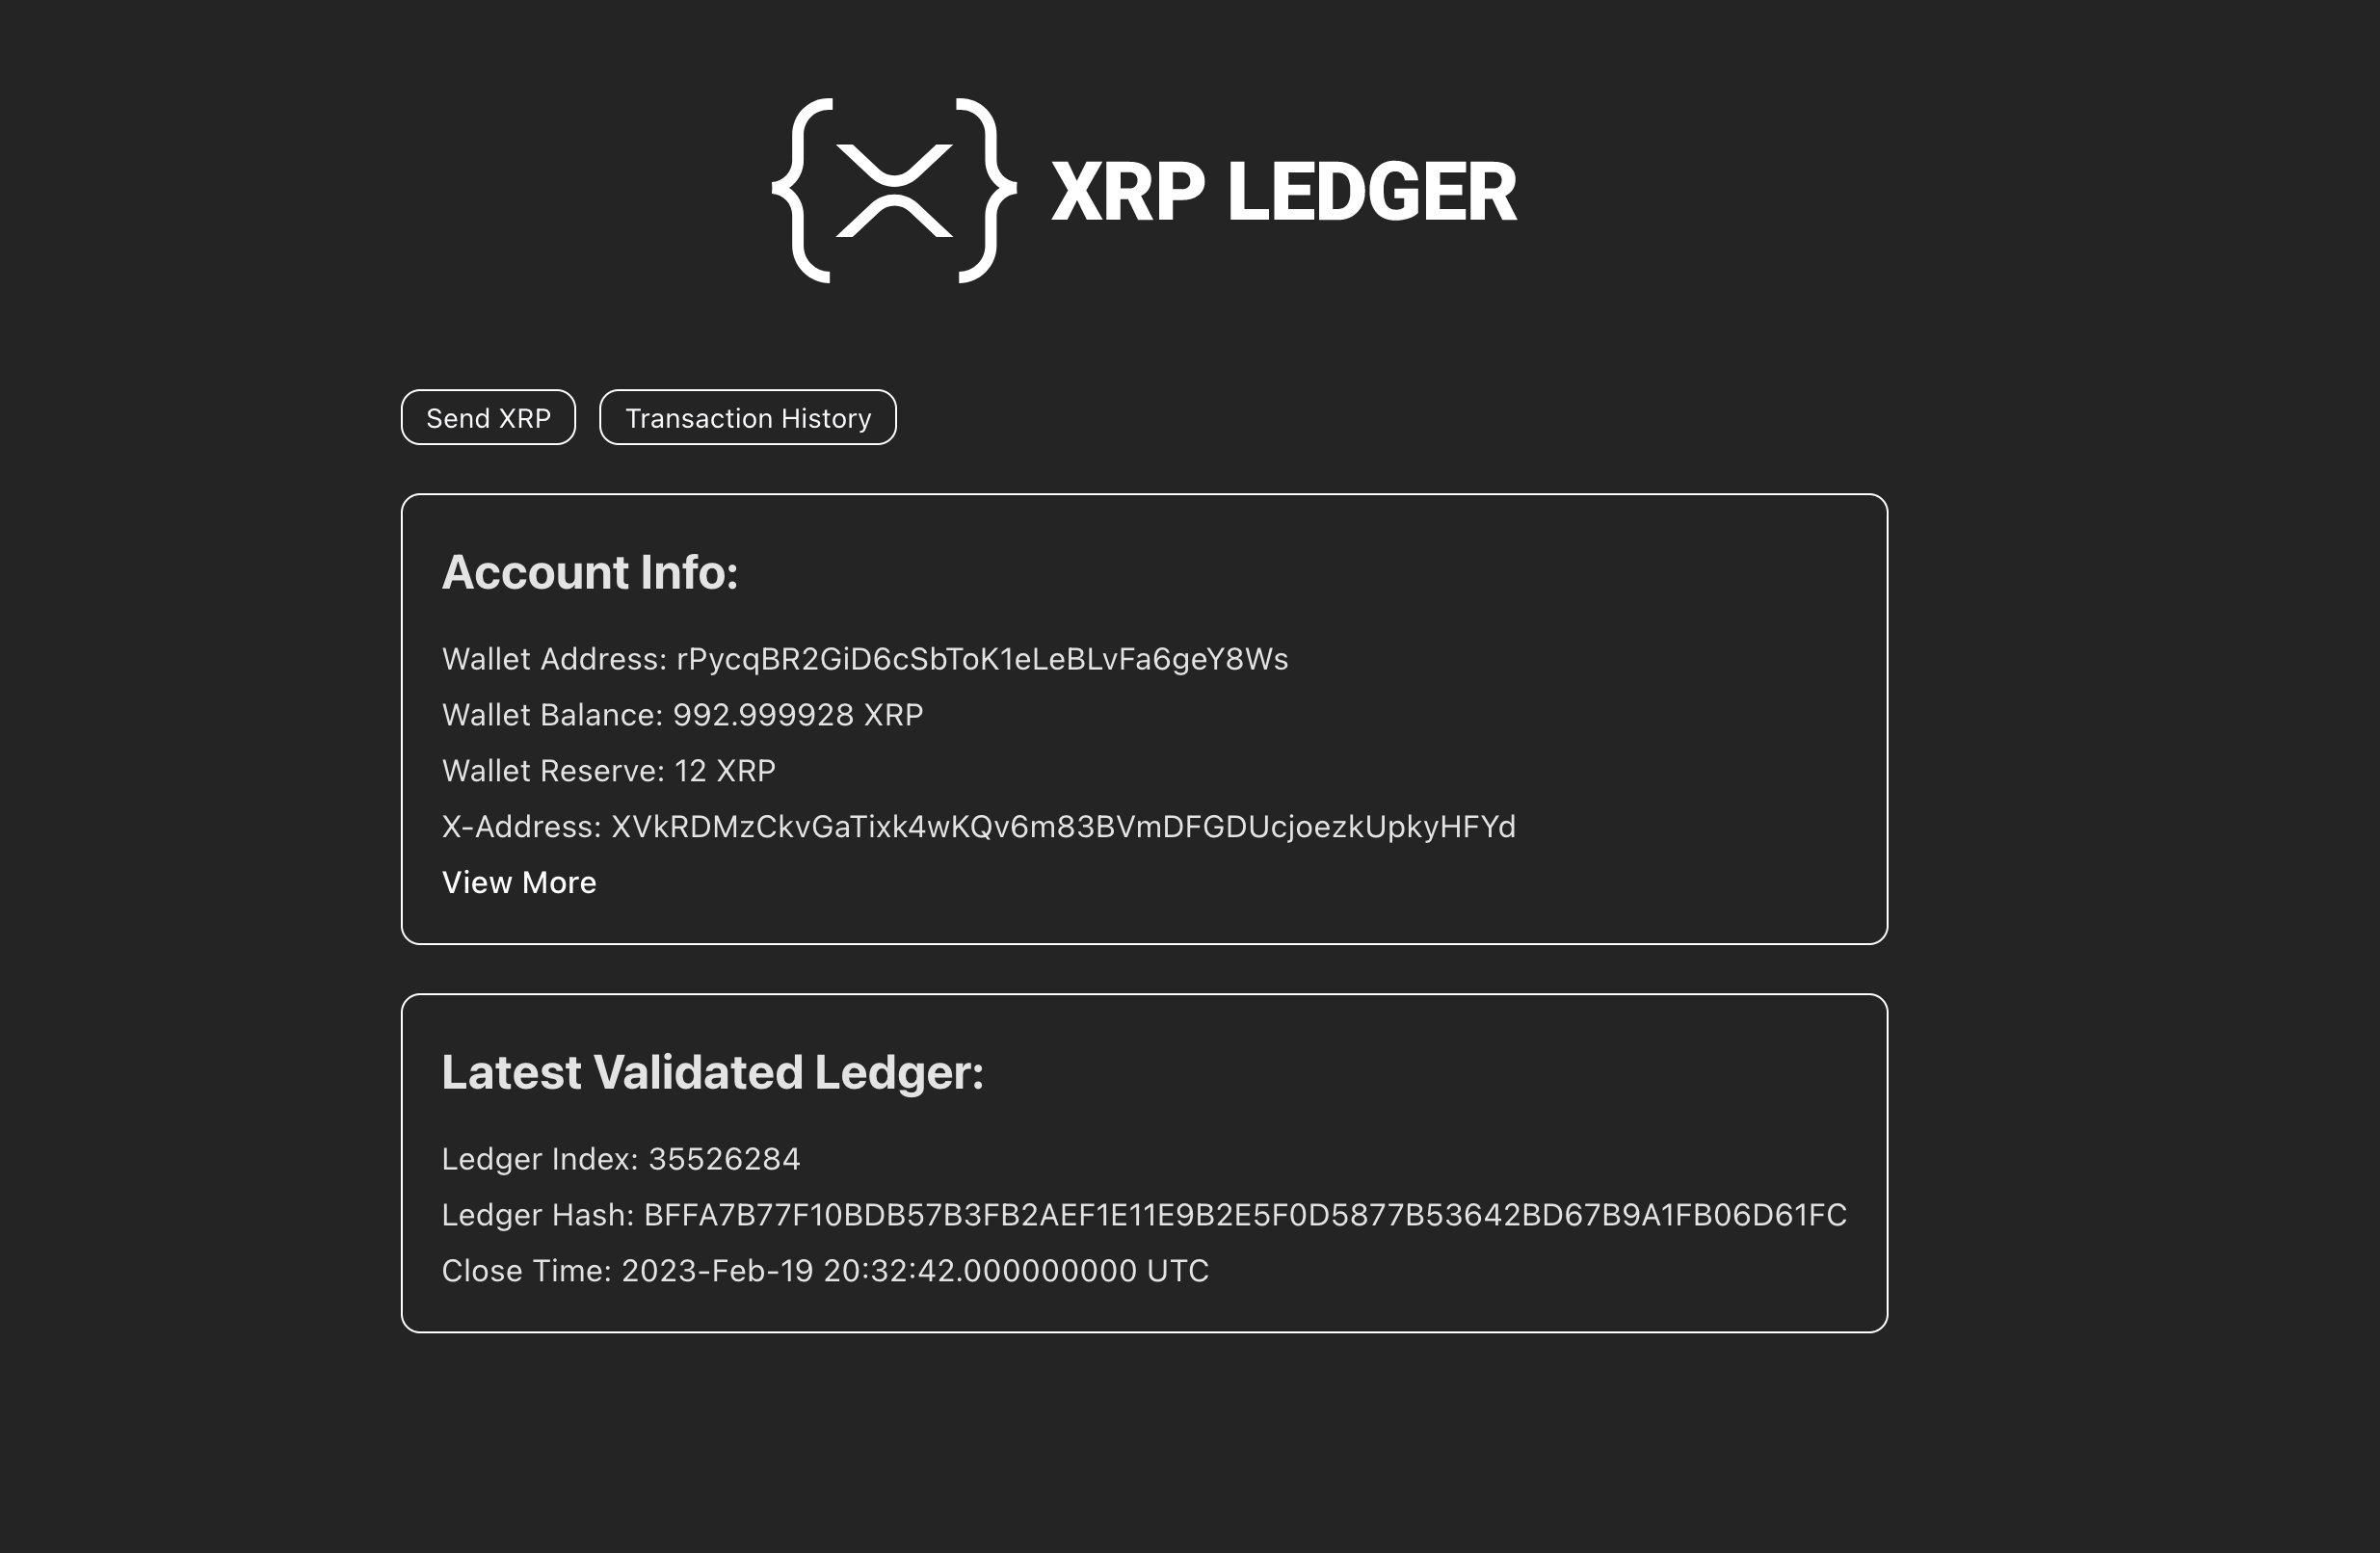
This basic setup creates a homepage and applies some visual styles. The goal is for the homepage to:
- Display our account info
- Show what's happening on the ledger
- And add a little logo for fun
To make that happen, we need to connect to the XRP Ledger and look up the account and the latest validated ledger.
- In the
src/directory, make a new folder namedhelpers. Create a new file there namedget-wallet-details.jsand define a function namedgetWalletDetailsthere. This function uses the account_info method to fetch account details and the server_info method to calculate the current reserves. The code to do all this is as follows:
import { Wallet, classicAddressToXAddress } from 'xrpl';

export default async function getWalletDetails({ client }) {
    const wallet = Wallet.fromSeed(process.env.SEED);

    // Get the wallet details
    const {
        result: { account_data },
    } = await client.request({
        command: 'account_info',
        account: wallet.address,
        ledger_index: 'validated',
    });

    const ownerCount = account_data.OwnerCount || 0;

    // Get the reserve base and increment
    const {
        result: {
            info: {
                validated_ledger: { reserve_base_xrp, reserve_inc_xrp },
            },
        },
    } = await client.request({
        command: 'server_info',
    });

    // Calculate the total reserve amount
    const accountReserve = ownerCount * reserve_inc_xrp + reserve_base_xrp;

    console.log('Got wallet details!');

    return {
        account_data,
        accountReserve,
        xAddress: classicAddressToXAddress(wallet.address, false, false),
        address: wallet.address
    };
}- Now, let's add the code to
index.jsfile to fetch the account and ledger details and display them on the home page. Copy the code written below to theindex.jsfile. Here we render the wallet details using the function we defined inget-wallet-details.js. In order to make sure we have up to date ledger data, we are using the ledger stream to listen for ledger close events.
import { Client, dropsToXrp, rippleTimeToISOTime } from 'xrpl';

import addXrplLogo from './src/helpers/render-xrpl-logo';
import getWalletDetails from './src/helpers/get-wallet-details.js';

// Optional: Render the XRPL logo
addXrplLogo();

const client = new Client(process.env.CLIENT); // Get the client from the environment variables

// Get the elements from the DOM
const sendXrpButton = document.querySelector('#send_xrp_button');
const txHistoryButton = document.querySelector('#transaction_history_button');
const walletElement = document.querySelector('#wallet');
const walletLoadingDiv = document.querySelector('#loading_wallet_details');
const ledgerLoadingDiv = document.querySelector('#loading_ledger_details');

// Add event listeners to the buttons
sendXrpButton.addEventListener('click', () => {
    window.location.pathname = '/src/send-xrp/send-xrp.html';
});

txHistoryButton.addEventListener('click', () => {
    window.location.pathname = '/src/transaction-history/transaction-history.html';
});

// Self-invoking function to connect to the client
(async () => {
    try {
        await client.connect(); // Connect to the client

        // Subscribe to the ledger stream
        await client.request({
            command: 'subscribe',
            streams: ['ledger'],
        });

        // Fetch the wallet details
        let wallet_details
        try {
            wallet_details = await getWalletDetails({ client })
        } catch(error) {
            alert(`Error loading wallet: ${error}.\n\nMake sure you set the SEED in your .env file.`)
            return
        }
        const { account_data, accountReserve, xAddress, address } = wallet_details;
        walletElement.querySelector('.wallet_address').textContent = `Wallet Address: ${account_data.Account}`;
        walletElement.querySelector('.wallet_balance').textContent = `Wallet Balance: ${dropsToXrp(account_data.Balance)} XRP`;
        walletElement.querySelector('.wallet_reserve').textContent = `Wallet Reserve: ${accountReserve} XRP`;
        walletElement.querySelector('.wallet_xaddress').textContent = `X-Address: ${xAddress}`;

        // Redirect on View More link click
        walletElement.querySelector('#view_more_button').addEventListener('click', () => {
            window.open(`https://${process.env.EXPLORER_NETWORK}.xrpl.org/accounts/${address}`, '_blank');
        });

        walletLoadingDiv.style.display = 'none';


        // Fetch the latest ledger details
        client.on('ledgerClosed', (ledger) => {
            ledgerLoadingDiv.style.display = 'none';
            const ledgerIndex = document.querySelector('#ledger_index');
            const ledgerHash = document.querySelector('#ledger_hash');
            const closeTime = document.querySelector('#close_time');
            ledgerIndex.textContent = `Ledger Index: ${ledger.ledger_index}`;
            ledgerHash.textContent = `Ledger Hash: ${ledger.ledger_hash}`;
            closeTime.textContent = `Close Time: ${rippleTimeToISOTime(ledger.ledger_time)}`;
        });

    } catch (error) {
        await client.disconnect();
        console.log(error);
    }
})();
In the
helpersfolder, add render-xrpl-logo.js to handle displaying a logo.Finally create a new folder named
assetsin thesrc/directory and add the filexrpl.svgthere.
These files are used to render the XRPL logo for aesthetic purposes.
The one other thing we do here is add events to two buttons - one to send XRP and one to view transaction history. They won't work just yet — we'll implement them in the next steps.
Now the application is ready to run. You can start it in dev mode using the following command:
yarn devYour terminal should output a URL which you can use to open your app in a browser. This dev site automatically updates to reflect any changes you make to the code.
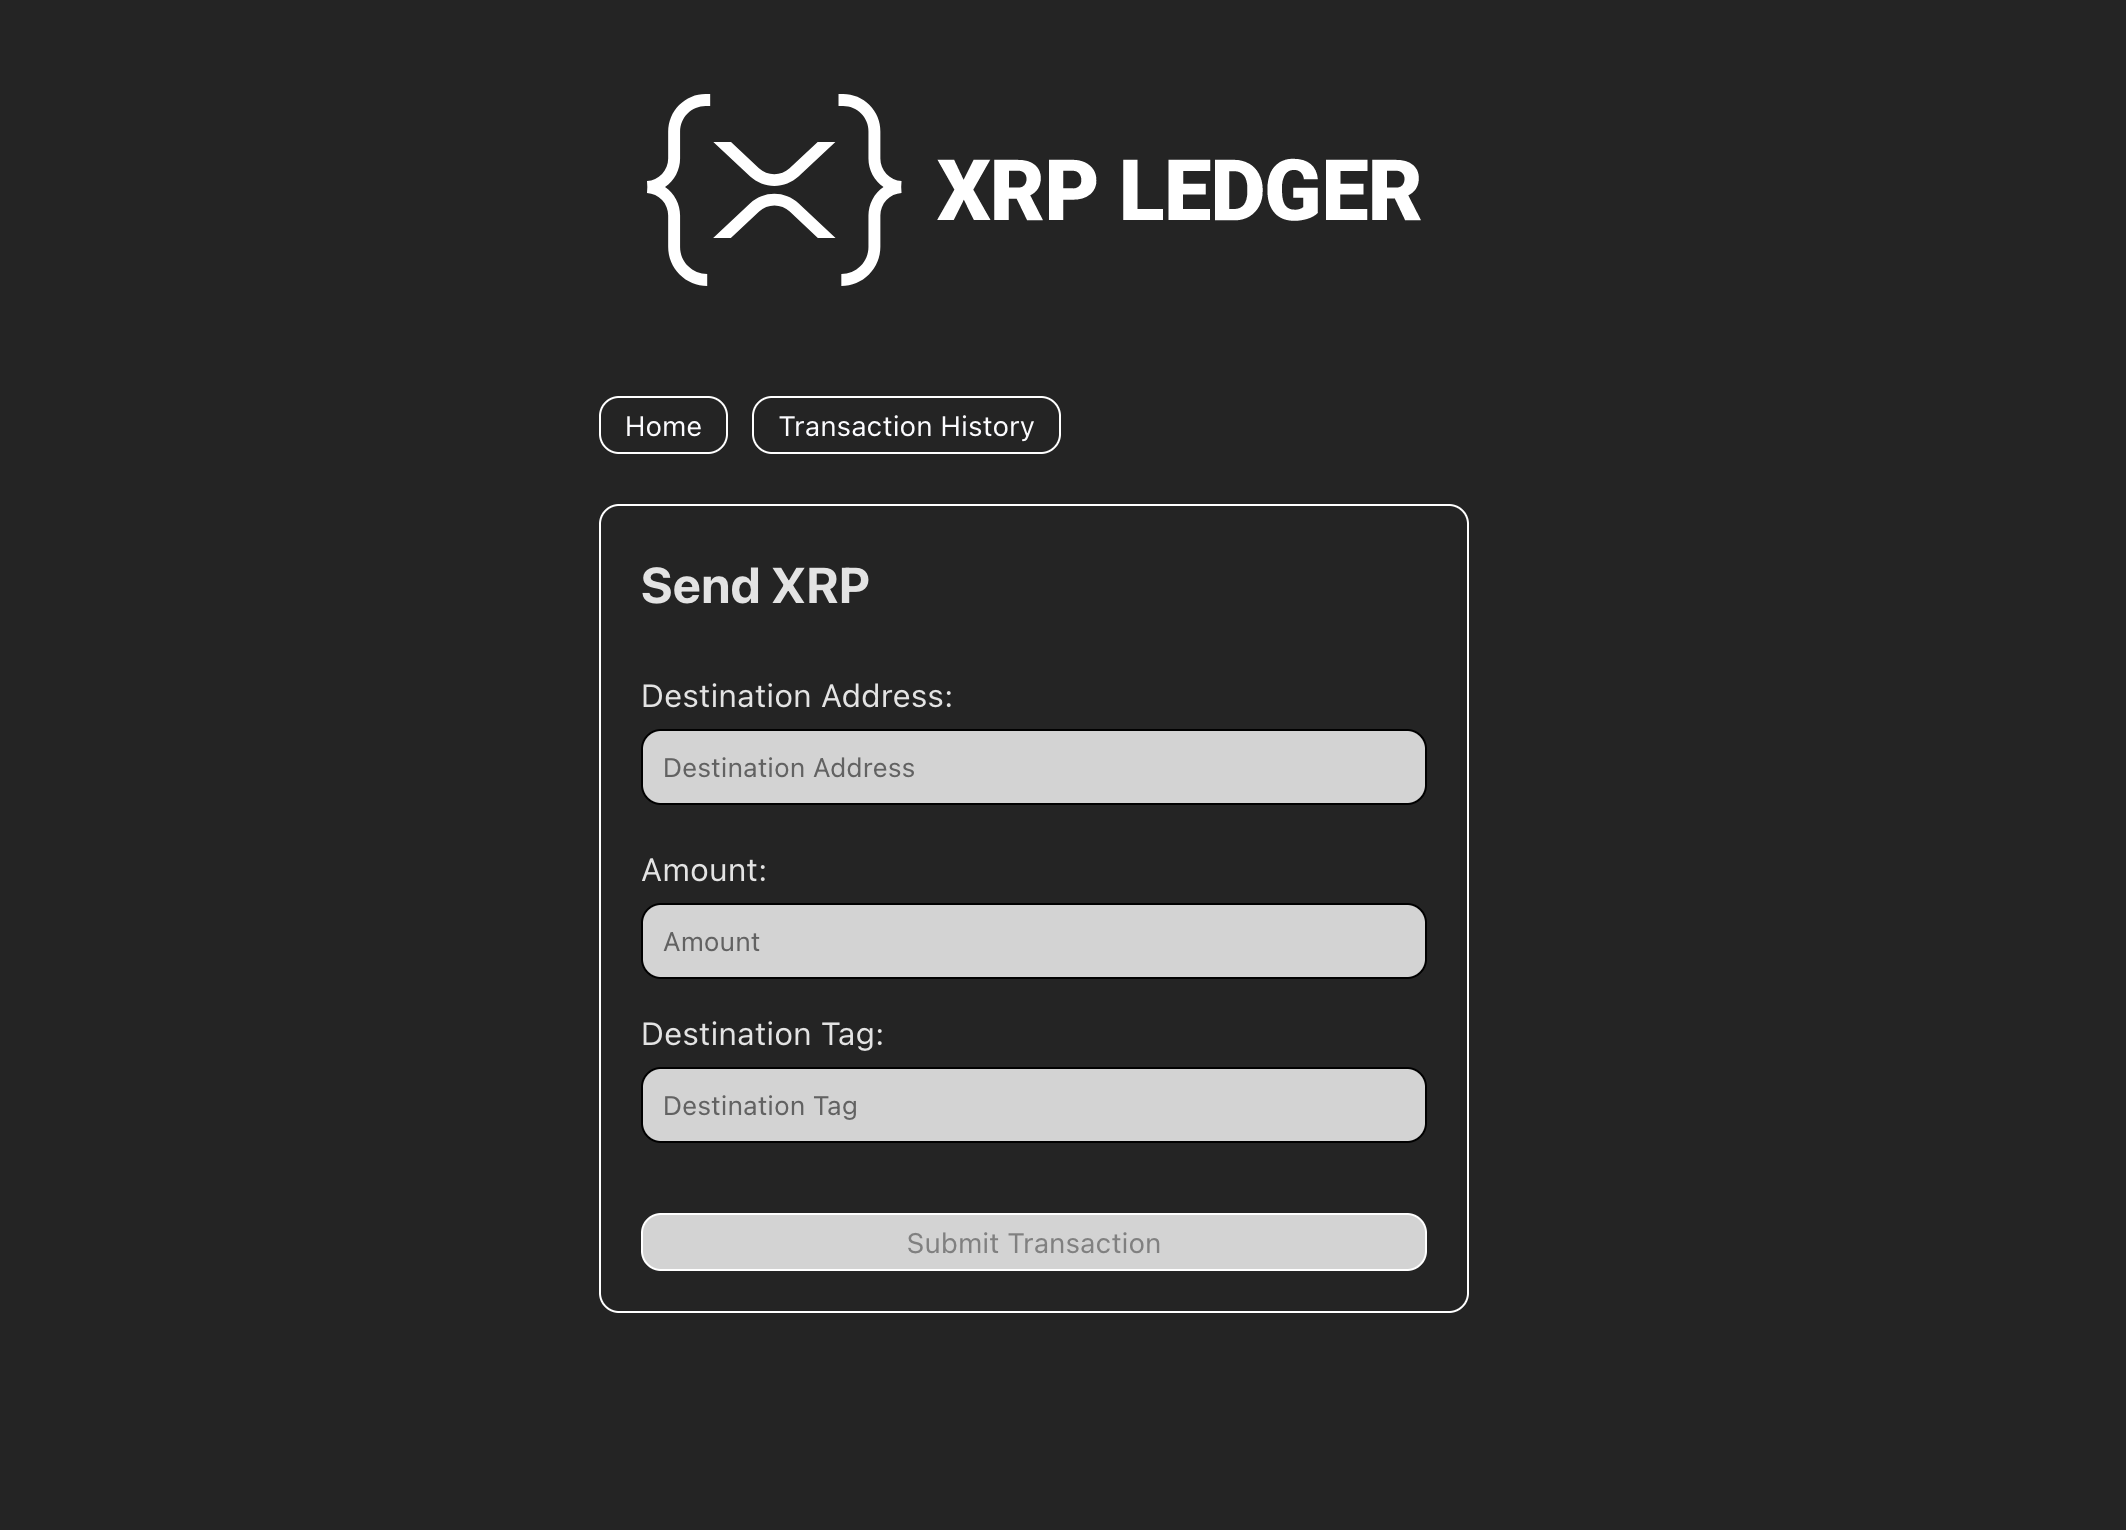
3. Create the Send XRP Page
Now that we've created the home page, we can move on to the "Send XRP" page. This is what allows this wallet to manage your account's funds.
Create a folder named
send-xrpin thesrcdirectory.Inside the
send-xrpfolder, create two files namedsend-xrp.jsandsend-xrp.html.Copy the contents of the send-xrp.html file to your
send-xrp.htmlfile. The provided HTML code includes three input fields for the destination address, amount, and destination tag, each with their corresponding labels.Now that we have the HTML code, let's add the JavaScript code. In the
helpersfolder, create a new file namedsubmit-transaction.jsand copy the code written below to the file. In this file, we are using the submit method to submit the transaction to the XRPL. Before submitting every transaction needs to be signed by a wallet, learn more about signing a transaction.
import { Wallet } from 'xrpl';

export default async function submitTransaction({ client, tx }) {
    try {
        // Create a wallet using the seed
        const wallet = Wallet.fromSeed(process.env.SEED);
        tx.Account = wallet.address;

        // Sign and submit the transaction
        const response = await client.submit(tx, { wallet });
        console.log(response);

        return response;
    } catch (error) {
        console.log(error);
        return null;
    }
}- Now back to the
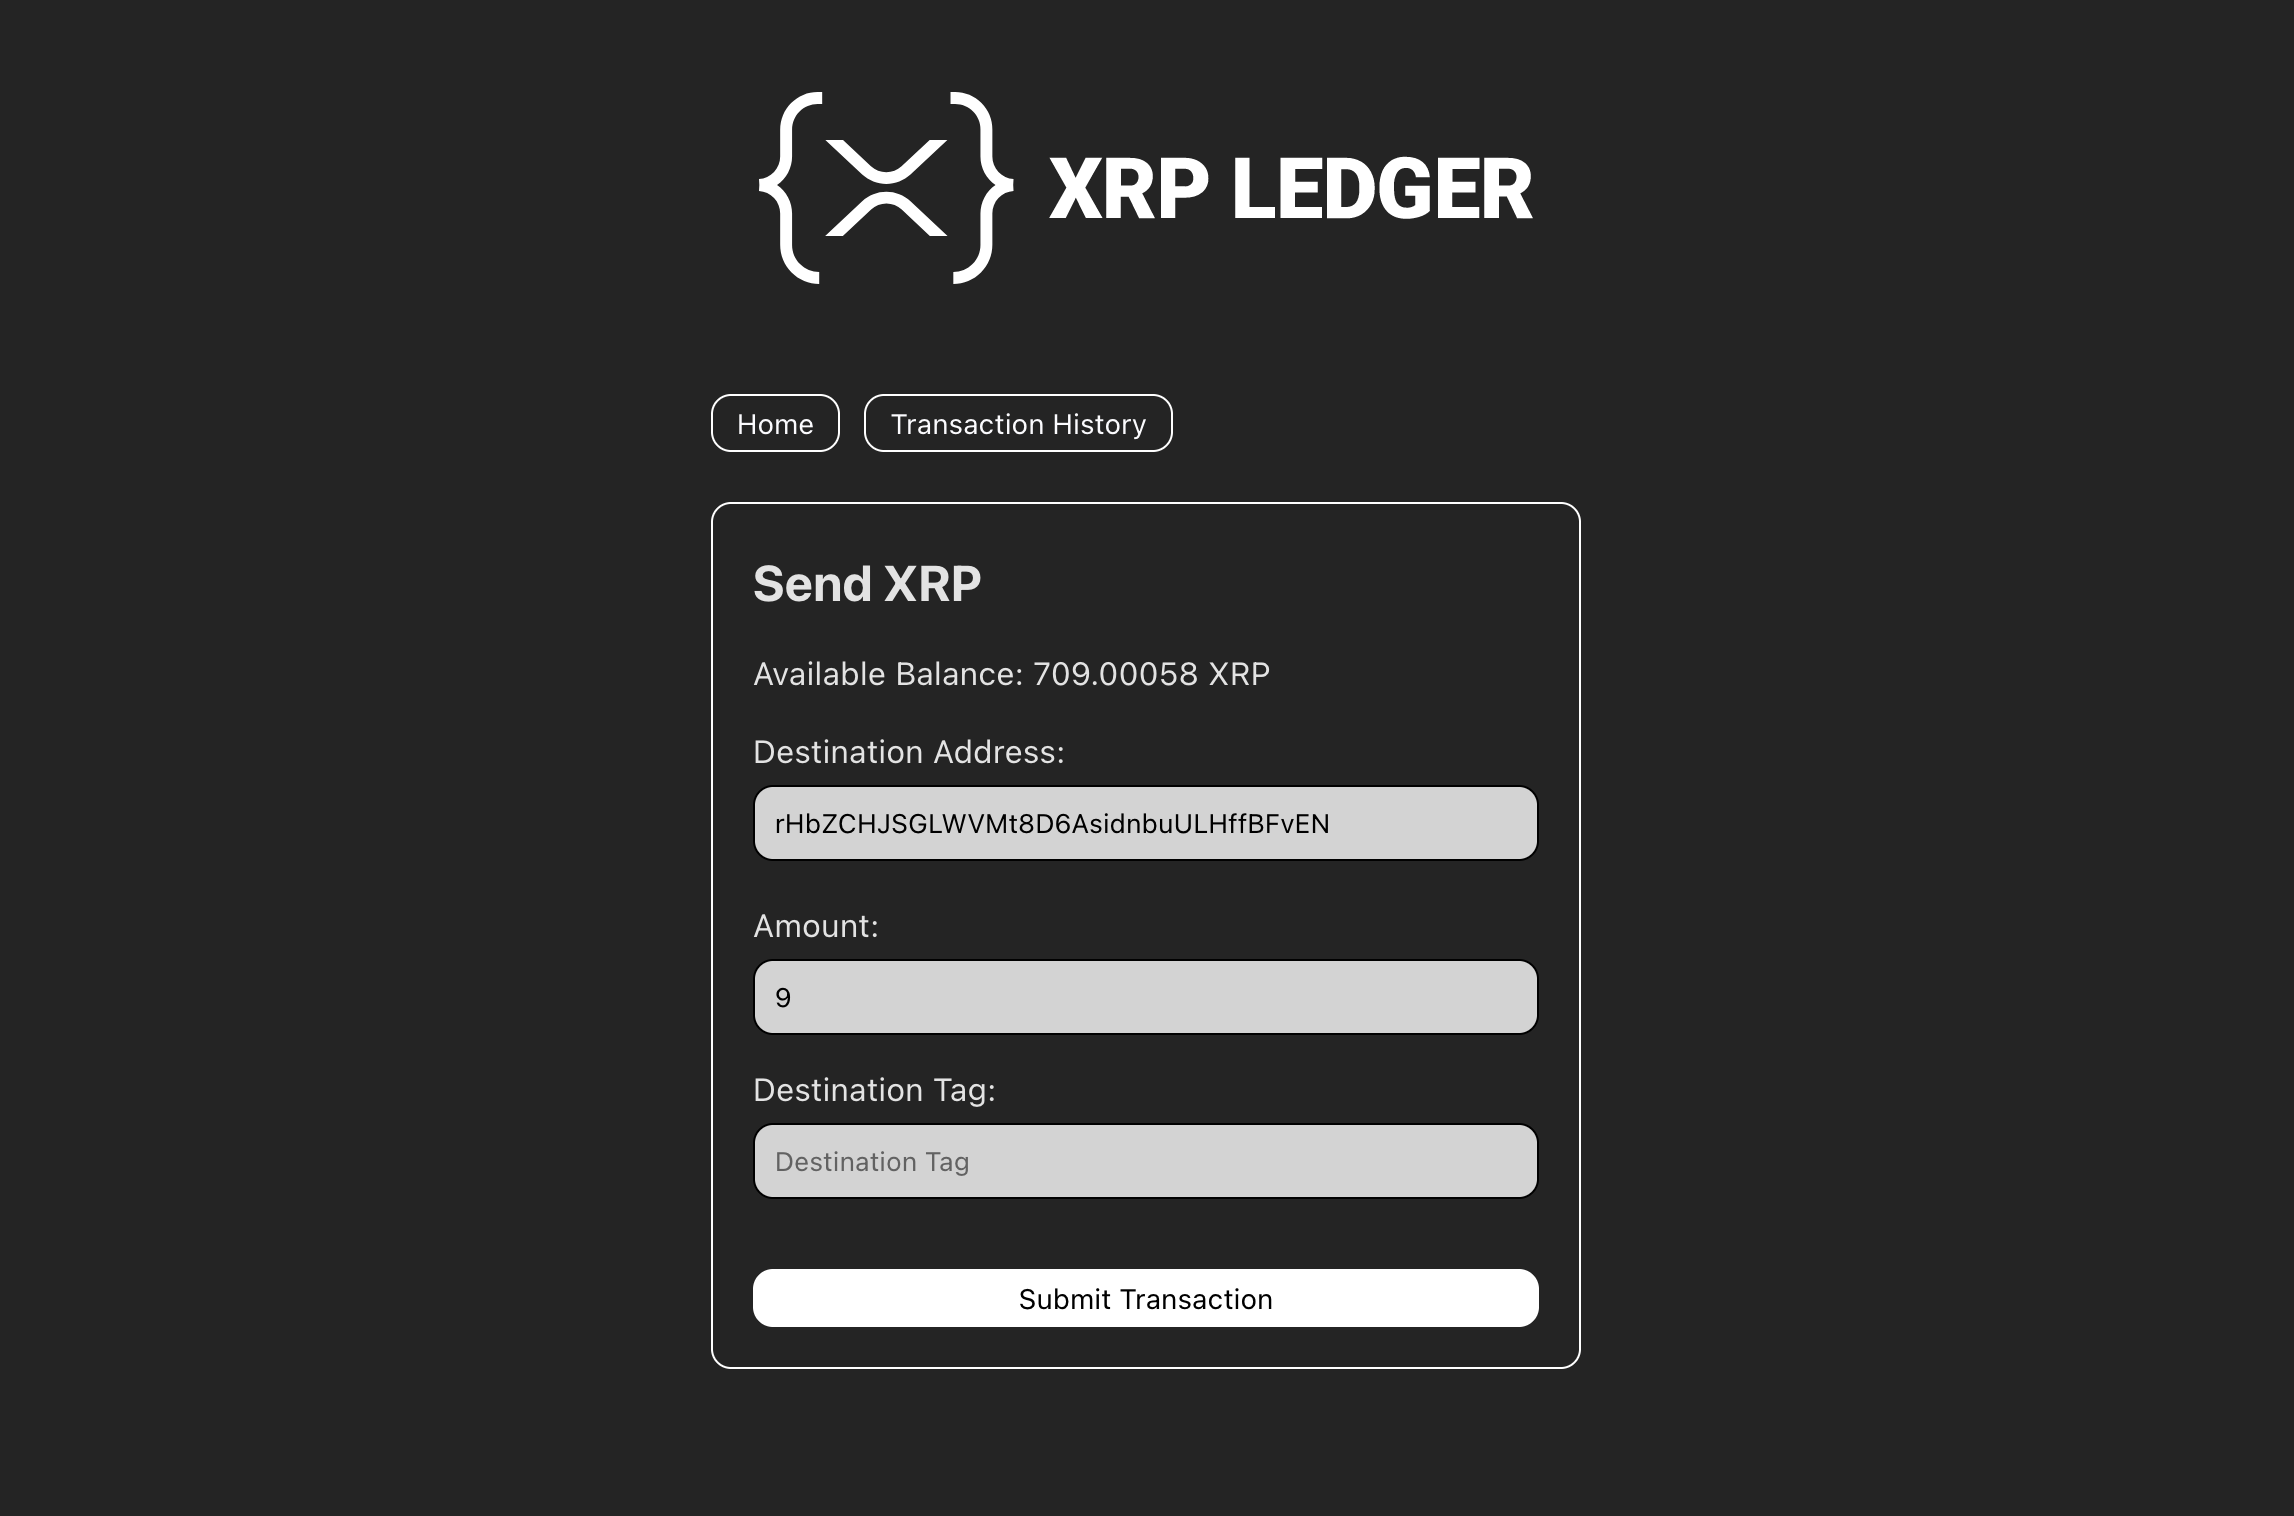
send-xrp.jsfile, copy the code written below to the file. In this piece of code we are first getting all the DOM elements from HTML and adding event listners to update & validate the fields based on the user input. UsingrenderAvailableBalancemethod we display the current available balance of the wallet.validateAddressfunction validates the user address, and the amount is validated using a regular expression. When all the fields are filled with correct inputs, we call thesubmitTransactionfunction to submit the transaction to the ledger.
import { Client, Wallet, dropsToXrp, isValidClassicAddress, xrpToDrops } from 'xrpl';

import getWalletDetails from '../helpers/get-wallet-details';
import renderXrplLogo from '../helpers/render-xrpl-logo';
import submitTransaction from '../helpers/submit-transaction';

// Optional: Render the XRPL logo
renderXrplLogo();

 // Get the client from the environment variables
const client = new Client(process.env.CLIENT);

// Self-invoking function to connect to the client
(async () => {
    try {
        await client.connect();

        const wallet = Wallet.fromSeed(process.env.SEED);

        // Subscribe to account transaction stream
        await client.request({
            command: 'subscribe',
            accounts: [wallet.address],
        });

        // Fetch the wallet details and show the available balance
        await getWalletDetails({ client }).then((
            { accountReserve, account_data }) => {
                const bal = dropsToXrp(account_data.Balance) - accountReserve;
                availableBalanceElement.textContent = `Available Balance: ${bal} XRP`;
        });

    } catch (error) {
        await client.disconnect();
        console.log(error);
    }
})();

// Get the elements from the DOM
const homeButton = document.querySelector('#home_button');
const txHistoryButton = document.querySelector('#transaction_history_button');
const destinationAddress = document.querySelector('#destination_address');
const amount = document.querySelector('#amount');
const destinationTag = document.querySelector('#destination_tag');
const submitTxBtn = document.querySelector('#submit_tx_button');
const availableBalanceElement = document.querySelector('#available_balance');

// Disable the submit button by default
submitTxBtn.disabled = true;
let isValidDestinationAddress = false;
const allInputs = document.querySelectorAll('#destination_address, #amount');

// Add event listener to the redirect buttons
homeButton.addEventListener('click', () => {
    window.location.pathname = '/index.html';
});

txHistoryButton.addEventListener('click', () => {
    window.location.pathname = '/src/transaction-history/transaction-history.html';
});

// Update the account balance on successful transaction
client.on('transaction', (response) => {
    if (response.validated && response.tx_json.TransactionType === 'Payment') {
        getWalletDetails({ client }).then(({ accountReserve, account_data }) => {
            const bal = dropsToXrp(account_data.Balance) - accountReserve;
            availableBalanceElement.textContent = `Available Balance: ${bal} XRP`;
        });
    }
});

const validateAddress = () => {
    destinationAddress.value = destinationAddress.value.trim();
    // Check if the address is valid
    if (isValidClassicAddress(destinationAddress.value)) {
        // Remove the invalid class if the address is valid
        destinationAddress.classList.remove('invalid');
        isValidDestinationAddress = true;
    } else {
        // Add the invalid class if the address is invalid
        isValidDestinationAddress = false;
        destinationAddress.classList.add('invalid');
    }
};

// Add event listener to the destination address
destinationAddress.addEventListener('input', validateAddress);

// Add event listener to the amount input
amount.addEventListener('keydown', (event) => {
    const codes = [8, 190];
    const regex = /^[0-9\b.]+$/;

    // Allow: backspace, delete, tab, escape, enter and .
    if (!(regex.test(event.key) || codes.includes(event.keyCode))) {
        event.preventDefault();
        return false;
    }

    return true;
});

// NOTE: Keep this code at the bottom of the other input event listeners
// All the inputs should have a value to enable the submit button
for (let i = 0; i < allInputs.length; i++) {
    allInputs[i].addEventListener('input', () => {
        let values = [];
        allInputs.forEach((v) => values.push(v.value));
        submitTxBtn.disabled = !isValidDestinationAddress || values.includes('');
    });
}

// Add event listener to the submit button
submitTxBtn.addEventListener('click', async () => {
    try {
        console.log('Submitting transaction');
        submitTxBtn.disabled = true;
        submitTxBtn.textContent = 'Submitting...';

        // Create the transaction object
        const txJson = {
            TransactionType: 'Payment',
            Amount: xrpToDrops(amount.value),
            Destination: destinationAddress.value,
        };

        // Get the destination tag if it exists
        if (destinationTag?.value !== '') {
            txJson.DestinationTag = parseInt(destinationTag.value);
        }
        console.log("Sending...", txJson);

        // Submit the transaction to the ledger
        const { result } = await submitTransaction({ client, tx: txJson });
        const txResult = result?.meta?.TransactionResult || result?.engine_result || '';

        // Check if the transaction was successful or not
        // and show the appropriate message to the user
        if (txResult === 'tesSUCCESS') {
            alert('Transaction submitted successfully!');
        } else {
            throw new Error(txResult);
        }
    } catch (error) {
        alert('Error submitting transaction, Please try again.');
        console.error(error);
        submitTxBtn.disabled = false;
    } finally {
        // Re-enable the submit button after the transaction is submitted
        // so the user can submit another transaction
        submitTxBtn.disabled = false;
        submitTxBtn.textContent = 'Submit Transaction';
    }
});
You can now click 'Send XRP' to try creating your own transaction! You can use this example to send XRP to the testnet faucet to try it out.
Testnet faucet account: rHbZCHJSGLWVMt8D6AsidnbuULHffBFvEN
Amount: 9
Destination Tag: (Not usually necessary unless you're paying an account tied to an exchange)
4. Create the Transactions Page
Now that we have created the home page and the send XRP page, let's create the transactions page that will display the transaction history of the account. In order to see what's happening on the ledger, we're going to display the following fields:
- Account: The account that sent the transaction.
- Destination: The account that received the transaction.
- Transaction Type: The type of transaction.
- Result: The result of the transaction.
- Delivered amount: The amount of XRP or tokens delivered by the transaction, if applicable.
- Link: A link to the transaction on the XRP Ledger Explorer.
delivered_amount field from the metadata, not the Amount field from the transaction instructions. Partial Payments can deliver much less than the stated Amount and still be successful.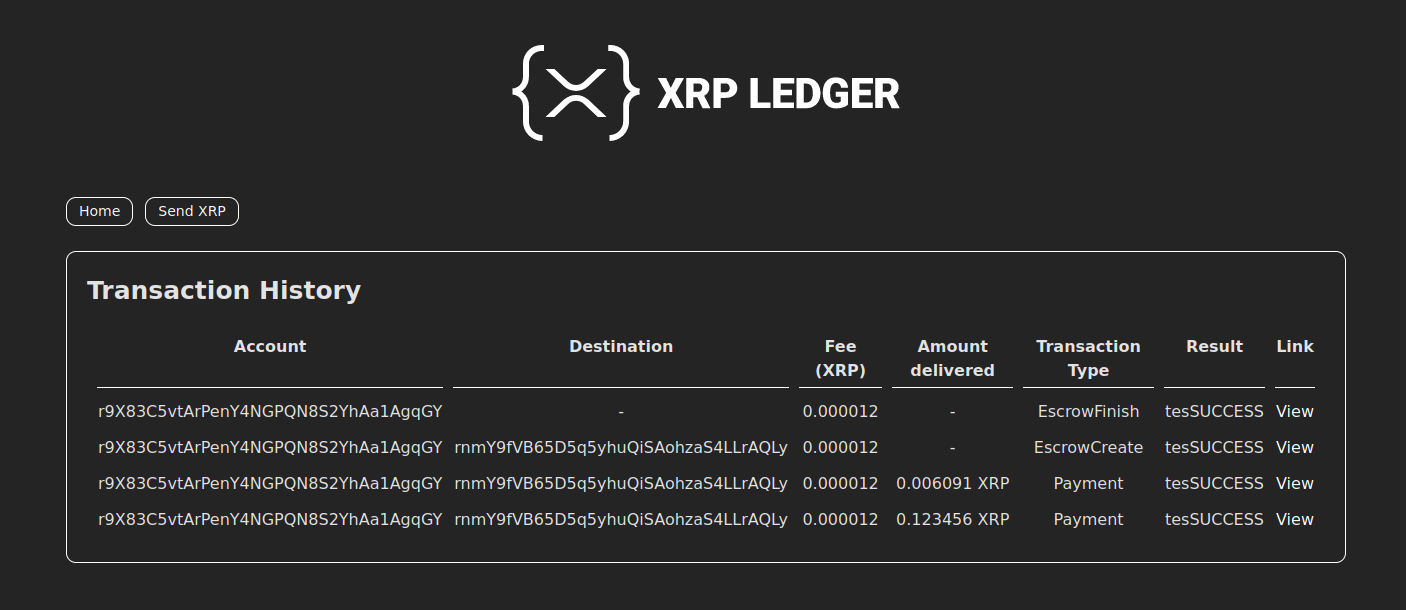
- Create a folder named
transaction-historyin the src directory. - Create a file named
transaction-history.jsand copy the code written below.
import { Client, Wallet, convertHexToString, dropsToXrp } from 'xrpl';

import renderXrplLogo from '../helpers/render-xrpl-logo';

// Optional: Render the XRPL logo
renderXrplLogo();

// Declare the variables
let marker = null;

// Get the elements from the DOM
const txHistoryElement = document.querySelector('#tx_history_data');
const sendXrpButton = document.querySelector('#send_xrp_button');
const homeButton = document.querySelector('#home_button');
const loadMore = document.querySelector('#load_more_button');

// Add event listeners to the buttons
sendXrpButton.addEventListener('click', () => {
    window.location.pathname = '/src/send-xrp/send-xrp.html';
});

homeButton.addEventListener('click', () => {
    window.location.pathname = '/index.html';
});

// Add the header to the table
const header = document.createElement('tr');
header.innerHTML = `
    <th>Account</th>
    <th>Destination</th>
    <th>Fee (XRP)</th>
    <th>Amount Delivered</th>
    <th>Transaction Type</th>
    <th>Result</th>
    <th>Link</th>
`;
txHistoryElement.appendChild(header);

// Converts the hex value to a string
function getTokenName(currencyCode) {
    if (!currencyCode) return "";
    if (currencyCode.length === 3 && currencyCode.trim().toLowerCase() !== 'xrp') {
        // "Standard" currency code
        return currencyCode.trim();
    }
    if (currencyCode.match(/^[a-fA-F0-9]{40}$/)) {
        // Hexadecimal currency code
        const text_code = convertHexToString(value).replaceAll('\u0000', '')
        if (text_code.match(/[a-zA-Z0-9]{3,}/) && text_code.trim().toLowerCase() !== 'xrp') {
            // ASCII or UTF-8 encoded alphanumeric code, 3+ characters long
            return text_code;
        }
        // Other hex format, return as-is.
        // For parsing other rare formats, see https://github.com/XRPLF/xrpl-dev-portal/blob/master/content/_code-samples/normalize-currency-codes/js/normalize-currency-code.js
        return currencyCode;
    }
    return "";
}

function renderAmount(delivered) {
    if (delivered === 'unavailable') {
        // special case for pre-2014 partial payments
        return 'unavailable';
    } else if (typeof delivered === 'string') {
        // It's an XRP amount in drops. Convert to decimal.
        return `${dropsToXrp(delivered)} XRP`;
    } else if (typeof delivered === 'object') {
        // It's a token amount.
        return `${delivered.value} ${getTokenName(delivered.currency)}.${delivered.issuer}`;
    } else {
        // Could be undefined -- not all transactions deliver value
        return "-"
    }
}

// Fetches the transaction history from the ledger
async function fetchTxHistory() {
    try {
        loadMore.textContent = 'Loading...';
        loadMore.disabled = true;
        const wallet = Wallet.fromSeed(process.env.SEED);
        const client = new Client(process.env.CLIENT);

        // Wait for the client to connect
        await client.connect();

        // Get the transaction history
        const payload = {
            command: 'account_tx',
            account: wallet.address,
            limit: 10,
        };

        if (marker) {
            payload.marker = marker;
        }

        // Wait for the response: use the client.request() method to send the payload
        const { result } = await client.request(payload);

        const { transactions, marker: nextMarker } = result;

        // Add the transactions to the table
        const values = transactions.map((transaction) => {
            const { hash, meta, tx_json } = transaction;
            return {
                Account: tx_json.Account,
                Destination: tx_json.Destination,
                Fee: tx_json.Fee,
                Hash: hash,
                TransactionType: tx_json.TransactionType,
                result: meta?.TransactionResult,
                delivered: meta?.delivered_amount
            };
        });

        // If there are no more transactions, hide the load more button
        loadMore.style.display = nextMarker ? 'block' : 'none';

        // If there are no transactions, show a message
        // Create a new row: https://developer.mozilla.org/en-US/docs/Web/API/Document/createElement
        // Add the row to the table: https://developer.mozilla.org/en-US/docs/Web/API/Node/appendChild

        if (values.length === 0) {
            const row = document.createElement('tr');
            row.innerHTML = `<td colspan="6">No transactions found</td>`;
            txHistoryElement.appendChild(row);
        } else {
            // Otherwise, show the transactions by iterating over each transaction and adding it to the table
            values.forEach((value) => {
                const row = document.createElement('tr');
                // Add the transaction details to the row
                row.innerHTML = `
                ${value.Account ? `<td>${value.Account}</td>` : '-'}
                ${value.Destination ? `<td>${value.Destination}</td>` : '-'}
                ${value.Fee ? `<td>${dropsToXrp(value.Fee)}</td>` : '-'}
                ${renderAmount(value.delivered)}
                ${value.TransactionType ? `<td>${value.TransactionType}</td>` : '-'}
                ${value.result ? `<td>${value.result}</td>` : '-'}
                ${value.Hash ? `<td><a href="https://${process.env.EXPLORER_NETWORK}.xrpl.org/transactions/${value.Hash}" target="_blank">View</a></td>` : '-'}`;
                // Add the row to the table
                txHistoryElement.appendChild(row);
            });
        }

        // Disconnect
        await client.disconnect();

        // Enable the load more button only if there are more transactions
        loadMore.textContent = 'Load More';
        loadMore.disabled = false;

        // Return the marker
        return nextMarker ?? null;
    } catch (error) {
        console.log(error);
        return null;
    }
}

// Render the transaction history
async function renderTxHistory() {
    // Fetch the transaction history
    marker = await fetchTxHistory();
    loadMore.addEventListener('click', async () => {
        const nextMarker = await fetchTxHistory();
        marker = nextMarker;
    });
}

// Call the renderTxHistory() function
renderTxHistory();
This code uses account_tx to fetch transactions we've sent to and from this account. In order to get all the results, we're using the marker parameter to paginate through the incomplete list of transactions until we reach the end.
- Create a file named
transaction-history.htmland copy the code from transaction-history.html into it.
transaction-history.html defines a table which displays the fields mentioned above.
You can use this code as a starting point for displaying your account's transaction history. If you want an additional challenge, try expanding it to support different transaction types (e.g. TrustSet). If you want inspiration for how to handle this, you can check out the XRP Ledger Explorer to see how the transaction details are displayed.
Next Steps
Now that you have a functional wallet, you can take it in several new directions. The following are a few ideas:
- You could support more of the XRP Ledger's transaction types including tokens and cross-currency payments
- You could add support for displaying multiple tokens, beyond just XRP
- You could support creating offers in the decentralized exchange
- You could add new ways to request payments, such as with QR codes or URIs that open in your wallet.
- You could support better account security including allowing users to set regular key pairs or handle multi-signing.
- Or you could take your code to production by following the Building for Production with Vite guide.